
When you delete an item on your Windows computer, it gets saved in the Recycle Bin so that you can fetch it whenever you want. A lot of Windows users do not like this feature and want their files to not get stored in the Recycle Bin and instead be permanently deleted. In that case, we need to add ‘Permanently Delete’ item to Context Menu on your Windows computer.

How to add Permanently Delete to Context Menu to Windows 11/10
When you right-click on a certain file, you get various options including Copy, Cut, Paste, and Delete. The Delete that you see there will allow you to send the file to the Recycle Bin.
If you want to delete the file permanently, you have to open Recycle Bin and delete the file again. This might sound like a bit of a hassle to users who want to get their work done in the most effective manner. That is why we will add Permanently Delete to the context menu so that you don’t have to delete the file twice.
In order to do the same, we will use Registry Editor. It is a built-in Windows utility that will allow you to configure your computer to work the way you want. However, before doing the same, we need to create a backup of the Registry if something goes wrong. Once you have created the backup, follow the prescribed steps to add a Permanently Delete option to the Context Menu.
- Open Registry Editor from the Start Menu.
- When the UAC prompt appears, click on the Ok button.
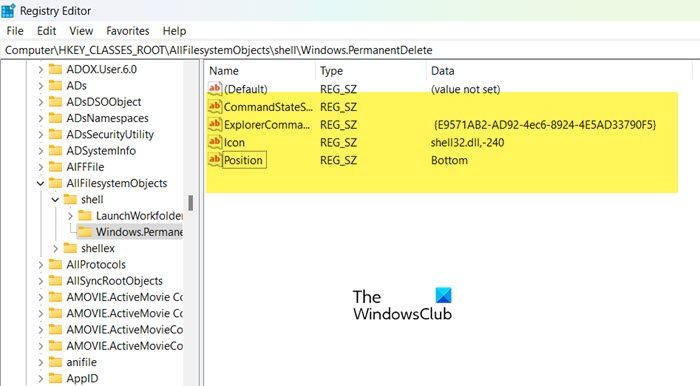
- Navigate to the following location.
ComputerHKEY_CLASSES_ROOTAllFilesystemObjects
- Expand AllFilessystemObjects, right-click on shell and select New > Key.
- Name the newly created key Windows.PermanentDelete.
- Right-click on Windows.PermanentDelete and select New > String Value.
- You have to name the newly created value CommandStateSync.
- Now, create another String by right-clicking on Windows.PermanentDelete and select New > String Value.
- This string should be named ExplorerCommandHandler.
- Double-click on ExplorerCommandHandler, type {E9571AB2-AD92-4ec6-8924-4E5AD33790F5}and click Ok.
- Then, create another key by right-clicking on Windows.PermanentDelete and select New > String Value.
- Name the newly created key Icon and then set its Value data to shell32.dll,-240.
- One last string we need to create will be called Position. Use the method we studied earlier to do the same.
- Now, enter Bottom in the Value data field.
Note: If you want the “Permanently Delete” option to be at the top of the context menu then write Top instead of Bottom.
You can now close Registry Editor as Windows.PermanentDelete button is added to the context menu. You can now select it and the file will be deleted permanently deleted.
TIP: To delete files or folders without sending them to the Recycle Bin, you can also select the items and press ‘Shift+Delete’ on the keyboard.
How to remove the Permanently Delete option?
The Permanently Delete option can be removed by just deleting the Windows.PermanentDelete key you created earlier. All you have to do is open Registry Editor and go to ComputerHKEY_CLASSES_ROOTAllFilesystemObjects. Then, right-click on Windows.PermanentDelete key and select Delete. Once the key is deleted, reboot your computer and check if the issue is resolved. Hopefully, this will do the job for you.
We hope now you know how to add or remove the Permanently Delete option from the Context Menu.
Read: Mount ISO option missing in Context Menu of Windows
How do I customize the context menu in Windows 11?
There are various ways to customize the context menu on a Windows 11 computer. One can use the infamous Registry Editor (the one we used in this post) or some third-party app to do their job. We recommend you check how to use the Context Menu editor to add or remove options from the context menu and make it function the way you want.
How do I get the Windows 10 context menu back in Windows 11?
When you right-click on a particular file in Windows 11, you will see a different context menu, to get the old one back, just click on the Show More Options button or use the keyboard shortcut Shift + F10. You will see all the options that were previously present in the old Windows 10 context menu. If you want to permanently get it back, use our post to get the old Context Menu back.