
Brief: Here’s a quick tutorial that shows the steps for changing the locales on Ubuntu and other Linux distributions from the command line.
It’s been some time since I wrote something on It’s FOSS. The truth is that I’ve been writing for a Spanish version of It’s FOSS. If you’ve not visited it and/or you’re a Spanish speaker, please visit It’s FOSS en Español and check all the Linux content in Spanish.
You may be wondering why I’m sharing this fact with you. It’s because this post includes this new page as an example.
At the time of doing a clean installation of your favorite Linux distro, the system asks you to choose a main language. Even though it’s not frequent, some people consider changing that language to a new one later on, like me for example.
See, I have to take screenshots in both Spanish (for It’s FOSS en Español) and in English (for It’s FOSS). This becomes a problem, because I have only one computer, and changing the user is not a fast solution for me.
That’s why I’d like to share with you this quick tip, where I’ll show you how to change your main system language with two simple lines in the terminal.
Let’s begin!
Changing Linux system language from the terminal
Let’s suppose you want to change your main language from English to Spanish.
Verify which language you have set as default (main language). For this, let’s use the locale command.
localeYou should see something like this.
[email protected]:~$ locale
LANG=en_US.UTF-8
LANGUAGE=
LC_CTYPE="en_US.UTF-8"
LC_NUMERIC="en_US.UTF-8"
LC_TIME="en_US.UTF-8"
LC_COLLATE="en_US.UTF-8"
LC_MONETARY="en_US.UTF-8"
LC_MESSAGES="en_US.UTF-8"
LC_PAPER="en_US.UTF-8"
LC_NAME="en_US.UTF-8"
LC_ADDRESS="en_US.UTF-8"
LC_TELEPHONE="en_US.UTF-8"
LC_MEASUREMENT="en_US.UTF-8"
LC_IDENTIFICATION="en_US.UTF-8"
LC_ALL=
Here you can see that the main language is English. Now to change it, use the dpkg command in this fashion:
sudo dpkg-reconfigure localesOnce you run the command before, you should see the next screen in your terminal.

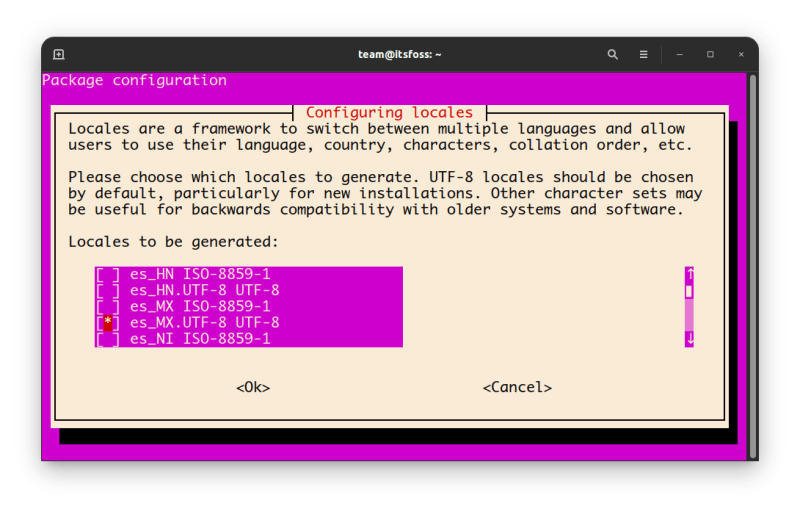
Here, you should move using the up and down arrow until you reach the desired language. In my case, I desire Spanish, and more specific, Mexican Spanish because I’m Mexican.
Not all languages may have the options, but if yours have, opt for UTF-8.
Once your language has been found, press the SPACE KEY to mark it and then ENTER.
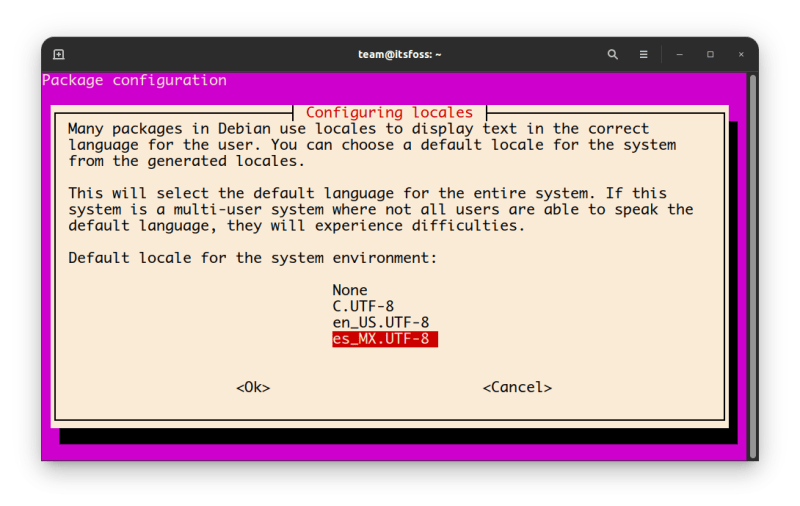
Finally, select this new language as your default by moving to it using the arrow key and pushing the ENTER KEY, in the last windows.
Once done, you should see a message like this in your terminal:
Generating locales (this might take a while)...
  en_US.UTF-8... done
  es_MX.UTF-8... done
Generation complete.
And that’s all! Now you’re able to change your default language as many times you want directly from the terminal.
Please let us know if you have any doubt about this topic in the comments section. Good look!