
Whether you’re a programmer, creative professional, or someone who just wants to browse the web, there are times when you find yourself finding the differences between files.
There are two main tools that you can use for comparing files in Linux:
- diff: A command line utility that comes preinstalled on most Linux systems. The diff command has a learning curve.
- Meld: A GUI tool that you can install to compare files and directories. It is easier to use, especially for desktop users.
But there are several other tools with different features for comparing files. Here, let me mention some useful GUI and CLI tools for checking the differences between files and folders.
Note: The tools aren’t ranked in any particular order. Choose what you find the best for you.
1. Diff command
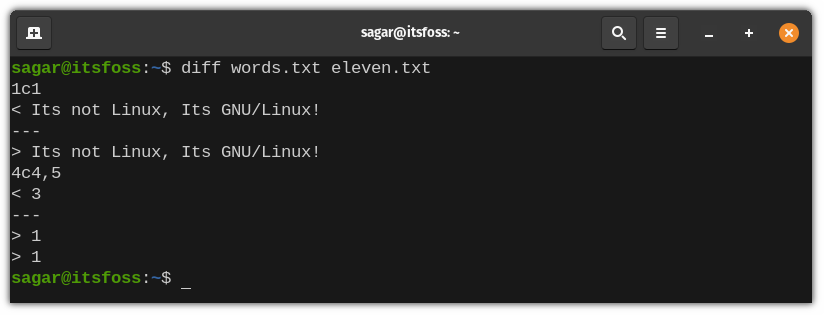
Diff stands for difference (obviously!) and is used to find the difference between two files by scanning them line by line. It’s a core UNIX utility, developed in the 70s.
Diff will show you lines that are required to change in compared files to make them identical.
Key Features of Diff:
- Uses special symbols and characters to indicate lines required to change to make both files identical.
- Goes through line by line to provide the best possible result.
And, the best part is, diff comes pre-installed in every Linux distro.
As you can see in the screenshot above, it’s not easy to understand the diff command output in the first attempt. Worry not. We have a detailed guide on using diff command for you to explore.
2. Colordiff command
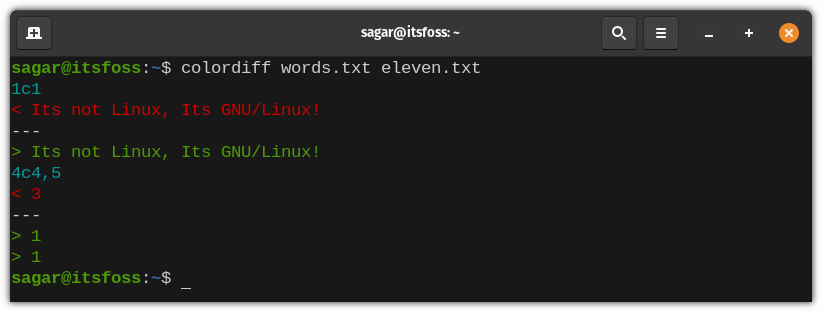
For some reason, if you find Diff utility a bit bland in terms of colors, you can use Colordiff which is a modified version of the diff command utility with enhanced color and highlighting.
Key Features Colordiff:
- Syntax highlighting with attractive colors.
- Improved readability over the Diff utility.
- Licensed under GPL and has digitally signed source code.
- Customizable
Installation:
Colordiff is available in the default repository of almost every popular Linux distribution and if you’re using any Debian derivative, you can type in the following:
sudo apt install colordiff3. Wdiff command
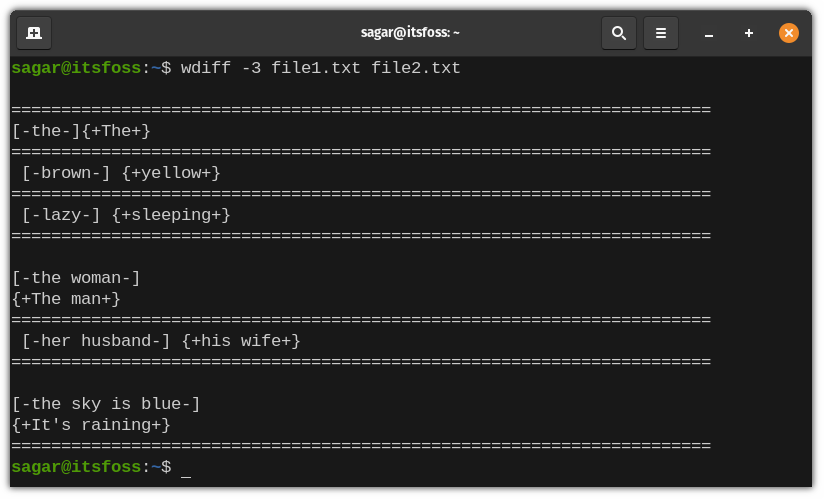
Wdiff is the CLI front end of the Diff utility, and it has a different approach for comparing files i.e it scans on a word-per-word basis.
It starts by creating two temporary files and will run Diff over them. Finally, it collects the output from you’re met with word differences between two files.
Key Features of Wdiff:
- Supports multiple languages.
- Ability to add colorized output by integrating with Colordiff.
Installation:
Wdiff is available in the default repository of Debian derivatives and other distros. For Ubuntu-based distros, use the following command to get it installed:
sudo apt install wdiff4. Vimdiff command
Key Features of Vimdiff:
- Ability to export the results on an HTML web page.
- Can also be used with Git.
- Customization (of course).
- Ability to use it as CLI and GUI tool.
It’s one of the most powerful features that you get with Vim editor. Whether you are using Vim in your terminal or the GUI version, you can use the vimdiff command.
Vimdiff works in a more advanced manner than the usual diff utility. For starters, when you enter vimdiff command, it starts the vim editor with your usual diff. However, if you know how to get around your way through Vim and its commands, you can perform a variety of tasks along with it.
So, I’d highly recommend you to get familiar with the basic commands of Vim if you intend to use this. Furthermore, having an idea of how to use buffers in Vim will be beneficial.
Installation:
To use Vimdiff, you would need to have Vim installed on your system. We also have a tutorial on how to install the latest Vim on Ubuntu.
You can use the command below to get it installed (if you’re not worried about the version you install):
sudo apt install vim5. Gitdiff command

As its name suggests, this utility works over a Git repository.
This command will utilize the diff command we discussed earlier and will run over git data sources. That can be anything from commits, and branches to files and a lot more.
Key features of Gitdiff:
- Ability to determine changes between multiple git data sources.
- Can also be used with binary files.
- Supports highlighting with colors.
Installation:
Gitdiff does not require any separate installation unless you don’t have Git installed on your system. And if you’re looking for the most recent version, we have a tutorial on how to install the latest Git version on Ubuntu.
Or, you can just follow the given command to install Git on your Ubuntu-based distro:
sudo apt install git6. Kompare

Looking for a GUI tool that not just differentiates files, but also allows you to create and apply patches to them?
Then Kompare by KDE will be an interesting choice!
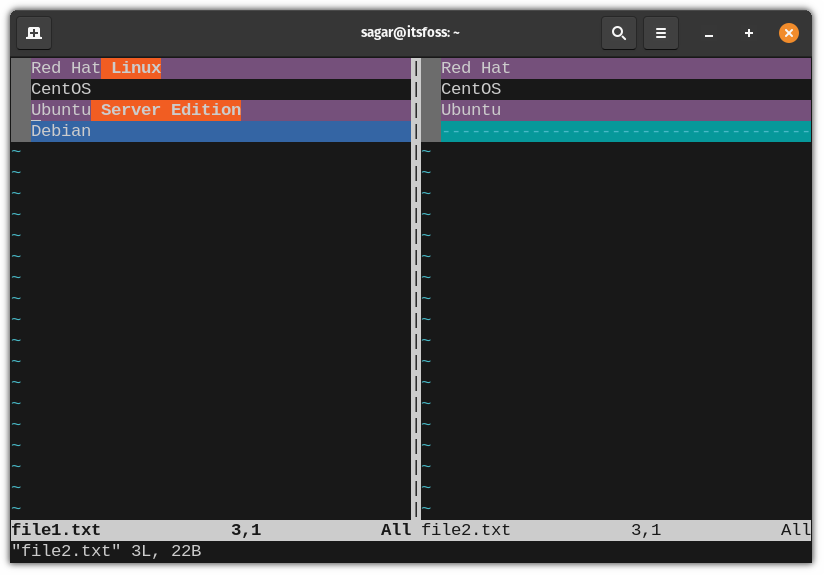
Primarily, it is used to view source files to compare and merge. But, you can get creative with it!
Kompare can be used over multiple files, and directories and supports multiple Diff formats.
Key Features of Kompare:
- Offers statistics of differences found between compared files.
- Bézier-based connection widget shows the source and destination of files.
- Source and destination can also be changed with commands.
- Easy to navigate UI.
- Allows to create and apply patches.
- Support for various Diff formats.
- Appearance can be customized to some extent.
Installation:
Being part of the KDE family, Kompare can be found easily on the default repository of popular Linux distros and the software center. But, if you prefer the command-line, here’s the command:
sudo apt install kompare7. Meld

Tools like Kompare may overwhelm new users as they offer a plethora of features, but if you’re looking for simple, Meld is a good pick.
Meld provides up to three-way comparison for files and directories and has built-in support for version control systems. You can also refer to a detailed guide on how to compare files using Meld to know more about it.
Key Features of Meld:
- Supports up to 3-way file comparison.
- Syntax highlighting.
- Support for version control systems.
- Simple text filtering.
- Minimal and easy-to-understand UI.
Installation:
Meld is popular software and can be found easily on the default repository of almost any Linux distro. And for installation on Ubuntu, you can use this command:
sudo apt install meldAdditional: Sublime Merge (Non-FOSS)

Coming from the developers of the famed Sublime Text editor, Sublime Merge is targeted at programmers who are constantly dealing with version control systems, especially Git, as having the best workflow with Git is its primary focus.
From command line integration, powerful search, and flexibility to Git flow integration, anything that powers your workflow comes with it.
Like Sublime Text, Sublime Merge is also not open source. Similarly, it is also free but encourages you to buy a license for continuous use. However, you can continue using it without purchasing the license forever.
What’s Your Pick?
There are a few more tools like Sublime Merge. P4Merge and Beyond Compare come to my mind. These are not open source software but they are available for the Linux platform.
In my opinion, the diff command and Meld tools are enough for most of your file comparison needs. Specific scenarios like dealing with Git could benefit from specialized tools like GitDiff.