
How to Install MySQL 5.7 on Linux CentOS and Ubuntu
MySQL is an open source relational database management system developed by Oracle corporation. The source code is released under GNU General Public License, and for proprietary, there is a paid edition that offers additional functions. MySQL is an important component of the LAMP and LEMP stacks. Many applications use these stacks with MySQL as the database system.
In this tutorial, I will guide you how to install and configure the new stable MySQL 5.7 version on CentOS 7 server and Ubuntu 16.04 server.
Below is what we will do for this purpose.
- Add a new repository that contains the latest MySQL version.
- Install MySQL 5.7 stable version.
- Add MySQL to the boot time.
- Reset the default MySQL root password.
- Testing to create new user and database.
Step 1 – Add New Repository
MySQL provides a repository for several Linux distributions including rpm and deb based distributions that contain the latest stable MySQL release. So we need to add a new MySQL repository to the system to proceed.
Add the new MySQL repository to the CentOS 7 server with this yum command.
yum localinstall https://dev.mysql.com/get/mysql57-community-release-el7-9.noarch.rpm
You will be asked to add a new repository, type ‘y‘ and press ‘Enter‘ to confirm.

For Ubuntu, download the MySQL deb package repository file and install it with the dpkg command and then update the repository.
wget https://dev.mysql.com/get/mysql-apt-config_0.8.3-1_all.deb
dpkg -i mysql-apt-config_0.8.3-1_all.deb
apt-get update
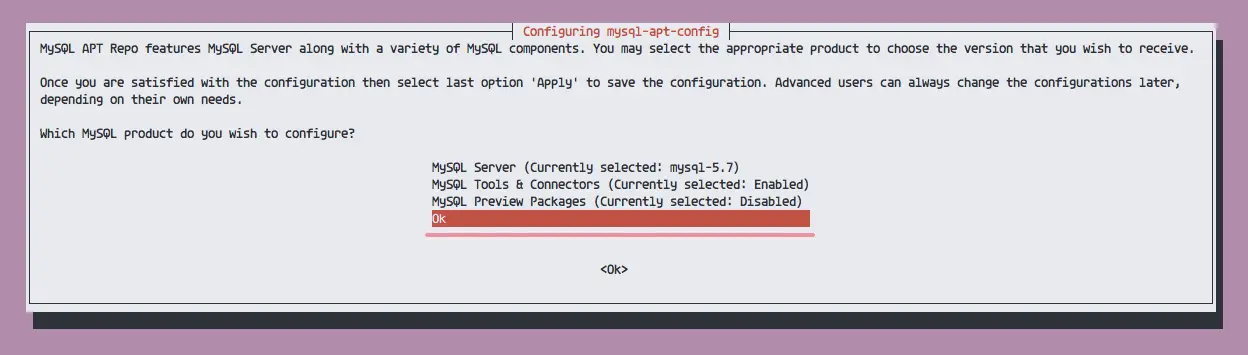
During the package repository installation, you will be asked which MySQL version you want to install and which additional MySQL tools you want to install. I will leave all at the default, so just choose ‘Ok‘ and press ‘Enter‘.
A new repository has been added to the system.
Step 2 – Install MySQL 5.7
The new MySQL repository is available on the system now and we are ready to install MySQL 5.7 latest stable version from the repository. The package name is ‘mysql-community-server’.
On CentOS, install ‘mysql-community-server’ with yum.
yum -y install mysql-community-server
For Ubuntu, please use this apt command.
apt-get install -y mysql-community-server
Note:
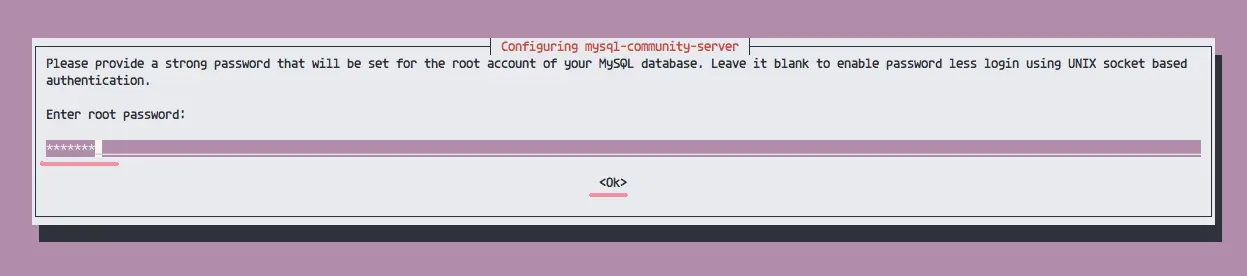
On Ubuntu, you will be asked for a new MySQL root password, type in and repeat a strong password.
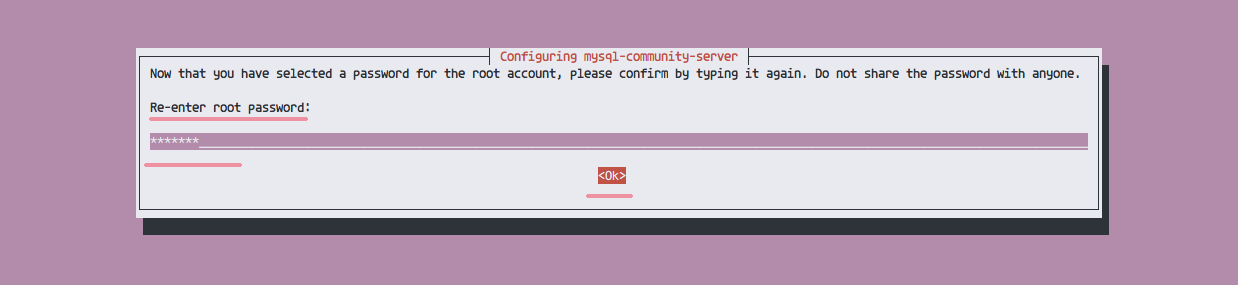
Retype your password.
MySQL 5.7 installed.
Step 3 – Start MySQL and Enable Start at Boot Time
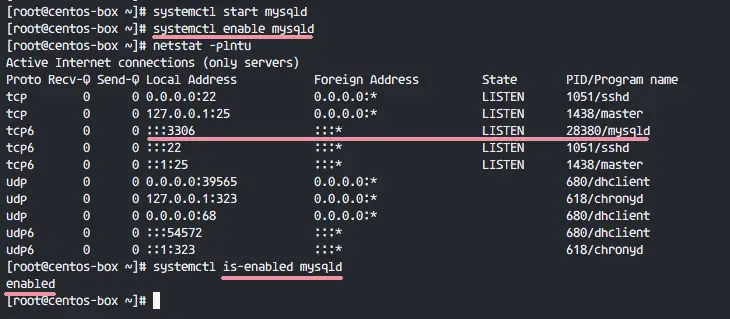
After installing MySQL, start it and add MySQL to start at boot time automatically with the systemctl command.
For CentOS server use ‘mysqld’ service.
systemctl start mysqld
systemctl enable mysqld
For Ubuntu we can use ‘mysql’ service.
systemctl start mysql
systemctl enable mysql
MySQL started, it’s using port 3306 for the connection, you can check that on both Ubuntu and Centos server with the netstat command.
netstat -plntu
If you want to check if the mysql service automatically starts at the boot time or not, you can use the is-enabled option below.
For CentOS.
systemctl is-enabled mysqld
For Ubuntu.
systemctl is-enabled mysql
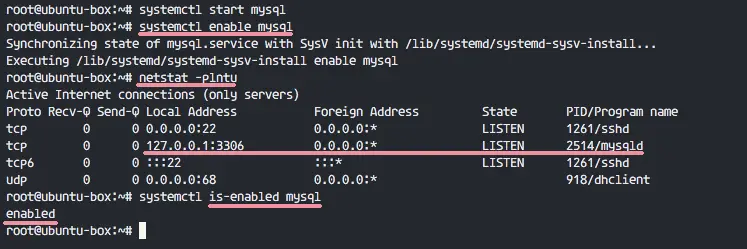
enabled result = the service is added to start at boot time.
Step 4 – Configure the MySQL Root Password
MySQL 5.7 is installed and started. As you can see, the MySQL root password for Ubuntu has been configured during the installation process, so we do not need to configure or reset the password on Ubuntu. But this is not the case on CentOS.
On CentOS 7, MySQL will generate a strong default password when MySQL is started the first time, the default password is shown in the mysqld.log file. You can use the grep command below for showing the default MySQL password.
grep ‘temporary’ /var/log/mysqld.log
You will see default MySQL root password, and we should set a new default password now.

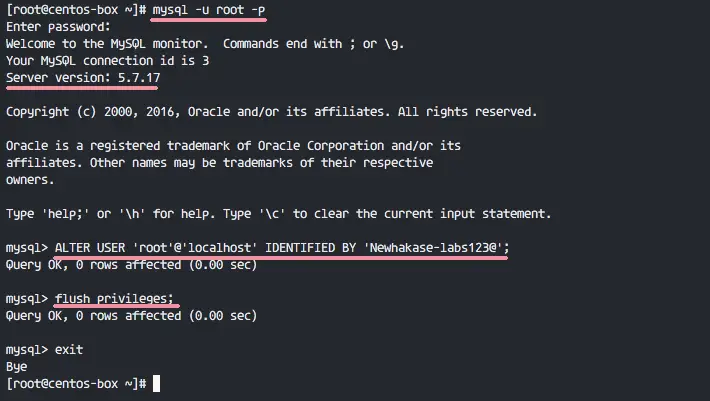
Connect to the MySQL shell with the default password.
mysql -u root -p
TYPE DEFAULT PASSWORD
Now replace the default password with a new and strong password, in my case, I will set the password ‘Newhakase-labs123@’ with the MySQL query below.
ALTER USER ‘root’@’localhost’ IDENTIFIED BY ‘Newhakase-labs123@’;
flush privileges;
The default password has been changed.
Note:
You can use this query to reset the MySQL root password CentOS and Ubuntu at any time later as well.
Step 5 – Testing
In this step, we will try to connect to the MySQL shell with the new password and then create a new database and user.
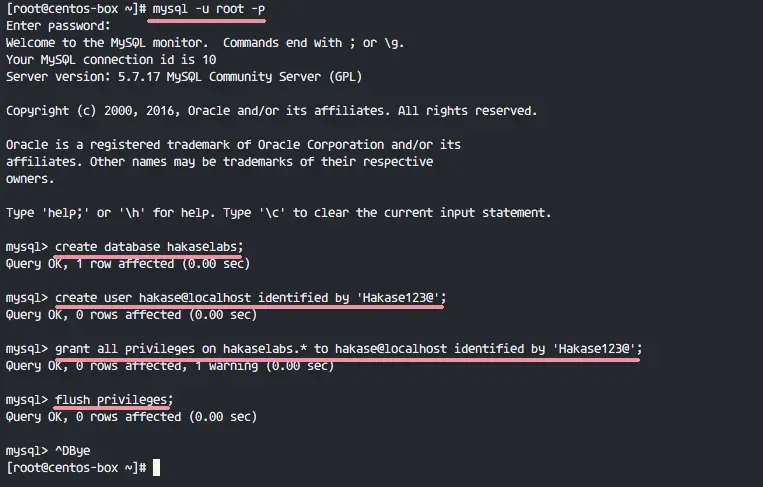
Connect to the MySQL shell with the MySQL root password, using the ‘mysql’ command.
mysql -u root -p
TYPE NEW PASSWORD: Newhakase-labs123@
Create a new database named ‘hakaselabs’. Of course, you can choose your own name here.
create database hakaselabs;
And create a new user with the name ‘hakase’ and the password is ‘Hakase123@’ (or whatever userrname and password you want to use).
create user [email protected] identified by ‘Hakase123@’;
Now grant privileges for the new database to the new user.
grant all privileges on hakaselabs.* to [email protected] identified by ‘Hakase123@’;
flush privileges;
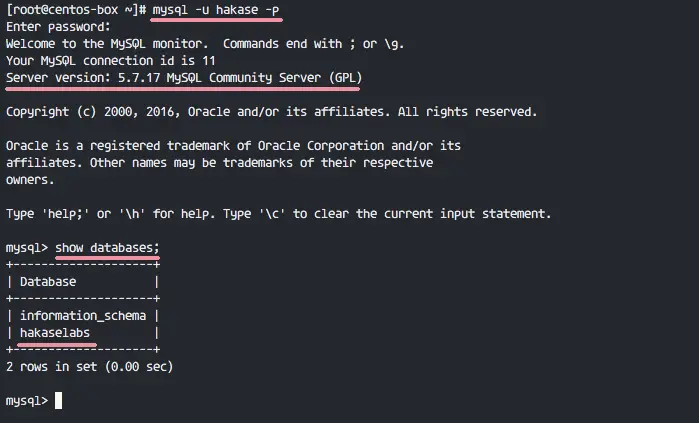
Exit from the MySQL shell and try connect again with the new user.
mysql -u hakase -p
TYPE THE PASSWORD: Hakase123@
Show the database list under the ‘hakase’ user.
show databases;
You can see a database named ‘hakaselabs’.
MySQL 5.7 has been installed successfully, it has been started and configured to automatically start at boot time. And we created a new user and database and connected successfully to the MySQL shell with our new user.
Reference
https://dev.mysql.com/doc/refman/5.7/en/linux-installation.html