
The Windows Lock Screen was introduced in the now infamous Windows 8 version. People seem to have mixed feelings about it– some like seeing a pretty picture when they start their computer, while others see it as an unnecessary annoyance which involves yet another click of the mouse to get past it (me, for instance).
This week’s Quick Tips article will show you how to skip the Lock Screen nuisance when you boot up your computer. Please note that the following instructions will work on the Pro, Enterprise, and Education editions of Windows 10. Eliminating the Lock Screen in the Home edition involves Registry changes that won’t be covered in this post.
How To Disable The Lock Screen
We’ll be using the Group Policy Editor to accomplish our task. It is a straightforward procedure, so follow these steps to get the job done:
- Use the Windows Key + R to open a Run Box
- Type in gpedit.msc and hit Enter
- In the left panel under Local Computer Policy, follow this path: Administrative Templates ->Control Panel->Personalization
That should bring you to a screen that looks similar to this one:
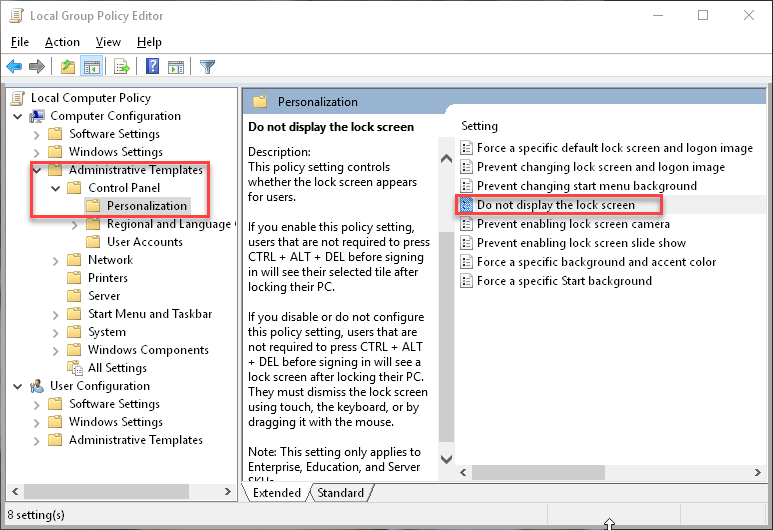
- In the right panel, double-click on Do not display the lock screen
- In the window that opens, tick the Enable radio button
It should look like this:

Click the OK button, close the Group Policy Editor, and you’re done. To revert to the original settings, come back to this screen and you can choose either Not Configured, or Disabled. (Either choice will yield the same results.)
As always, if you have any helpful suggestions, comments or questions, please share them with us,