
Fast user switching in Windows 10 lets you seamlessly change between multiple user accounts on a single PC. Here’s a quick step-by-step guide on how to enable and disable this feature. The mentioned methods will work for both Windows 10 and 11.
Method 1 – Add a “HideFastUserSwitching” File to the Registry Editor
The Registry Editor lets you view the administrative settings and make root-level changes to the system.
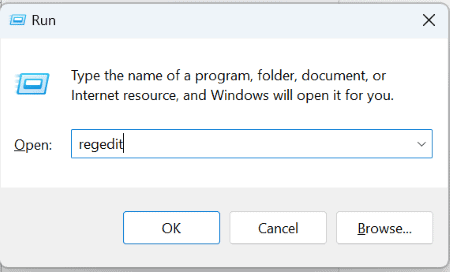
Step 1 – Press “Windows key + R” together to launch the Run dialog box.
Step 2 – Enter “regedit” in the dialog box and hit Enter.
Step 3 – Expand the following folders in the Registry Editor:
HKEY_LOCAL_MACHINE > SOFTWARE > Microsoft > Windows > CurrentVersion > Policies
Step 4 – Navigate to the System folder and right-click on it.

Step 5 – Select New and click DWORD (32-bit) Value.
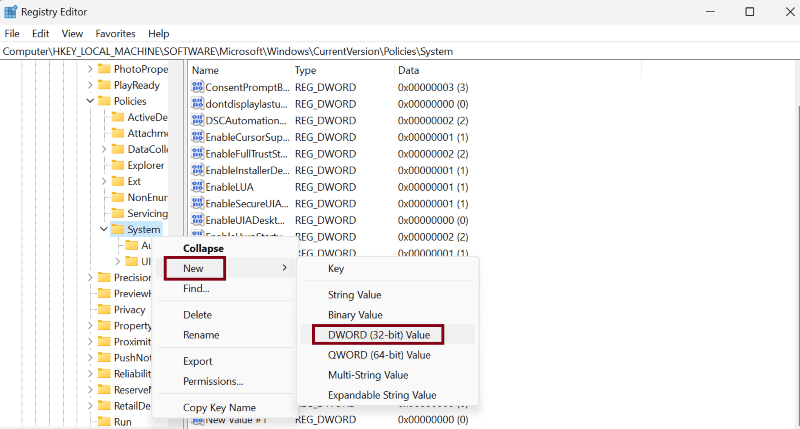
Step 6 – Rename the new file to “HideFastUserSwitching”.
Step 7 – Double-click on this new file to open it and make sure the value is set to ‘0’.

Step 8 – Likewise, to disable fast user switching, the value data should be set to ‘1’.

Finally, restart your system to settle the changes.
Method 2 – Enable/Disable in Group Policy Editor
Another way to manipulate fast user switching on Windows 10 is through Group Policy Editor:
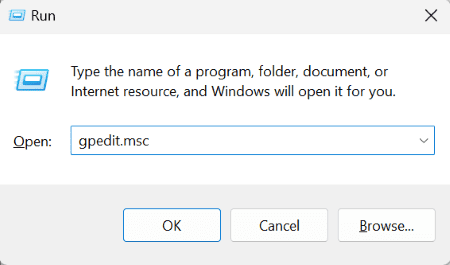
Step 1 – Press “Windows key + R” together to launch the Run dialog box.
Step 2 – Enter “gpedit.msc” in the dialog box and press OK.
Step 3 – Now the Local Group Policy Editor appears. Expand the following folders in the editor:
Local Computer Policy > Computer Configuration > Administrative Templates > System
Step 4 – Double-click on the Logon folder.

Step 5 – Locate the file “Hide entry points for Fast User Switching” and double-click on it.

Step 6 – Select “Enabled” in the new pop-up window.

Step 7 – Alternatively, select “Disabled” if that’s what you want to do.

Step 8 – Click on Apply and then the OK button.
So, now you know how to successfully enable and disable fast user switching on Windows 10.
Remember, running multiple profiles on a single computer demands a lot of resources which might affect your PC’s performance in the long run. So, leverage this feature only when it’s truly necessary.