
- Printer problems are one of the most common issues submitted to IT departments all over the world. Sometimes, the only way to deal with them is to remove the printer to reinstall it.
- If you are unable to remove the printer in Windows 10, this article covers all scenarios and provides you with much-needed support.
- We are proud of solving different printer issue and we have gathered the entire collection of guides in the Printer Errors section.
- The printer is just one of the many items that can be connected to the computer. The Peripherals Troubleshooting section contains instructions on fixing any issues with them.
We frequently use printers to print important documents, but problems with printers can sometimes appear.
To fix printer problems we sometimes need to remove the printer, but Windows 10 users reported that they can’t remove printer on their PC.
Fix – Can’t remove printer Windows 10
Solution 1 – Check Print Server Properties
Users reported that they can’t remove their printer on Windows 10, and if you’re having the same problem you might be able to fix it by deleting the printer driver from Print Server Properties window.
To do that, follow these steps:
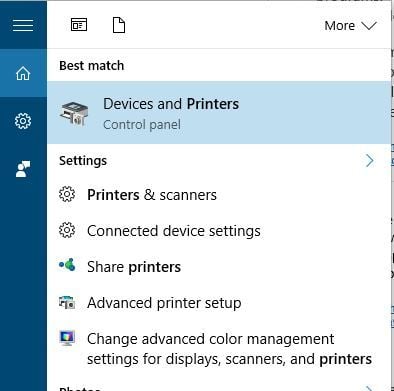
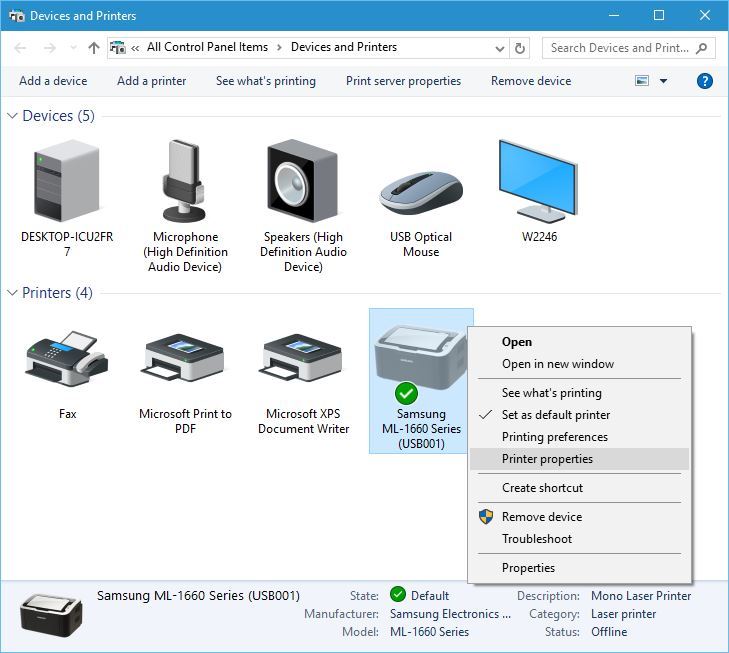
- Press Windows Key + S and enter printers. Choose Devices and Printers from the menu.
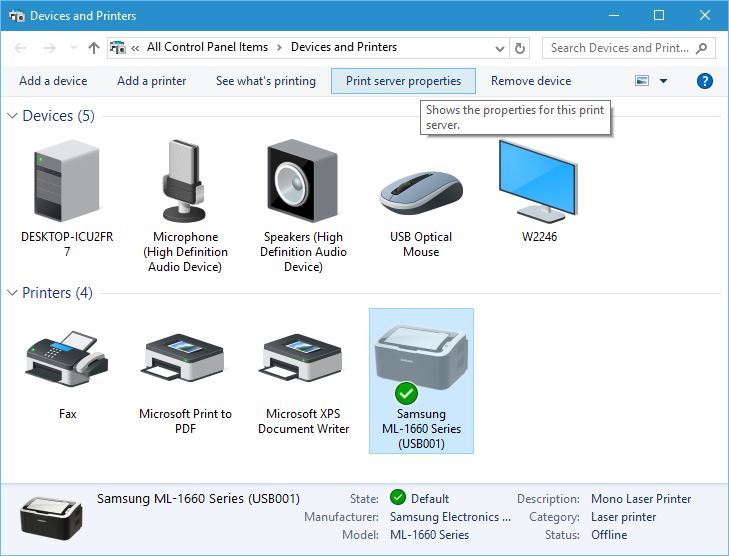
- When Devices and Printers window opens, select any printer and click the Print server properties.
- Print Server Properties will now open. Go to the Drivers tab, select the printer you want to remove and click the Remove button. Select Remove driver and driver package option.
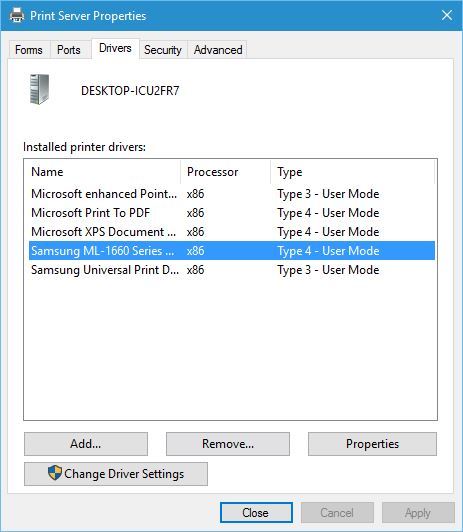
- After removing the printer, click Apply and OK to save changes.
After you’re done with Print Server Properties, you can open the Settings app and go to System > Apps & features, locate the printer driver/software and remove it from your PC.
If you can’t remove your printer by using this method, you’ll have to stop the Print Spooler service first. To do that, follow these steps:
- Press Windows Key + R and enter services.msc. Press Enter or click OK.
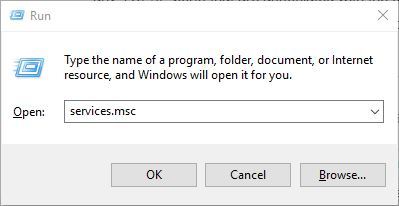
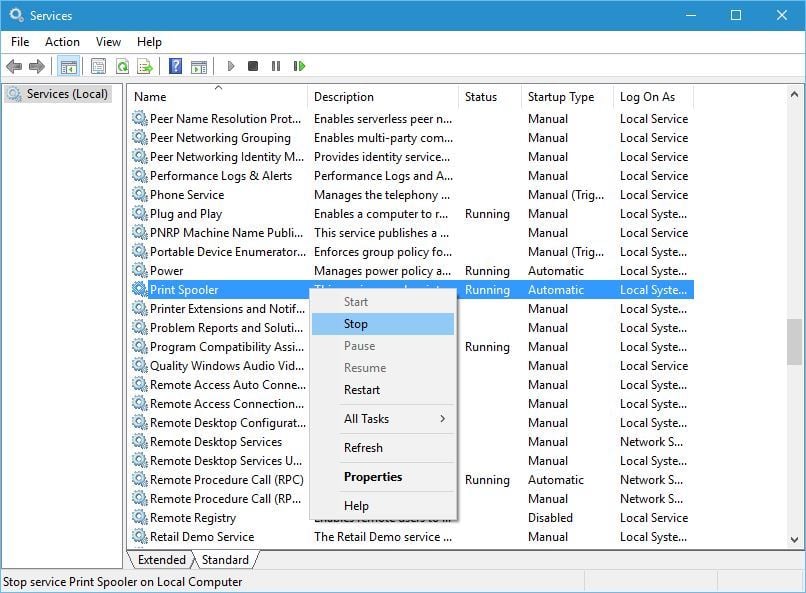
- Locate Printer Spooler service, right-click it and choose to Stop from the menu.
- Go to C:WindowsSystem32spoolPrinters folder. You’ll need administrator privileges to access this folder.
- Delete everything from the Printers folder.
- Go back to Services window, locate Print Spooler service, right-click it and choose Start.
After restarting the Spooler service, try using Print Server Properties window to remove your printer.
Keep in mind that issues can occur if your printer is shared with other computers on your network, so be sure to stop printer sharing and remove printer mappings.
Avoid these technicalities by installing one of these driver removal tools!
Solution 2 – Edit the registry
If you can’t remove a printer in Windows 10, you might have to change a few values in your registry. Changing the registry can cause problems with your PC, therefore it might a good idea to create a backup of your registry, just in case.
To remove your printer from the registry, do the following:
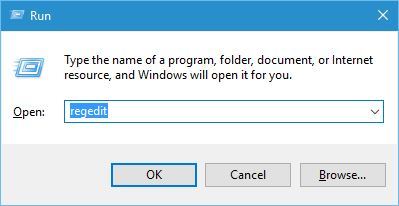
- Press Windows Key + R and enter regedit. Press Enter or click OK.
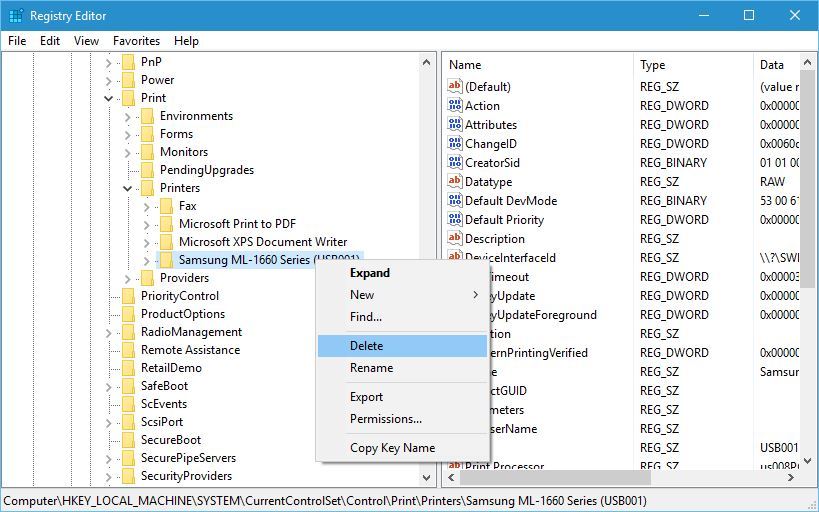
- When Registry Editor opens navigate to the HKEY_LOCAL_MACHINESYSTEMCurrentControlSetControlPrintPrinters key in the left pane.
- Expand the Printers key and locate your printer. Right click it and choose Delete from the menu. Be careful not to delete any other key from the registry.
- After deleting the printer key restart your PC.
When your PC restarts, go to the Devices and Printers window, find your printer and delete it.
Make your life easier with one of these user-friendly registry editing software!
Solution 3 – Cancel all print jobs
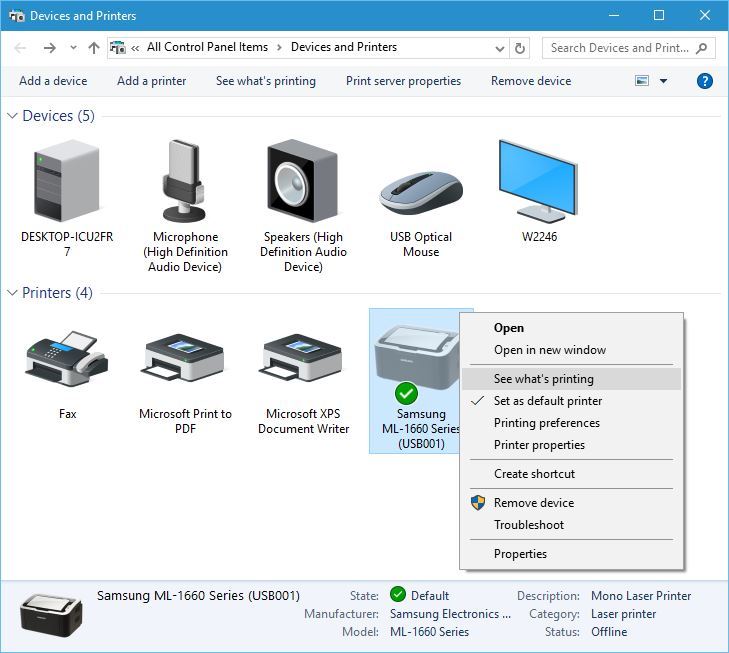
Sometimes you won’t be able to remove a printer because there are still active print jobs. Before you can remove your printer, simply go to Devices and Printers, locate your printer, right-click it and choose to See what’s printing option.
Be sure to remove all entries from the printing queue. After removing all printing jobs you should be able to remove your printer without any problems.
Devices and printers won’t open in Windows 10? Here are the best tips to solve the issue!
Solution 4 – Remove your printer using the Print Management
According to users, if you can’t remove a certain printer in Windows 10, you might want to try removing it by using the Print Management tool.
To remove a printer with Print Management, do the following:
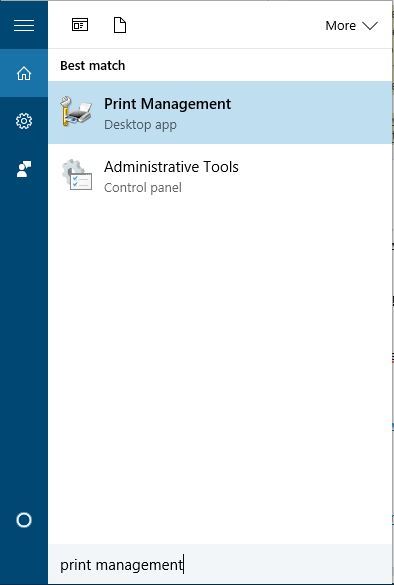
- Press Windows Key + S and enter print management. Select Print Management from the menu.
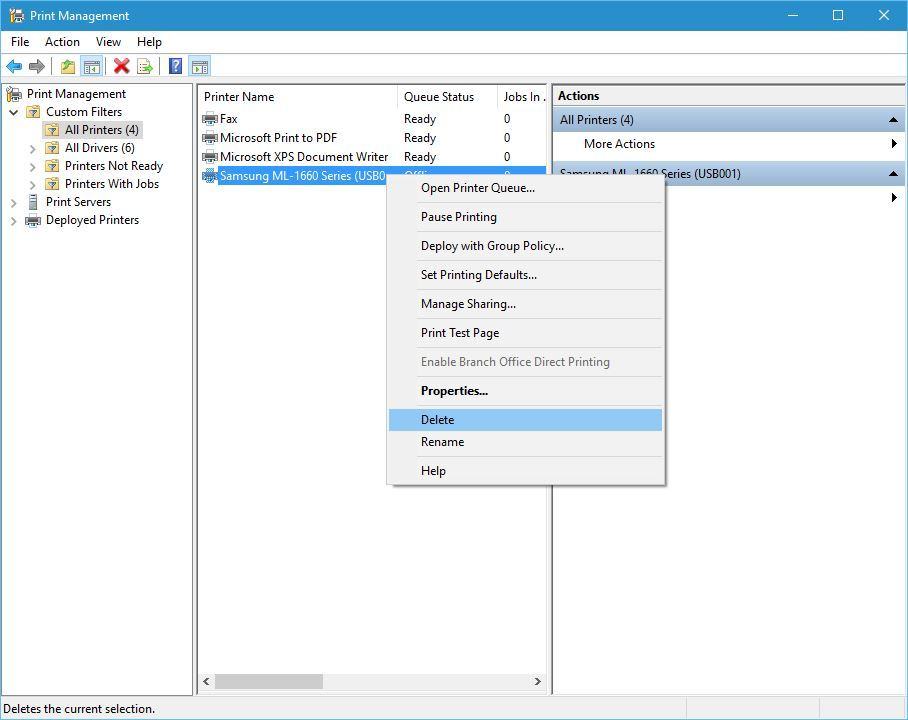
- Once the Print Management window opens, go to Custom Filters > All Printers.
- Locate the printer you want to remove, right-click it and choose Delete from the menu.
Solution 5 – Delete hidden printers from Device Manager
Sometimes hidden devices can cause problems with printers, therefore you’ll need to remove them. To do that, follow these steps:
- Press Windows Key + X to open Power User Menu. Select Device Manager from the list.

- When Device Manager opens, select View > Show hidden devices.
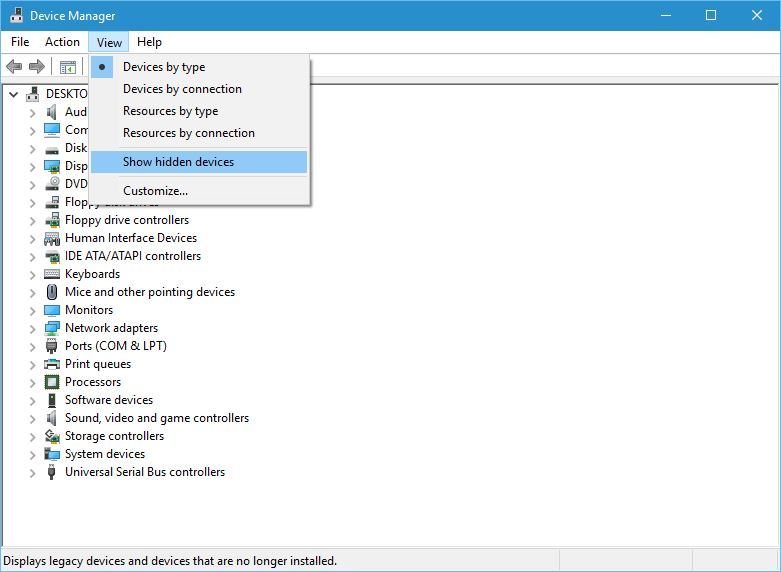
- Delete your printer from Print queues and Printers sections.
- After you’re done, restart your PC.
Solution 6 – Delete the driver entries from the registry
We have to mention that this is an advanced procedure, so be extra cautious while performing it. First, you need to uninstall all printers from your PC. After all, printers are uninstalled, do the following:
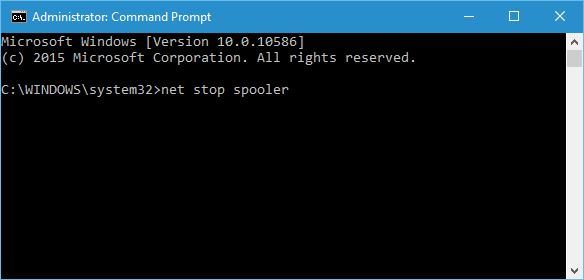
- Press Windows Key + X and choose Command Prompt (Admin).
- When Command Prompt opens, enter net stop spooler and press Enter.
- Start Registry Editor. For more information on how to do that, check Solution 1.
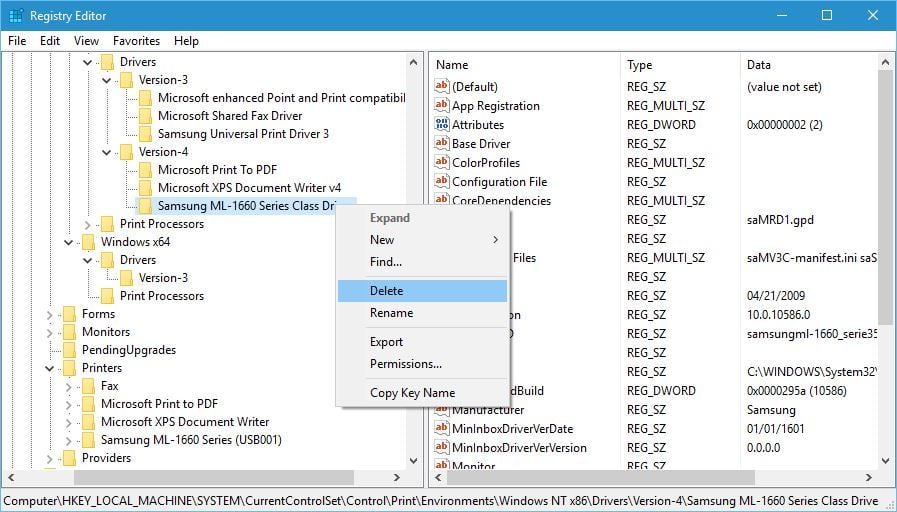
- Go to the HKEY_LOCAL_MACHINESYSTEMCurrentControlSetControlPrintEnvironmentsWindows NT x86DriversVersion-4 key in the left pane. If you use the 64-bit version of Windows 10, you’ll have to navigate to the HKEY_LOCAL_MACHINESYSTEMCurrentControlSetControlPrintEnvironmentsWindows x64DriversVersion-4 key instead.
- Expand the Version 4 key and locate your printer. Right-click it and choose Delete.
- After doing that, go to C:WindowsSystem32spooldriversw32x863 in File Explorer.
- Delete all files from C:WindowsSystem32spooldriversw32x863 folder. If you have C:WindowsSystem32spooldriversw32x861 or C:WindowsSystem32spooldriversw32x862 folders on your PC, be sure to delete all files from those folders as well. Bear in mind that some printers can have extra folders, so you’ll have to find those folders and delete them. For example, HP’s printers have hphp and Hewlett_Packard additional folders.
- Delete the .inf files that are linked to the removed drivers %windir%inf.
- Start Command Prompt as administrator and enter net start spooler. Press Enter to execute the command.

Bear in mind that this is an advanced solution, therefore we advise you to create a System Restore point so you can restore your PC in case anything goes wrong.
Solution 7 – Update the printer drivers
If none of the previous workarounds resolved the problem, let’s try updating the printer driver to the latest version. Here’s how to do that:
- Go to Search, type cmd, and open the Device Manager.
- Expand Print queues, and select your printer.
- Right-click your printer and go to Update driver.
- Follow further instructions to update the printer driver.
- Restart your computer.
Update drivers automatically
If you don’t want the hassle of searching for drivers on your own, you can use a tool that will do this for you automatically. Of course, as you’re not able to connect to the internet at the moment, this tool won’t be useful.
However, once you get online, it will help you to keep all your drivers up to date, so you won’t be in this situation anymore.
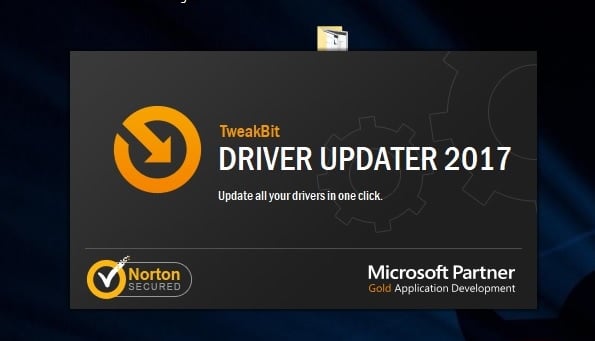
Tweakbit’s Driver Updater (approved by Microsoft and Norton Antivirus) will help you update drivers automatically and prevent PC damage caused by installing the wrong driver versions.
After several tests, our team concluded that this is the best-automatized solution.
Here is a quick guide on how to use it:
- Download and install TweakBit Driver Updater
- Once installed, the program will start scanning your PC for outdated drivers automatically. Driver Updater will check your installed driver versions against its cloud database of the latest versions and recommend proper updates. All you need to do is wait for the scan to complete.
- Upon scan completion, you get a report on all problem drivers found on your PC. Review the list and see if you want to update each driver individually or all at once. To update one driver at a time, click the ‘Update driver’ link next to the driver name. Or simply click the ‘Update all’ button at the bottom to automatically install all recommended updates.
Note: Some drivers need to be installed in multiple steps so you will have to hit the ‘Update’ button several times until all of its components are installed.
You can also get a driver updater from our fresh list. All are great choices!
Fix – Can’t remove printer driver in use Windows 10
Solution 1 – Delete the driver as every user
If you have multiple users on your PC, you might not be able to remove the printer since the driver is in use. In order to fix this problem, you need to log in to each user account that has the printer connected and delete the device.
After that, log in to the administrator account and delete the driver package.
Solution 2 – Close all applications, restart explorer.exe and delete the driver
This problem can sometimes appear if certain application loaded one of the driver UI components, and in order to fix this problem you need to close all running applications and stop the explorer.exe process.
To do that, follow these steps:
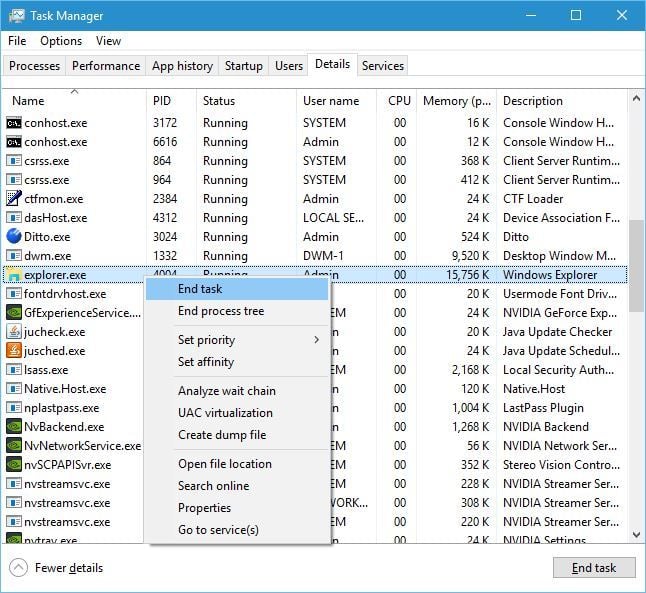
- Press Ctrl + Shift + Esc to open Task Manager.
- Once the Task Manager opens, go to the Details tab.
- In the Details tab, locate explorer.exe, right-click it and choose End task.
- In Task Manager click on File > Run new task.
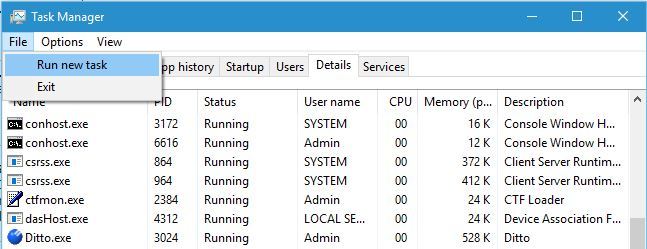
- Create new task window will appear. Enter explorer.exe and click OK.
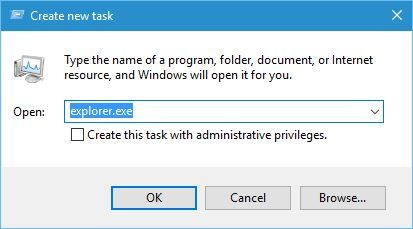
- When Explorer starts again, try to delete the printer driver.
- Optional: If you can’t delete the driver, stop the Print Spooler service and try again. Be sure to turn on Spooler service back on after you delete the driver.
Solution 3 – Use Kyocera Deleter tool
If you can’t remove the printer because the driver is in use, you might want to try using the Kyocera Deleter tool.
Users reported that this tool will delete your printer without any problem, but be sure to run this tool as the administrator since it requires administrator privileges to remove your printer.
Download and learn to use Kyocera printer drivers for Windows 10 from our complete guide!
Solution 4 – Try to delete the printer quickly after restarting Print Spooler service
Few users reported that you can fix this problem by trying to remove the printer after restarting the Print Spooler service.
We already explained how to restart this service in one of our previous solutions, so we advise you to check it out.
This process requires speed, therefore be sure to remove the printer as soon as you restart the Print Spooler service. According to users, you only have a few seconds to remove the printer, so be sure to do it as fast as you can.
If Print Spooler doesn’t work, we have a comprehensive guide on how to solve its issues.
Solution 5 – Disable Bidirectional support
Users reported that you can fix this problem by disabling Bidirectional support. To do that, follow these steps:
- Open Devices and Printers.
- Locate your printer, right-click it and select Printer properties.
- When the Properties window opens, go to the Ports tab and uncheck Enable bidirectional support option.
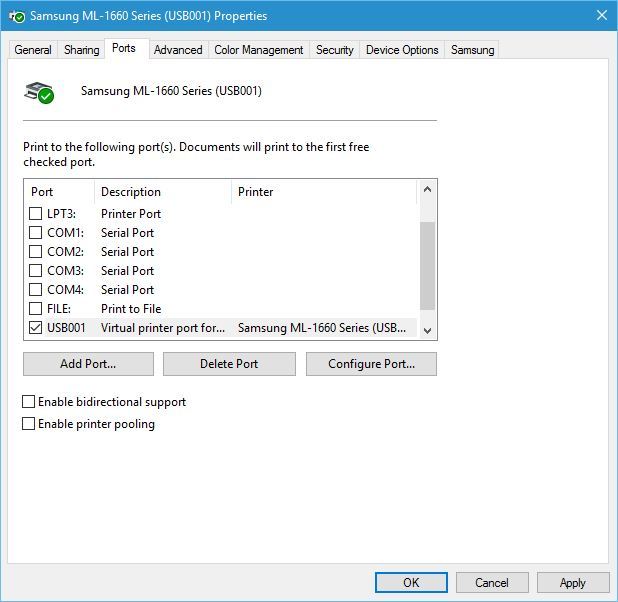
- Click Apply and OK to save changes.
Solution 6 – Set the Print Spooler service to Manual
Users reported that you can fix this problem by setting the Spooler service to Manual. To do that, open the Services window, locate the Print Spooler service and double click it to open its properties. Set the Startup type to Manual and click Apply and OK to save changes.
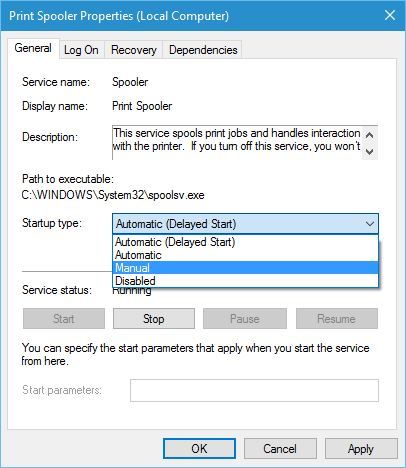
After that, try to remove your printer. If the uninstall tool mentions Print Spooler service, simply go to Services, locate Print Spooler service and start it.
After that, you should be able to remove your printer without any problems.
Not being able to remove a printer in Windows 10 can be a big problem, but you can usually fix this problem by restarting the Print Spooler service and trying to delete the printer again.
If that doesn’t work, be sure to try all other solutions from this article.
If you have any of the following issues, the solutions presented above also apply:
- Remove printer drivers Windows 10 Registry – sometimes, you can bypass removal errors by editing the registry. Be careful in performing any changes here.
- Unable to remove printer windows 10 – you are in the right place since if the default way of removing a printer doesn’t work, this article has a ton of ways to help you.
- How to remove Printer driver from Registry – users need a step by step instruction in performing this operation, which we provide in the article.