
If you’ve got a hard drive you want to add to your Linux server, physical or virtual, it’s not going to work out of the box. You’ll have to initialize the drive with a filesystem, and set it to automatically mount at boot.
This guide will focus on the basics for getting a new hard drive up and running on Linux. If you need more complex management, we recommend using Logical Volume Management (LVM) instead, which follows a different procedure. Among other things, this makes managing partitions on drives easier, and allows for easy resizing of logical volumes.
Install The Drive
This may seem self explanatory, but it’s not always as simple as just plugging it in. If you’re installing a physical drive in a physical server, you may have to boot into your BIOS or RAID configuration utility to create a new logical drive out of the physical drive you installed. This way, you can group multiple hard drives together into one large, uniform file system, or simply just use the single drive. If you’re just using a single drive, RAID 0 is your only option. If you have two drives, RAID 1 is a better choice for durability. For three drives, RAID 5 is your best bet, and at four drives and above, RAID 10 or RAID 6 are both good options.
If your RAID controller allows it, you may choose to add a new drive to your existing array and expand the total size. If this is an option, you don’t need to do anything past setting it up with the RAID controller, though you may need to wait through an array rebuild depending on your configuration.
If you’re installing a drive into a cloud server, such as a new EBS volume, you’ll have to make sure the drive is initialized and is attached to your cloud server. The benefit of cloud drives like EBS is that it’s fully managed; You don’t have to worry about replacing problematic hard drives are dealing with RAID configuration, as that’s all handled by AWS and is abstracted away from you. EBS volumes can also be swapped between instances at will (though EFS is the only AWS drive type that can be attached to multiple instances at once).
Advertisement
Either way, it will work the same way. You can verify that the drive is installed and working properly if a new block level device is found when running lsblk:
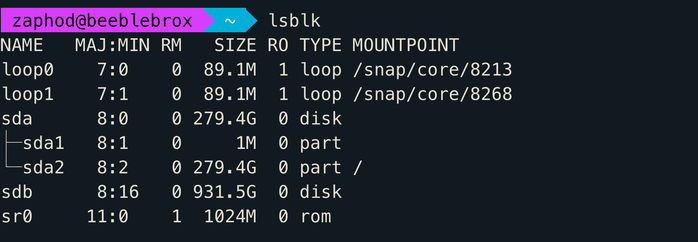
If you want more information, you can also run sudo fdisk -l, but lsblk makes for a better screenshot.
Linux treats just about everything on the OS as a file you can write to, and drives are no different. The /dev/ folder contains device files, which are a special interface to the drive hardware itself. Usually, your first drive will be sda, with all subsequent mounts coming in alphabetical order.
sda
sdb
sdc
...
In this case, the primary OS drive is sda, with two partitions (denoted by a number after the drive prefix), one of which is mounted at the root of the file system. The second drive that was just installed is sdb, which isn’t mounted and is just an empty disk, devoid of a filesystem. If you’re installing a cloud drive, it will probably come in this same form too, entirely initialized and ready for whatever filesystem you choose to put on it.
A brief word of caution: We’ll assume your drive is sdb for the rest of this tutorial, since that’s likely to be the default if you’re installing a second drive. However, you’ll want to be extra careful when entering commands, since you don’t want to screw it up and mess with drives that have already been configured.
Create a New Filesystem
Since the drive doesn’t have a filesystem, we can’t use it for storing files. Not to worry, as a few commands will make quick work of that.
If you want, you can partition your drive before installing a filesystem. This is optional, as a filesystem can be installed directly to the device itself, which will act as one giant partition. If you’re setting up a non-boot drive, chances are you probably want to make use of the entire thing, so unless you have a specific reason to partition, you can omit this step.
To create a new filesystem on an empty volume, you’ll want to use the aptly named mkfs command:
sudo mkfs -t ext4 /dev/sdb
This creates a new ext4 filesystem on sbd. Linux has a lot of filesystem types, all with varying support. ext4 is stable, and the default filesystem for Linux. After about 50 TB though, it starts to degrade in performance, and filesystems like ZFS and XFS start to become more viable options.
Next, you’ll want to create a mount point. This can be anywhere on your drive, so long as the folder is accessible. By default, Linux uses the /mnt/ directory for most temporary mounts, and /media/ for removable mounts like CDs, but that’s just convention. Really, it doesn’t matter where you mount it, just make a new folder for it:
sudo mkdir /mnt/newdrive
Make sure this mount folder has proper permissions. Now, you can mount and test the new drive with:
sudo mount /dev/sdb /mnt/newdrive
The drive should now be fully usable, and available from the mount location you’ve chosen.
However, this mount isn’t permanent, and will not persist across reboots. Since that’s obviously an issue for a hard drive, you’ll have to add it to your fstab file.
Add The Mount To fstab
fstab, or filesystem tab, keeps track of devices and their mount points. It’s responsible for mounting your primary hard drive to /, and any drive added here will become part of the OS in much the same way.
Another word of caution: errors in an fstab file can cause the system to be unbootable, and unable to be fixed except from grub mode or an external USB. This isn’t a major issue, since you can check for errors before restarting, but you’ll want to make sure to do so.
Anyway, you’ll probably want to back up fstab:
sudo cp /etc/fstab /etc/fstab.old
Rather than using the device label (like /dev/sdb) devices in fstab must be added via UUID. This is because device order isn’t guaranteed, and it’s very possible for drive letter allocations to change, since they’re added dynamically on startup and whenever drives are hot swapped. You can find your device’s UUID with:
sudo blkid
Copy the UUID, and open up fstab:
sudo nano /etc/fstab
You’ll want to add the following line, replacing the UUID with your own, and /mount/point with your own mount point.
UUID=xxxxxxxx-xxxx-xxxx-xxxx-xxxxxxxxxxx /mount/point ext4 defaults,nofail 0 2

The nofail option tells the OS that it’s fine to boot without this drive, or if there are any errors in mounting. If it’s imperative that your system always has this drive available, you’ll want to remove this.
Now, you’ll want to check that there are no errors in fstab. Unmount the drive:
sudo umount /mount/point
And mount the drive using fstab:
sudo mount -a
If this completed with no errors, you’re good to go. If not, you’ll want to double check that your UUID and configuration is correct, and restore from the backup fstab.old if you need to.