Standard users cannot run a program with admin rights. All programs that run on a Windows computer must be able to access administrative privileges, and, unfortunately, Standard users do not have administrative rights by default. There can be cases where a standard user may need admin rights often. In that case, there needs to be a permanent setup that allows standard users to run a program with admin rights.
When do Standard users need admin rights?
When you’re a standard Windows user, you’ll need admin rights to perform many basic tasks, like installing new software, accessing the registry or group policy, etc. So If you want to run a few programs on Windows, admin rights shouldn’t be necessary; however, if you’re going to use your computer for admin tasks, you might not want admin rights.
How to allow Standard users to Run a Program with Admin rights
Security settings on Windows PCs often have admin rights enabled by default. It makes sense since most normal users shouldn’t need admin rights. However, many standard Windows users will come across this issue, as the steps below will show you how to fix the problem.
Here is the list of methods you can use to allow standard users to run a program with admin rights:
- Use the Run As Administrator Option
- Use the Task Scheduler
- Use a Shortcut Each of these methods is detailed below.
Use the one that best suits your needs.
1] Use the Run As Administrator Option

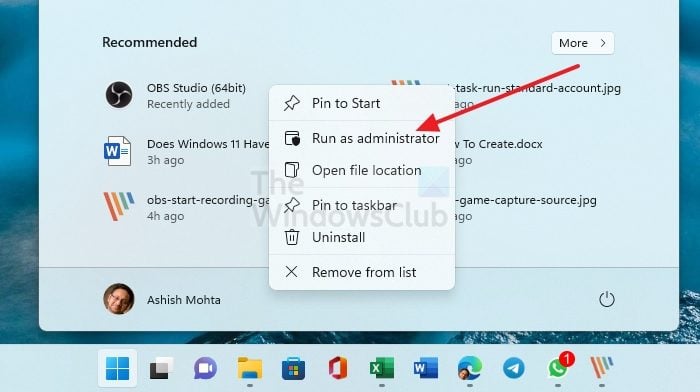
If you have a program that you need to run with administrator rights, you can use the “Run As Administrator” option. To do this, right-click on the program’s icon and select Run As Administrator. You will then be prompted to enter the administrator password. Once you do so, the program will run with the administrator.
While it is the easiest way, it also means that users will need to know the PIN or password of the admin account. It will not be ideal most of the time unless the admin can trust the users enough so they don’t misuse it.
2] Use the Task Scheduler

If you need to run a program in the background or at a certain time for a standard user with admin rights, then follow these steps:
- First, the user must open the Task Scheduler by going to the Start Menu and searching for Task Scheduler.
- Once in the Task Scheduler, the user should click Create Task in the right-hand pane.
- A new window will open titled Create Task. Here name the task and set it to run whether the user is logged on or not. They should also check the Run with the highest privileges box.
- Click on Change User or Group and select the user account you want to run the task.
- Under the Triggers tab, the user should click New and set the task to run at a certain time or interval.
- Make sure to fill in the rest of the details, so the task runs as expected.
It should be created by the admin users and allow us to run in the standard user account.
3] Use a Shortcut
A permanent solution would be if you can run a program without setting up a task or without knowing the password. The solution to this is an admin account that can create a shortcut for the standard user, which, when clicked, launches the program with the highest privileges.

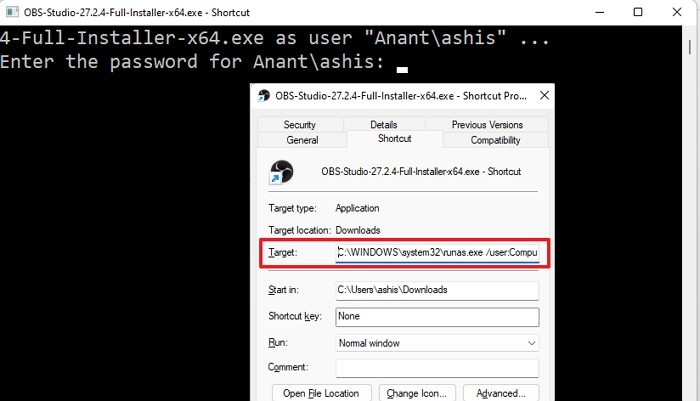
Follow these steps to set up the shortcut using the RunAs command. It allows anything to run with another account’s privileges. It is a loophole as the /savecred switch can save the password the first time you run it. Post that, it will not prompt for anything.
- Press the Windows key + R on the admin account to open the Run dialog box.
- Open the Start menu and locate the program you want to create a shortcut for.
- Right-click on the program and select Create shortcut.
- Right-click on the newly created shortcut and select Properties.
- In the Shortcut tab, locate the Target field and add the following at the start of the exe location.
runas /user:ComputerNameUsername /savecred
- The final path should look like this
runas /user:PCNAMEAdministrator /savecred <Path>Program.exe
- Change computer name and username accordingly.
Save it. Doing this will prompt you to enter in admin credentials once, and once they are entered, they get stored in Windows Credential manager and do not have to be entered again. The application will run elevated each time.
The standard user will now be able to launch the program with admin rights by double-clicking the shortcut. While this should work fine with a Microsoft account, it is best to use a local admin account for this.
What is Runas Command?
It is command to open any program with another user account. When used with /savecred it indicates if this user has previously saved the credentials. Hence it can launch the program with an admin account as well.
How to make Program always Run as Administrator in Windows?
To make a Program Run as Administrator in Windows 11/10:
- Right the program icon or the shortcut of the application
- Open the Properties box.
- Click the Compatibility tab.
- Here, select the Run this program as an administrator box.
- Click Apply > OK. This will apply the setting to the current user only.
- But if you’d like to apply the ‘always Run as Administrator’ setting to all users, then click Change setting for all users.
- This will open another dialog box. Again select Run this program as an administrator checkbox.
- Click Apply / OK.
