
Install Wavemon to find and measure WiFi signal strength in Linux Ubuntu. Using this application, users can easily check WiFi signal strength in Ubuntu Linux Terminal. Wavemon is an ncurses-based monitoring application for wireless network devices; a wireless device monitoring application that allows you to watch signal and noise levels, packet statistics, device configuration and network parameters of your wireless network hardware.
Each screen presents information in a specific manner. For example, the “info” screen shows current levels as bargraphs, whereas the “level” screen represents the same levels as a moving histogram.
On startup, you’ll see (depending on configuration) one of the different monitor screens. At the bottom, you’ll find a menu-bar listing the screens and their activating keys. Each screen is activated by either the corresponding function key or the key corresponding to the first character of the screen name. The following screens can be selected:
How To Install Wavemon
Wavemon can be installed on Ubuntu and Debian based system via running the following command:
sudo apt-get update

sudo apt-get install wavemon
How To Use Wavemon
Please note that wavemon is a commandline tool. It can only be accessed via terminal. In simple, run the command wavemon without any parameters in the terminal.
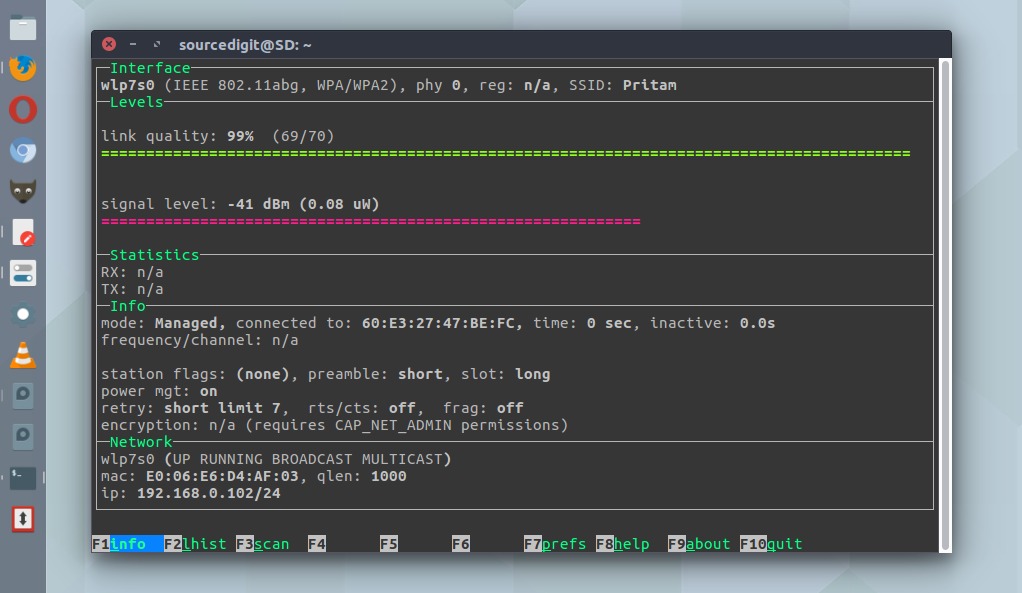
When the command wavemon is executed it shows the basic, yet detailed info about the WiFi wireless network connected to the system. It is the most comprehensive screen. It displays a condensed overview of wireless-specific parameters and network statistics, as well as bar graphs. The layout is arranged into several sub-sections. The Interface section at the top shows information about the monitoring interface, including interface name, type, ESSID, and available encryption formats.
In the Levels section, you can see up to four bargraphs showing:
(1) Relative signal quality is displayed
(2) Signal level in dBm is displayed
(3) Noise level in dBm is displayed
(4) Signal-Noise-Ratio (SNR) in dB is displayed
The option number, 3 and 4 are only displayed when the wireless driver supports noise level information. Also, the colour of the signal level bargraph changes from red to yellow and green at fixed levels. If thresholds have been set, two arrows on the signal level graph will show the positions of the current thresholds.
To exit or quit wavemon, press F10 or ‘q’.
Scan window (F3 or ‘s’)
A periodically updated network scan, showing access points and other wireless clients. It is sorted depending on sort_order. Each entry starts with the ESSID, followed by the colour-coded MAC address and the signal/channel information. A green/red MAC address indicates an (un-)encrypted access point, the colour changes to yellow for non-access points (in this case the mode is shown at the end of the line). The uncoloured information following the MAC address lists relative and absolute signal strengths, channel, frequency, and station-specific information. The station-specific information includes the station type (ESS for Access Point, IBSS for Ad-Hoc network), station count and channel utilisation.
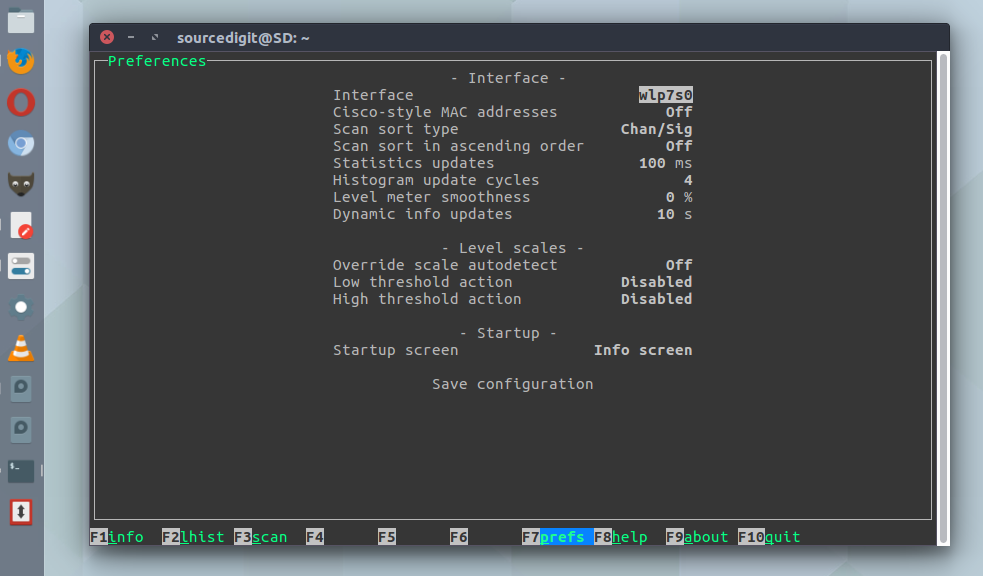
Preferences (F7 or ‘p’)
This allows you to change all program options such as interface and level scale parameters, and to save the new settings to the configuration file. To do so, select a parameter with and , then change the value with and .
Help (F8 or ‘h’)
This page might show an online-help.
About (F9 or ‘a’)
Release information and contact URLs.
Quit (F10 or ‘q’)
Exit wavemon.
How To Check WiFi Signal Strength In Linux Ubuntu originally posted on Source Digit – Linux, Ubuntu Tutorials & News, Technology, Gadgets & Gizmos.