
In this article we’ll run through the steps necessary to create a bootable installer of the Mac operating system, whether it’s so you can install the latest version of the macOS on multiple Macs, install the latest macOS beta, perform a clean install of the macOS, or just to be prepared with an emergency disk if your Mac experiences problems and you don’t want to connect to the internet or in Recovery mode (or you can’t access Recovery mode).
If you want to find out how to make a bootable install of macOS Big Sur, Catalina, Mojave, or an older version of Mac OS X or macOS, you’ve come to the right place.
You can also use your bootable installer to install the macOS on a separate volume of your hard drive (or on a partition if you are running an older version of the Mac OS). It’s also a hassle-free way to go back to an older version of macOS and a great option if you found downloading the installer took a long time and you don’t fancy spending the next few days downloading it multiple times on multiple Macs. Once is quite enough!
Luckily, making a bootable installation of the Mac operating system became a whole lot easier when Apple launched OS X Mavericks back in 2013. With that version of Mac OS X, and all versions since, it’s been possible to use the Terminal command createinstallmedia to create a bootable installer of the macOS, in this article we’ll show you how.
If you want to run macOS on an external drive, which is slightly different, we have a separate article.

What you need to make a bootable USB for Mac
There are two main things you’ll need to make your bootable install drive: a USB stick (or a Thunderbolt drive) and the installation files. Once you have those two things the process shouldn’t take very long.
A 15GB Flash Drive (at least!)
We recommend a 15GB (or more) drive – in fact more would be advisable: the installer for Big Sur was 13GB (and the actual installation takes up at least 35.5GB storage, so you’ll need to allow for that on your Mac).
We recommend a Flash memory stick, rather than a standard hard drvie, as it will be quicker. You’ll also benefit from USB 3, or USB Type C – this may be your only choice if you have a newer Mac. If you have an M1 Mac you might actally be better off with a Thunderbolt drive because there have been some issues with using USB drives with the M1 Mac.
Note: If you have data on the drive that you plan to use you will need to transfer it to another drive, or get a new drive, as it will be completely formatted and erased.
The installation files

Depending on which version of macOS you are running, and the version you want to to install, you will either be able to get the installation files from Software Update in System Preferences, the Mac App Store, or you will have to obtain them from elsewhere.
The Mac App Store is probably the easier option, but there can still be difficulties depending on which version of macOS your machine is running, and if you were hoping to grab older installation files that can be tricky – we have another article discussing how to get older versions of macOS.
It goes without saying that you will need an internet connection to download the software and you may need it while installing the version of macOS if it needs to check for firmware or confirm your iCloud credentials.
How to get macOS installer files
As we said already, how you get the installation files will depend on the version of macOS you are running currently and the version you want the installer for. Below we’ll look at how to get Catalina installers as well as how to get older versions of the macOS or even Mac OS X. We do have a dedicated article about How to download old Mac OS X and macOS versions.
How to get Big Sur installer
To get the installer for macOS Big Sur follow these steps:
- If you are already running Big Sur on your Mac go to the Mac App Store – click this link to go straight to the relevant page.
- Click on Get and the installation files will start to download.
If you are running Catalina then you could go to System Preferences and select Software Update and download Big Sur there (assuming your Mac is compatible with Big Sur – read Can my Mac run Big Sur?)
Download the installation files, but make sure you stop before clicking to install. You need to copy this installation file before installing on your Mac if you want to have access to it to make the boostable installer. Instructions for that below.
How to get Catalina installer
If it’s an older version of the macOS you want to run – such as Catalina – you can still get the installation files from the Mac App Store:
- Open the Mac App Store.
- Go to the Catalina page, you can click this link to Catalina on the Mac App Store.
- Now, if you click on Get, your Mac will offer to download the installers.
We explain how to get installers for the various versions of macOS here: How to download old macOS and Mac OS X versions.
Again, don’t click on install as you need the installation file for the next stage of this tutorial…
How to get a macOS beta installer
If you want to try out the latest Big Sur beta (or the macOS 12 beta when that is available) you’ll need to sign up for the beta program, you will then be able to download the installer files.
We explain how to get and install the macOS beta here. We have included the createinstallmedia code you’ll need for installing the Big Sur beta via a USB below.
How to get older macOS installation files
With macOS Catalina, Mojave or High Sierra installed it’s a little tricky to get the installation files for older versions of macOS. This is because when High Sierra launched Apple stopped making older versions of the OS available to download via the Mac App Store.
Luckily it can still be done, and we explain how to get old versions of macOS here. If it is already open make sure that you close the Mac App Store before clicking on any of these links or they won’t work.
- You can get macOS Mojave via this link.
- Download High Sierra here.
Apple provides dmg files of these older macOS versions – you need to download them in Safari. A disk image named InstallOS.dmg will download and once it does you need to locate the pkg installer inside the disk image.
- Sierra is here.
- El Capitan can be downloaded from this link.
- Yosemite is available here.
How to get old macOS from the Mac App Store
If you aren’t already running running Big Sur, Catalina, Mojave or High Sierra – or you have access to a Mac that isn’t running them – you can follow these steps to download the installation files of an older macOS:
- Launch the Mac App Store on your Mac.
- Look for the version of macOS you want in the store (if you have previously downloaded the version search under your Purchased tab).
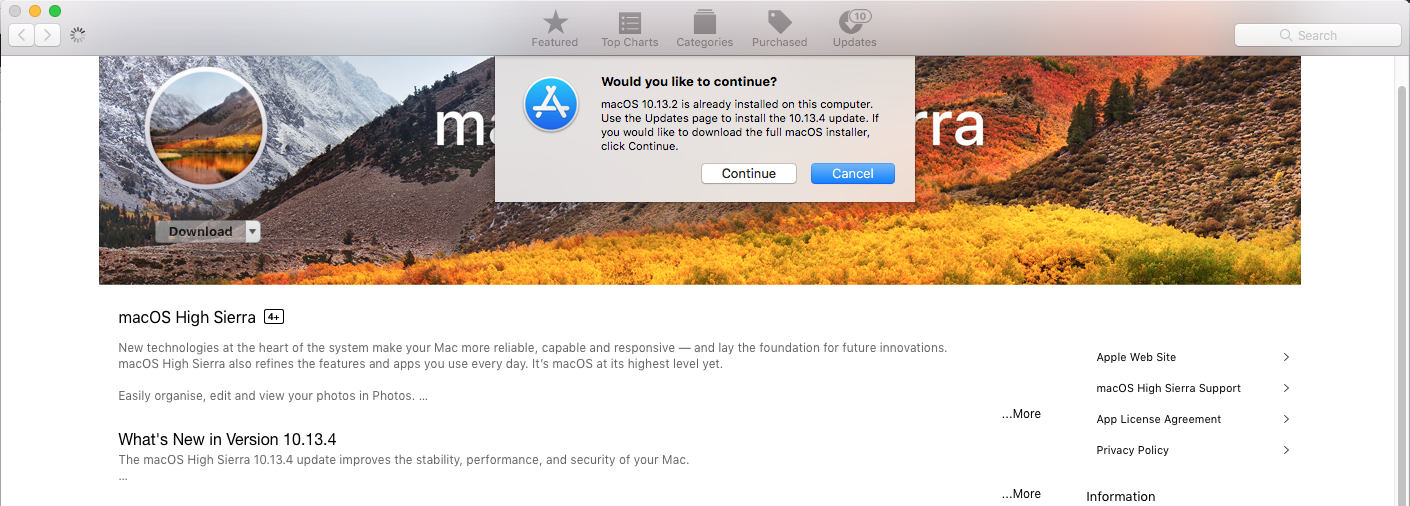
- Click on the Download button. If you have already installed this version of macOS, you will see a message warning that the version of macOS is already installed on this computer. Click on Continue to confirm that you still want to download the full installer.
- Your Mac will download the installer to your Applications folder. This process may take some time depending on the speed of your connection and whether you are using a wireless network. It took us about 10 minutes over Ethernet.
- If it automatically launches after download, quit – you don’t want to start the process of installing it on your Mac because doing so will delete the installers – and it’s the installers you need. If it opens, close the installer.
- You will find the installation files in your Applications folder, which you can access via the Finder.
How to create a bootable installer for macOS
Now you have the installation files, we can move onto the process of making the bootable installer.
Note, the createinstallmedia method described here doesn’t work under OS X 10.6 Snow Leopard or earlier – it requires OS X 10.7 Lion or later. Also, the processes have changed slightly since Mavericks so if your looking to create an installation of one of the ‘Cat’ versions of Mac OS X you should read this older article instead.
Since Mavericks, creating a bootable installation of macOS requires a single command in Terminal. The createinstallmedia command makes it possible to create a bootable copy of an installer on any drive that’s connected to your Mac.
Note that the createinstallmedia command erases anything on your external disk though, so make sure there’s nothing on it that you need.
These are the instructions to follow to create your bootable USB – note there will be tiny adjustments depending on the installer you require:
- Plug in an external drive with at least 15GB space as that’s how much the installer will require.
- Launch Disk Utility (press Command + spacebar and start to type Disk Utility).
- Before this next step, note: if you are running High Sierra or later you will need to click on the View drop down below the close minimise buttons. Choose Show All Devices from the options. Now you will see the external root drive in addition to the volume below it.
- Select the root drive in the sidebar (the next step won’t work if you only select the volume).
- Click on Erase.
- Choose Mac OS Extended (Journaled) as the Format.
- Choose GUID Partition Map as the Scheme.
- Your drive will probably be called ‘Untitled’ by default, you could give your drive a name such as ‘macOS’ or ‘USB’. (Note you will need to replace the term ‘MyVolume’ in the createinstallmedia command below with whatever name you give your drive).
- Click on Erase.
- Wait while Disk Uitlity creates the partition and sets up the drive (this can take a few minutes).
- Then click Done.
- Open Terminal (the easiest way is to press Command + spacebar and then start typing Terminal. Otherwise you’ll find it in the Utilities folder).
- Copy the text that corresponds to the version of macOS you are installing into Terminal – you’ll find the text in the section below. Make sure that you use the name you have given your drive – e.g. change Untitled to MyVolume.
- Click Enter/Return.
- Terminal will ask for a password. This is your user password. Note you won’t see characters appear as you type it in, that’s fine. After typing in your password, press Enter.
- Terminal will warn that it is about to erase the drive (so make sure there wasn’t anything important on it – there shouldn’t be if you already formatted it as per the instructions above). If you want to continue press Y and then Return. The process can take a while, you’ll see “Erasing Disk: 0%… 10%… 20%… 30%…100%…

- Now Terminal will spend a few minutes copying the installer file to your drive. “Copying installer files to disk… Copy complete” and so on will appear in the Terminal window.
- When Terminal has finished copying the installer you will see the words Copy complete and Done appear.
How to use an USB installer to update your Mac
Now you have the installer on the external drive you can use that to install copies of macOS on multiple Macs (as long as they are supported by that version).
- Plug the external drive into the Mac that you want to install the macOS on.
- Start up the Mac. If you have an Intel-powered Mac hold down the Option/Alt key while it is booting up. If it’s an M1 Mac then you just press and hold the on switch until you see options.
- Your Mac will eventually display the Startup Manager, click on your external drive to select that as the startup disk. Your Mac will start up in Recovery Mode.
- Click on Install macOS and then click on Continue. The version of macOS should start to install on your Mac now. (If you want to do a clean install, wiping your Mac first, follow the instructions here: How to do a clean install on a Mac.
- Eventually the Mac should restart. Wait while the update takes place and then enjoy your newly updated operating system.
You can also run the Mac operating system directly from an external drive rather than your built-in startup disk, this is handy if you are testing new versions of the Mac OS. The process is different to the one described above though, and we cover it here: Read about How to run macOS on an external hard drive here.
Note that older versions of macOS used “applicationpath” while newer ones don’t – if you use the command you will get an error (we have the code for the all versions of macOS and Mac OS X below).
createinstallmedia commands
The createinstallmedia command will be slightly different depending on which version of macOS you are wanting to use.
Note MyVolume may have a different name for you, for example it might be USB or Untitled. Check in Disk Utilities, it’s the name of the external disk you are using.
Big Sur beta
sudo /Applications/Install macOS Big Sur Beta.app/Contents/Resources/createinstallmedia –volume /Volumes/MyVolume –nointeraction
Big Sur
sudo /Applications/Install macOS Big Sur.app/Contents/Resources/createinstallmedia –volume /Volumes/MyVolume — /Applications/Install macOS Big Sur.app
Catalina
sudo /Applications/Install macOS Catalina.app/Contents/Resources/createinstallmedia –volume /Volumes/MyVolume
Mojave
sudo /Applications/Install macOS Mojave.app/Contents/Resources/createinstallmedia –volume /Volumes/MyVolume
High Sierra
sudo /Applications/Install macOS High Sierra.app/Contents/Resources/createinstallmedia –volume /Volumes/MyVolume
Sierra
sudo /Applications/Install macOS Sierra.app/Contents/Resources/createinstallmedia –volume /Volumes/MyVolume –applicationpath /Applications/Install macOS Sierra.app
El Capitan
sudo /Applications/Install OS X El Capitan.app/Contents/Resources/createinstallmedia –volume /Volumes/MyVolume –applicationpath /Applications/Install OS X El Capitan.app
Yosemite
sudo /Applications/Install OS X Yosemite.app/Contents/Resources/createinstallmedia –volume /Volumes/MyVolume –applicationpath /Applications/Install OS X Yosemite.app
Mavericks
sudo /Applications/Install OS X Mavericks.app/Contents/Resources/createinstallmedia –volume /Volumes/MyVolume –applicationpath /Applications/Install OS X Mavericks.app
Beware that we have heard of people copying and pasting in the — only for them to change to a – in Terminal, so be careful of that.