

If you prefer using an older classic keyboard such as the IBM Model M that doesn’t include a physical Windows key, there’s a neat way to “add” one using Windows 10 by borrowing a key you don’t use very often. Here’s how to do it.
Using Microsoft’s free PowerToys utility, you can easily reassign any key to work like any other key (or even give them a novel function like muting your audio). In our case, we’ll be assigning the Windows key function to a key of your choice.
(By default, the Command key on a Mac keyboard functions as the Windows key if plugged into a Windows 10 machine. There’s no need to use this trick when you’re using a Mac keyboard with Windows—just use the “Command” key as your Windows key.)
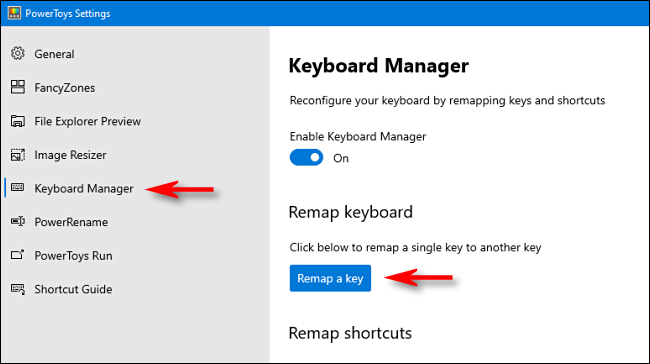
First, if you don’t already have PowerToys for Windows 10, download it for free from Microsoft’s website. After that, launch PowerToys, and click the “Keyboard Manager” option in the sidebar. In the “Keyboard Manager” options, click “Remap A Key.”
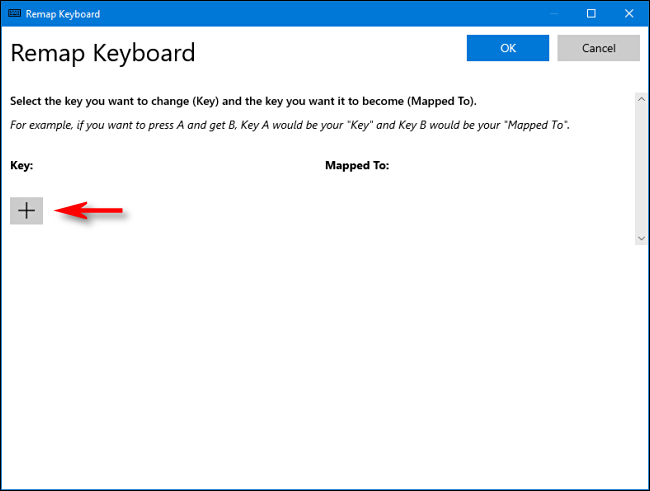
In the “Remap Keyboard” window that pops up, click the plus sign (+) to add a key mapping.
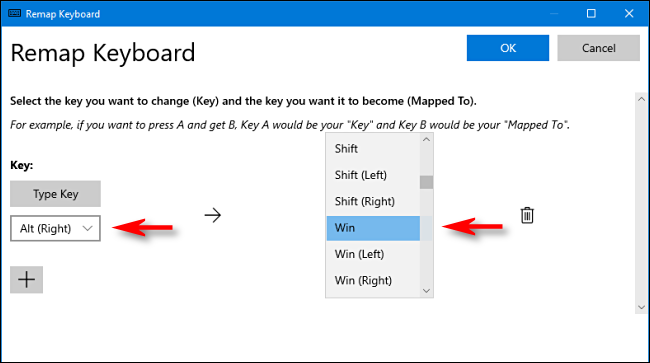
Now you have to decide which key you want to double as the Windows key. We find that the right Alt key works very well (if you have one), because it is easy to use for one-handed Windows shortcuts and most people use the left Alt key more frequently. You could also choose a seldom-used key, such as Scroll Lock or right Ctrl instead. It’s completely up to you.
While defining the mapping in PowerToys, use the drop-down menu below the “Key:” heading on the left to select the key you’d like to function as your Windows key. In this example, we’re using “Alt (Right).”
In the “Mapped To” section on the right, select “Win” (which represents the Windows key) from the drop-down menu.
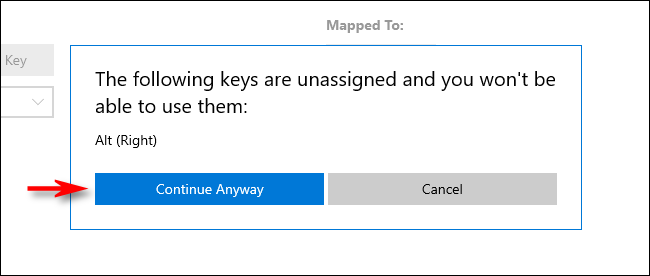
Click “OK.” Windows will probably warn you that the key you’re remapping won’t be usable because you’ve reassigned it to another function. In that case, click “Continue Anyway.”
After that, the new Windows key mapping should be active. Test it out. If you tap the key you assigned to Windows, your Start Menu should pop up. From then on, you should also be able to use it to launch handy shortcuts such as Windows+I to open Settings.
When you’re ready, close PowerToys, and you can use your computer as usual. You won’t have to log out or restart your PC; your change will take effect immediately.
How to Remove the New Windows Key Mapping
If you change your mind and want to assign a different key to Windows or restore the function of the key you remapped, launch PowerToys, and navigate to Keyboard Manager > Remap A Key.
Locate the mapping you defined earlier and click the trash can to delete it. Then click “OK” to close the window. After that, you’re free to create a new mapping or simply close Power Toys.