
If you have an iPhone, you have free access to the GarageBand app for iOS. Better still, you don’t have to be a GarageBand expert to create custom ringtones.
If you’ve grown tired of the canned ringtones that came with your iPhone and want something new, you can create custom ringtones. The easiest way to do this is directly from your iPhone. However, you can still go old-school and create new ringtones on your Mac or PC. Here’s how to get it done.
Creating ringtones on iPhone
If you have an iPhone, you have free access to the GarageBand app for iOS. Better still, you don’t have to be a GarageBand expert to create custom ringtones.
Install GarageBand, Find Song
If you don’t have GarageBand on your iPhone:
- Download GarageBand from the App Store if you haven’t yet done so.
- Tap Continue on the main GarageBand app, then Continue again if this is the first time you’ll use the app.
- Select Allow to approve GarageBand notifications.

Once GarageBand has been installed:
- Tap Tracks at the top of the app.
- Choose Audio Recorder by swiping right.
- Select the Multitrack button at the top left. It’s the third one in the series.

Next:
- Choose the Looper button at the top right. It’s the second from last.
- Tap Music from the pop-up.
- Select the song you wish to use for your ringtone. You can search through Albums, Artists, Genres, Playlists, and Songs. You can only use downloaded iTunes music. Due to copyright, you can’t use Apple Music songs.
- Drag the song into GarageBand.

Edit Your Song
Your ringtone should be no more than 30 seconds long. Most likely, the song that you selected is well beyond that length. Therefore, you must edit it by selecting your favorite part of the song.
- Push the Play button at the top of the screen and listen to your song; decide which section to use for your ringtone.
- Separately, grab both ends of the song and push them inward so that only your favorite part of the song remains.
- Press the Play button again to confirm your ringtone.
- Tap the My Songs button at the top left. It’s the first one on the list.
- Choose My Songs.

Change the Name, Export the File
- Long press the clip you just saved.
- Choose Rename from the menu.
- Give your clip a name.
- Tap Done.

Next:
- Long press the renamed clip again.
- Choose Share.
- Tap Ringtone.
- Select Export.
- Choose OK on the Ringtone Export Successful pop-up.

You’ve successfully created a ringtone on your iPhone using the GarageBand app. You can now assign it as the default ringtone or use it for individual contacts.
Using Your New Ringtone
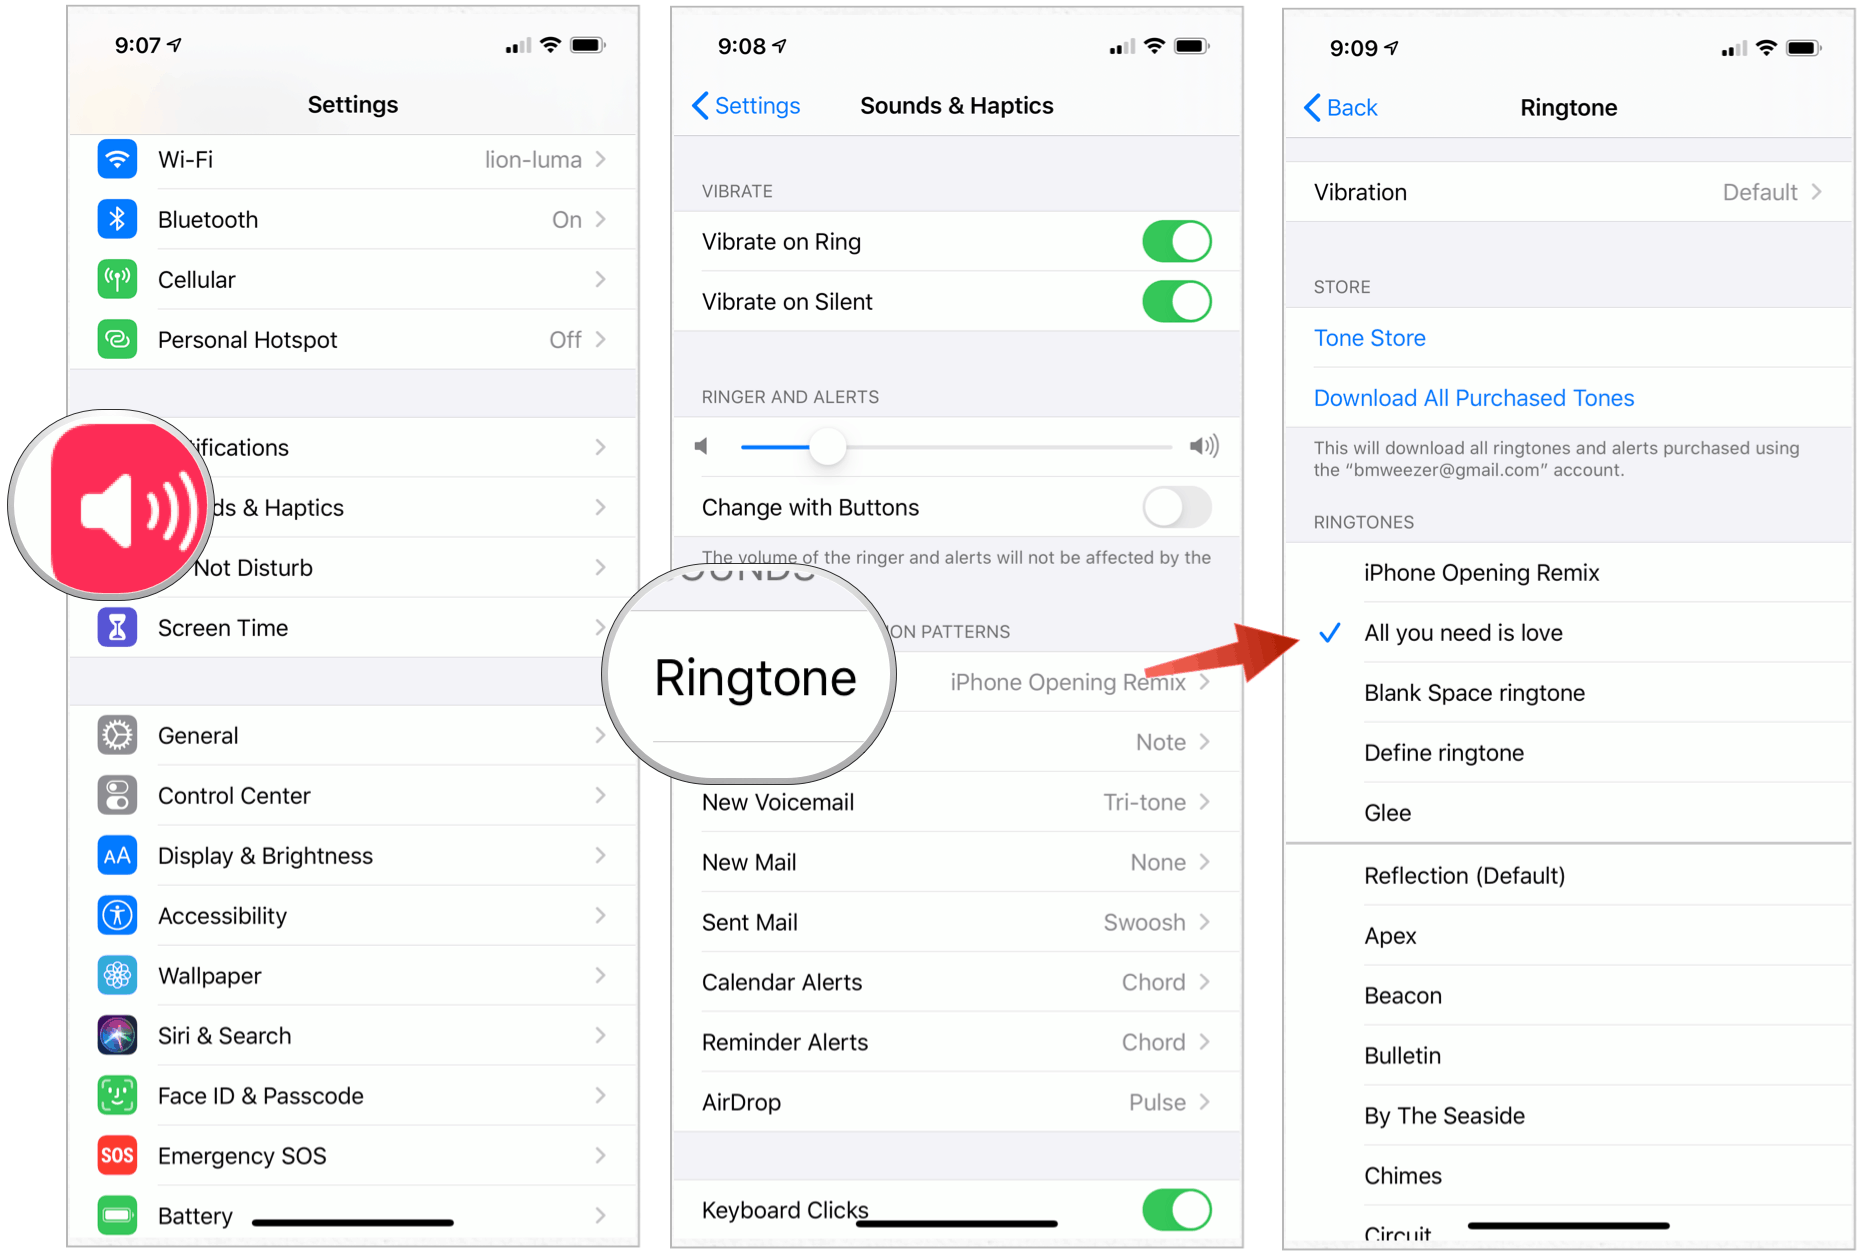
- Choose the Settings app on your iPhone.
- Tap Sounds & Haptics.
- Select Ringtone.
- Under Ringtones, select your newly created song as your default ringtone.
To assign the ringtone to individual calls only:
- Choose the Contacts app on the iPhone Home screen.
- Select your contact.
- Tap Edit at the top right of the display.
- Choose Ringtone.
- Select your custom ringtone.
- Tap Done.
- Choose Done again.
- Repeat Steps 1 through 7 to assign the ringtone to others on your Contacts list.

Creating Ringtones on your Mac
To create a new ringtone using the Music app on your macOS Catalina device:
- Click on the Music app on the Mac Dock.
- Search for the song you wish to use for your ringtone. You can search through Albums, Artists, Genres, Playlists, and Songs. You can only use downloaded iTunes music. Due to copyright, you can’t use Apple Music songs.
- Right-click on the downloaded song.
- Choose Get Info.
- Select Options.
- Check the boxes for Start and Stop time, then choose the start and stop points for your ringtone. These shouldn’t exceed 30 seconds. Listen to the song to find the part of the song you like the most.
- Click OK.

Next:
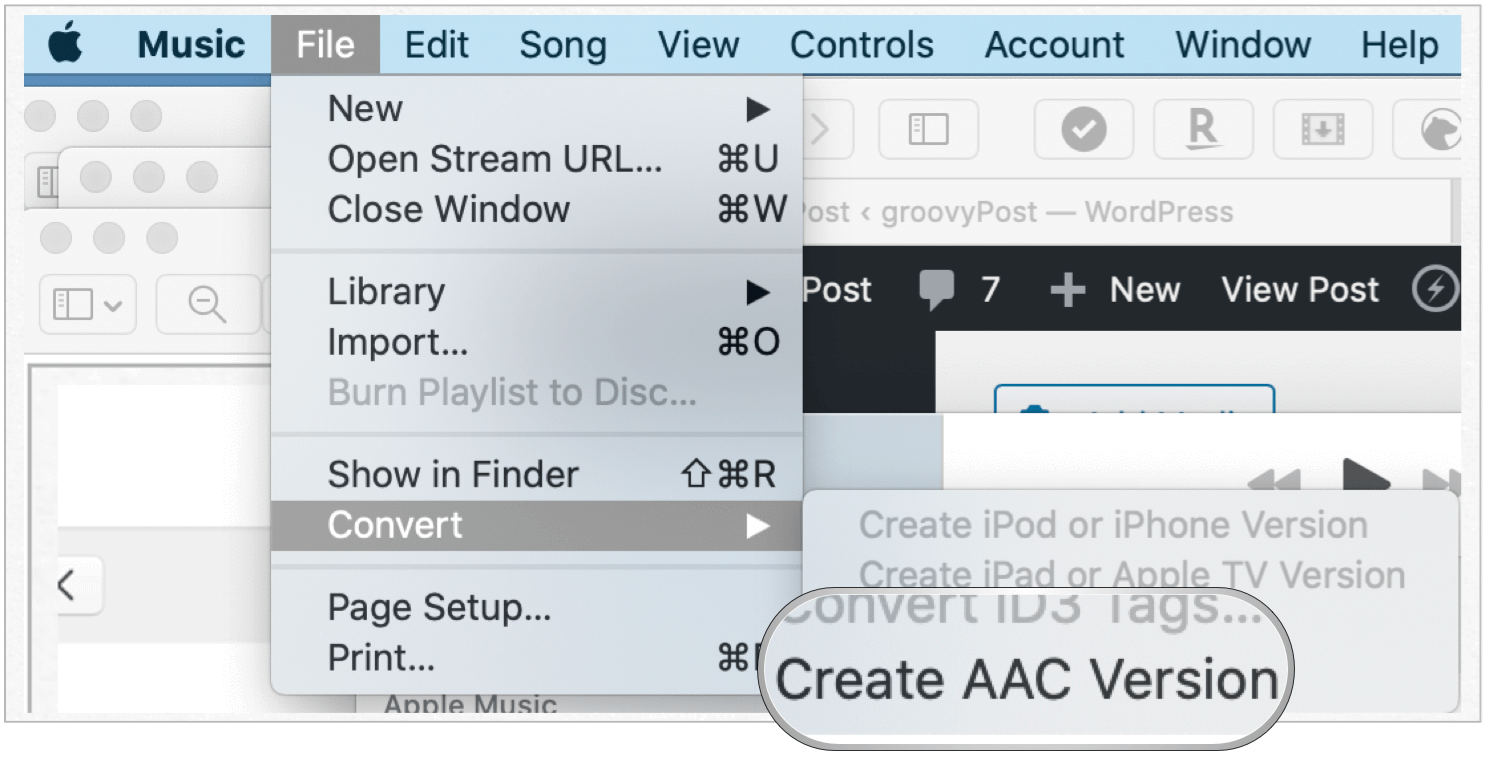
- Highlight the song you just changed in the Music app.
- Click File on the Mac Toolbar.
- Choose Convert > Create AAC version.
From here:
- On the original file, go back and remove the start and stop time.
- Drag the newly created AAC version of the song to the desktop.
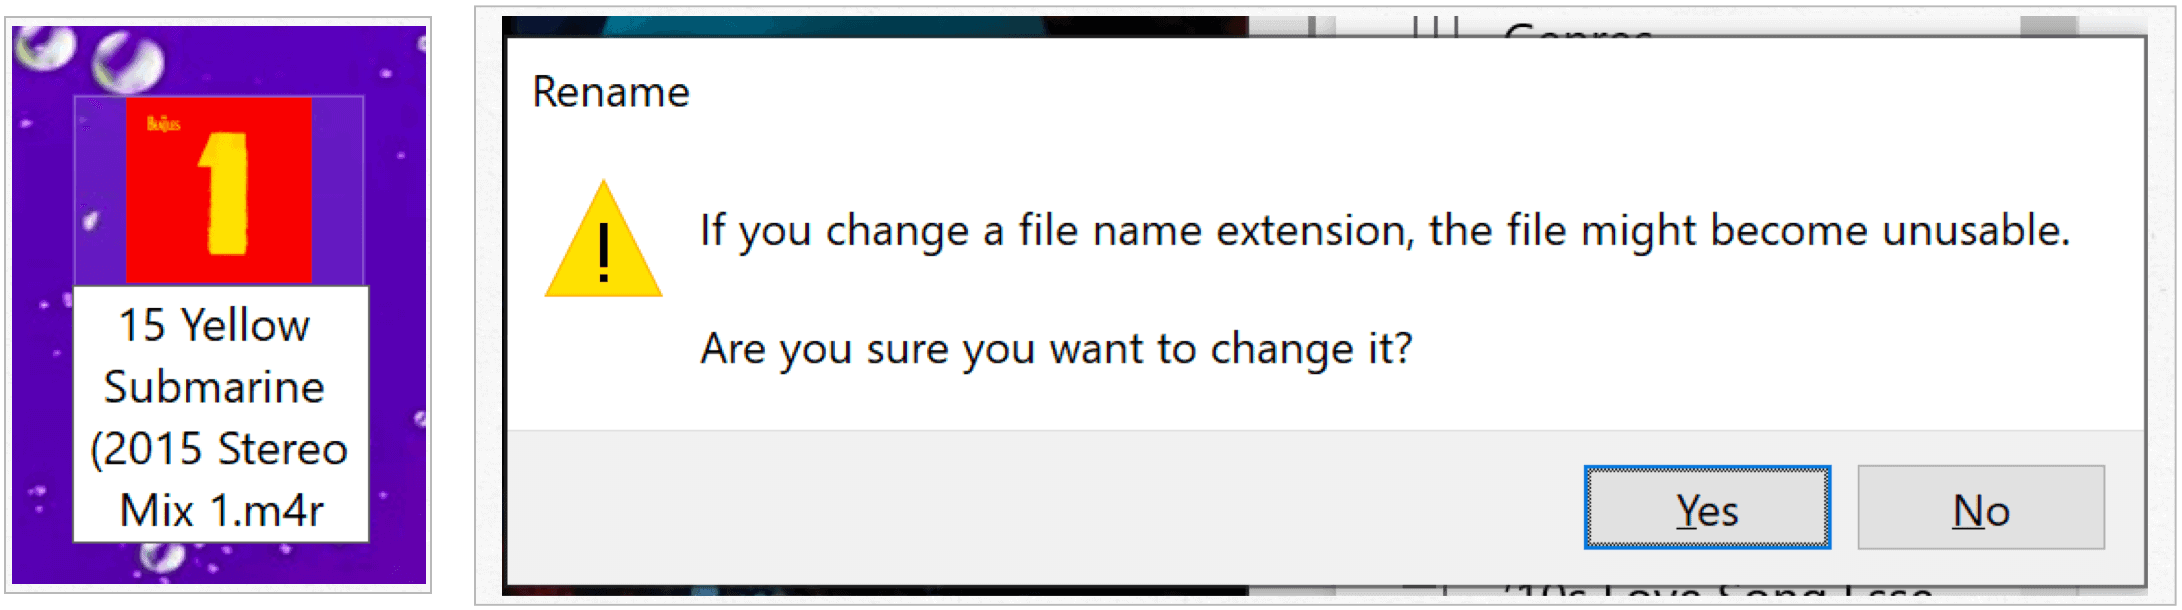
- Right-click on the AAC file that’s on your desktop, then click Rename. The record currently has a .m4a extension, which must be changed to .m4r.
- Change the name of the file to reflect the .m4r extension.
- Confirm the change in the pop-up box.

Saving to Your iPhone
The final step is to send y0ur newly created ringtone to your iPhone. To do so:
- Use a cable to connect your iPhone to your Mac. If this is the first time you have done this, you’ll be asked to Trust the connection. Do so.
- Click Finder on your Mac.
- Choose your phone under Locations.
- Drag the ringtone file into the sync window of your iPhone.
Your file should now be available as a ringtone option on your phone. You don’t have to sync your iPhone with your Mac for this to happen.
Using Your New Ringtone
- Choose the Settings app on your iPhone.
- Tap Sounds & Haptics.
- Select Ringtone.
- Under Ringtones, select your newly created song as your default ringtone.

To assign the ringtone to individual calls only:
- Choose the Contacts app on the iPhone Home screen.
- Select your contact.
- Tap Edit at the top right.
- Choose Ringtone.
- Select your custom ringtone.
- Tap Done.
- Choose Done again.
- Repeat Steps 1 through 7 to assign the ringtone to others on your Contacts list.
Creating Ringtones on your Windows 10 computer
You can also create ringtones on your Windows 10 machine. The steps to do so are very similar to the ones explained above for Mac users. However, because Windows still uses an iTunes app, that’s the app to use for creating new ringtones. The same basic rule applies, however. You can only use downloaded iTunes music. Due to copyright, you can’t use Apple Music songs.
- Click on the iTunes app on your computer.
- Find the song to use for your ringtone.
- Right-click on that song, choose Song Info.
- Select Options.
- Check the boxes for Start and Stop time, then choose the start and stop points for your ringtone. These shouldn’t exceed 30 seconds. Listen to the song to find the part of the song you like the most.
- Click OK.

Next:
- Highlight the song you just changed in the iTunes app.
- Click File on Toolbar.
- Choose Convert > Create AAC version.
- On the original file, go back and remove the start and stop time.
- Drag the newly created AAC version of the song to the desktop.
- Right-click on the AAC file that’s on your desktop, then click Rename. The record currently has a .m4a extension, which must be changed to .m4r. Make sure you can see file extensions in Windows.
- Change the name of the file to reflect the .m4r extension.
- Confirm the change in the pop-up box.
- Double-click on the file and open it with iTunes. Without this step, Windows doesn’t know this is a ringtone.
Saving to Your iPhone
The final step is to send y0ur newly created ringtone to your iPhone. To do so:
- Use a cable to connect your iPhone to your Windows machine. If this is the first time you have done this, you’ll be asked to Trust the connection. Do so.
- Right-click on the ringtone that’s on your desktop, select Copy.
- Click on the iPhone icon in iTunes, click on Tones on the left side of the screen.
- Go Edit-Paste on the iTunes Toolbar.
Your file should now be available as a ringtone option on your phone. You don’t have to sync your iPhone with your computer for this to happen.

Using Your New Ringtone
- Choose the Settings app on your iPhone.
- Tap Sounds & Haptics.
- Select Ringtone.
- Under Ringtones, select your newly created song as your default ringtone.

To assign the ringtone to individual calls only:
- Choose the Contacts app on the iPhone Home screen.
- Select your contact.
- Tap Edit at the top right.
- Choose Ringtone.
- Select your custom ringtone.
- Tap Done.
- Choose Done again.
- Repeat Steps 1 through 7 to assign the ringtone to others on your Contacts list.
Summary
As you can see, the easiest way to create custom ringtones for your iPhone is to use GarageBand on your device. You can also use your Mac or Windows by following a few extra steps.