
When editing videos in Adobe Premiere Pro, sometimes there’s footage that you may need or want to alter in some way. Maybe you want to only show a certain portion of the footage, add an effect, or do any number of changes to fit what you feel your video needs.
Cropping, rotating and resizing videos are some of the more common changes you may make while video editing in Adobe Premiere Pro. However, if you’re a beginner at video editing with Premiere, you might not know how to do these things yet, which can be frustrating.
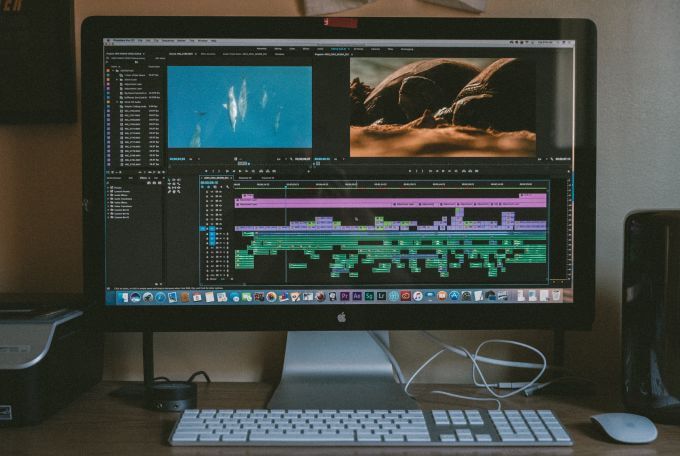
Premiere makes these processes very simple, so follow these steps to quickly become a pro at cropping, rotating and resizing your videos.
How to Crop Videos in Premiere Pro
Cropping a video is a little different than cropping a picture, but you can still do it in Premiere. You’ll be utilizing an effect that Premiere has in order to do so. Follow these steps to crop your video clip.
- Have the video you want cropped dragged onto your timeline.
- Go into the Effects panel, and search for Crop. It should show up under Transform. Click and drag it onto the video you want to crop.
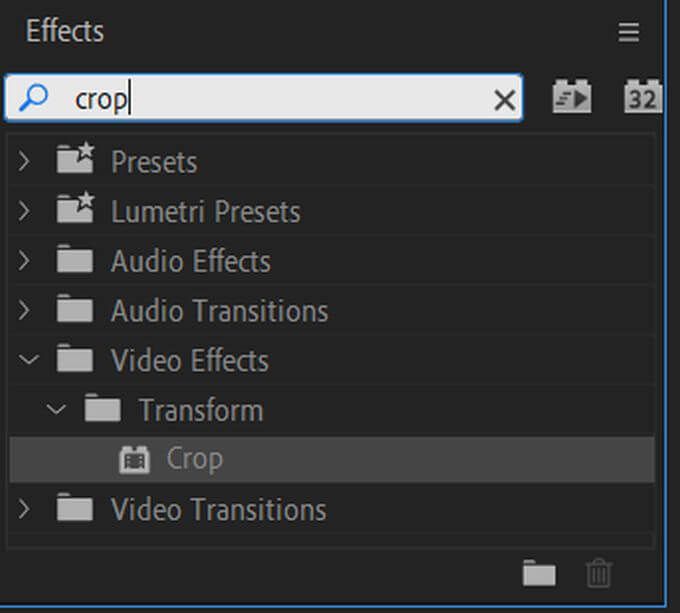
- Now, go into your Effect Controls. Find the Crop effect listed and look within the dropdown. You’ll see options for Left, Right, Top, and Bottom. You can drag the number values beside these to crop your video.
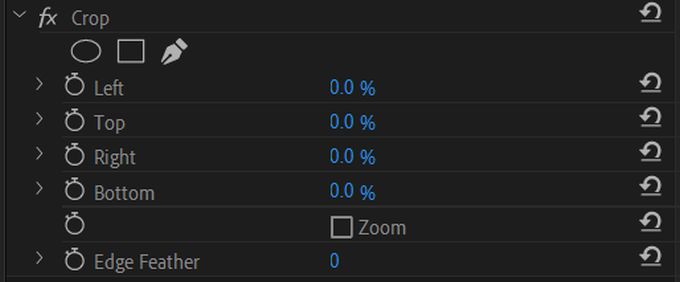
- You can also zoom your video in here to fill the screen if you wish by selecting Zoom. When you move the values when Zoom is selected, your video will fill the screen to your desired amount.
If you don’t want to use the numerical values, you can also crop by highlighting the crop effect, and a square with toggle bars should show up around your video in the preview window. You can use these bars to then crop the video.
If you want your video to fade into the crop, you can select Edge Feather and use the numerical value to change the intensity of the gradient.
How to Rotate Videos in Adobe Premiere Pro
Rotating a video can create some interesting effects in your end result. This is also a very easy effect to achieve. Here’s how to rotate your video within Adobe Premiere Pro.
- Go to the Effects Control panel, and click on the Motion dropdown section.
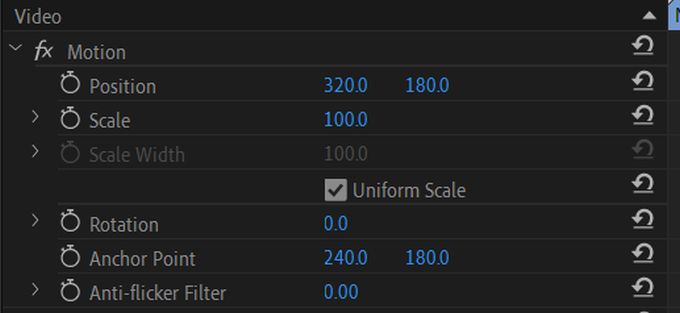
- You should then see the Rotation option listed here. Using the numerical value beside it, you can change the amount of rotation on your video. Dragging it right will rotate your video clockwise, and vice-versa.

- If you want to just flip your video in a certain direction, 90 will rotate it on its right side, 180 will flip it upside-down, and -90 will flip it to its left side.
Using this method allows you to rotate your video no matter how you have it set otherwise or what effects you have on it.
How to Resize Videos in Adobe Premiere Pro
Resizing a video is a good option if the video you’ve added doesn’t fit the size of your overall project. Those black bars that appear around these smaller videos can be annoying, so you may want to size them to fit. Here’s how to do that in Premiere in some different ways.
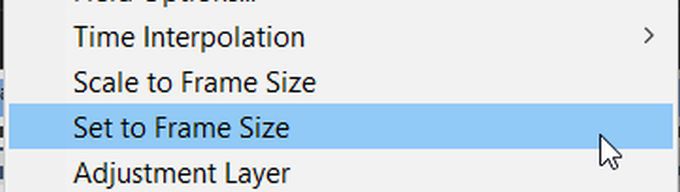
Set to Frame Size
This method is best if you have a lot of clips that don’t fit the sequence size settings.
- Find the video in your timeline that you want to fit to the frame size.
- Right-click on this clip and select Set to Frame Size. The clip should now fit the size of your sequence settings.
Scale to Frame Size
When Premiere scales your clip to the frame size, it manipulates the pixels in a way to fit the video to your sequence settings while also making it easy to process. This can sacrifice the quality of your video, however, but if you want a quicker processing time you can do it this way.
- Find the video in your timeline you want to scale.
- Right-click and select Scale to Frame Size. You should see your clip now scaled to the sequence settings.
Manual Scale
If you want to resize your video clip manually to achieve something other than setting it to the same sequence settings, there’s also an easy way to do this.
- Go into your Effect Controls panel and look under Motion. You should see an option called Scale.

- Next to Scale there is a numerical value you can change in order to set the size of your clip within the frame. By default, it’s set to 100, by you can make it as big as you wish or have it disappear entirely.
For any value that you change, you can always click the arrow icon next to the values to reset them back to default.
Cropping, Rotating and Resizing in Premiere
Using these methods above, you can easily make the needed changes to your video clips. It might seem confusing at first, especially if you’re brand new to video editing and Adobe Premiere, but over time you won’t have to think twice about these tasks.
If you feel like you’ve got the hang of it, you can also try animating these effects using keyframes to create all sorts of different visuals. The possibilities are endless when it comes to creating and manipulating effects in Adobe Premiere Pro.