

The caps lock key is a remnant of typewriters dating from the nineteenth century. Unless you’re in the accounting department, it’s probably not very useful, so today we’ll learn how to disable it, or remap it to something else that’s more useful.
A lot of people tend to use Caps Lock like a Shift key, so an easy method that some people prefer is to swap it with Shift—but a more interesting idea is to remap it to the Ctrl key since it’s a lot easier to hit the Caps Lock key without moving your typing hand position from the home row than it is to hit the regular Ctrl key.
Did you know you can also disable or remap Caps Lock on your iPad, Mac, or even your Chromebook?
How To Disable or Remap the Caps Lock Key in Windows Using PowerToys
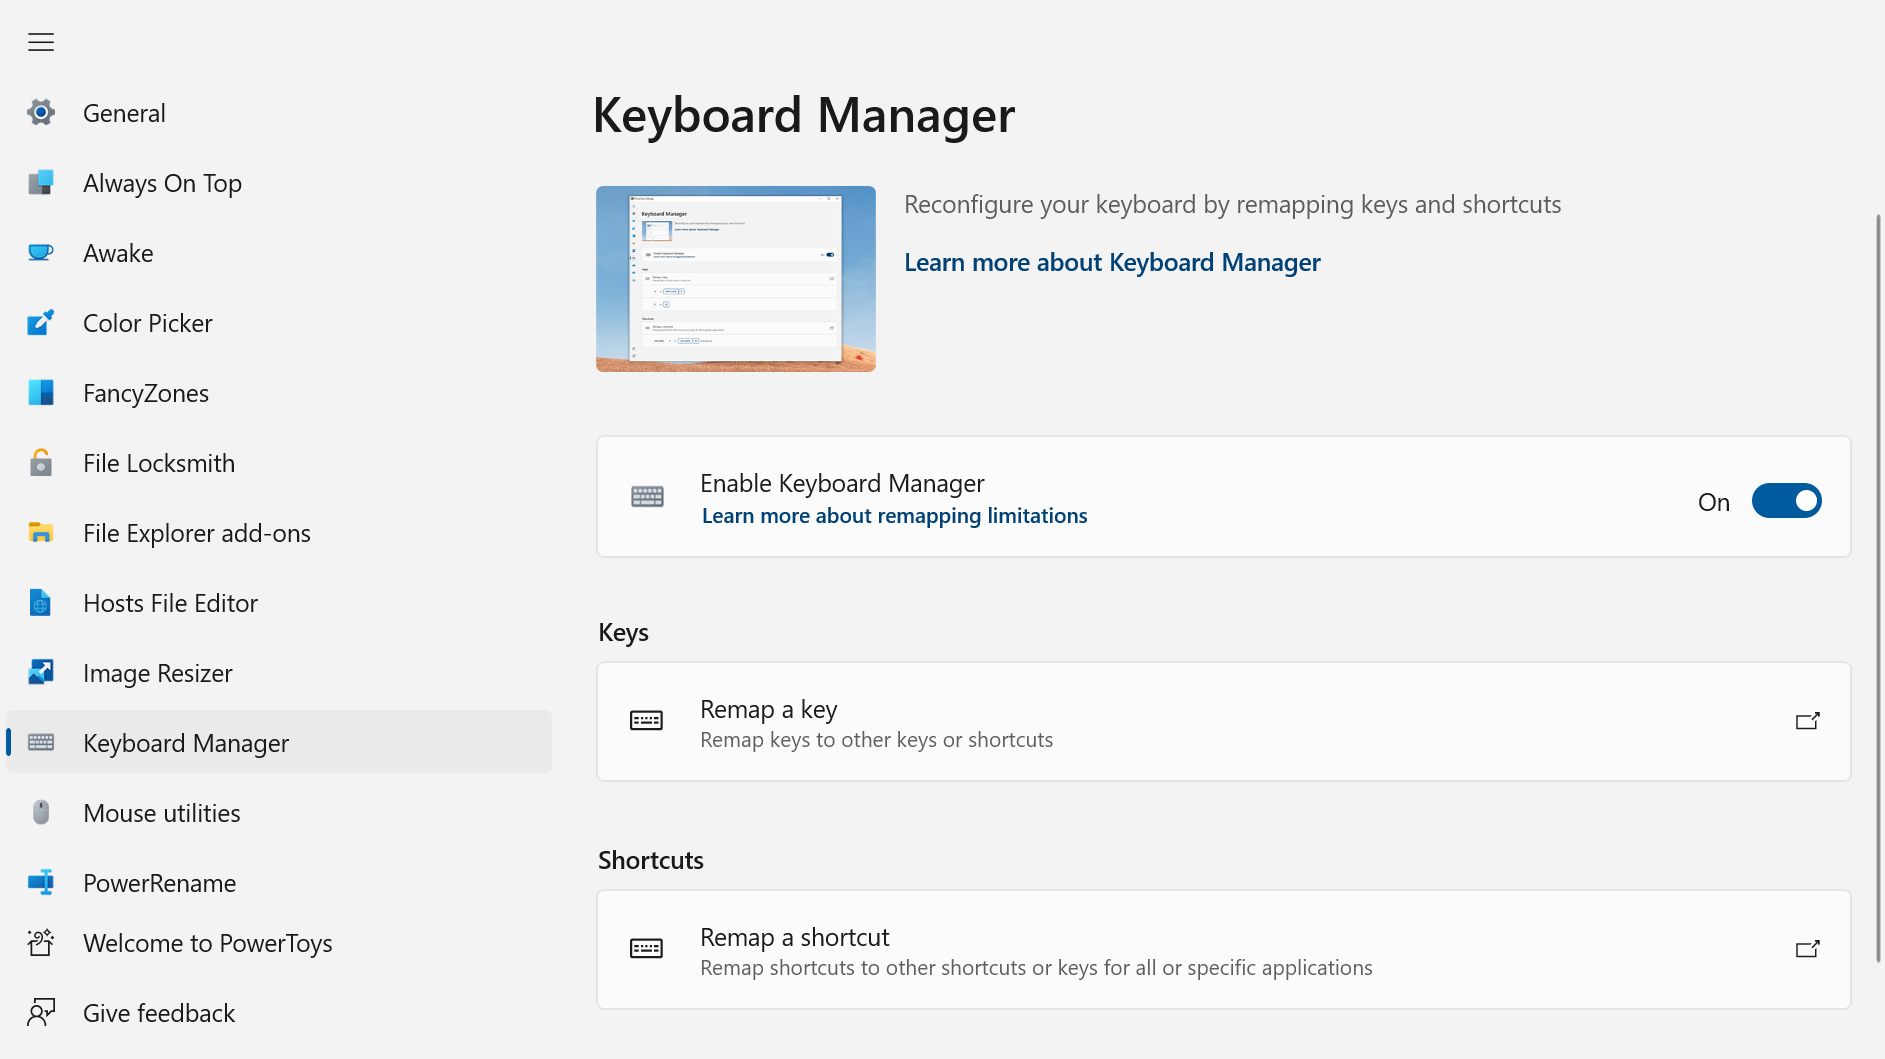
The easiest way to change the Caps Lock key is by downloading Microsoft’s PowerToys and using the built-in Keyboard Remapper to remap the Caps Lock key to something else. First, you’ll need to have installed PowerToys from Github, and then open up PowerToys Settings via the Start Menu.
Once you’ve opened PowerToys Settings, head to Keyboard Manager, and then click the “Remap a key” button.
In the Remap keys dialog, you’ll want to click the “Type” button under “Physical Key”, and then press the key you want to remap—in this case you’ll press the Caps Lock key. Once you’ve pressed the key you want to remap, click the OK button.
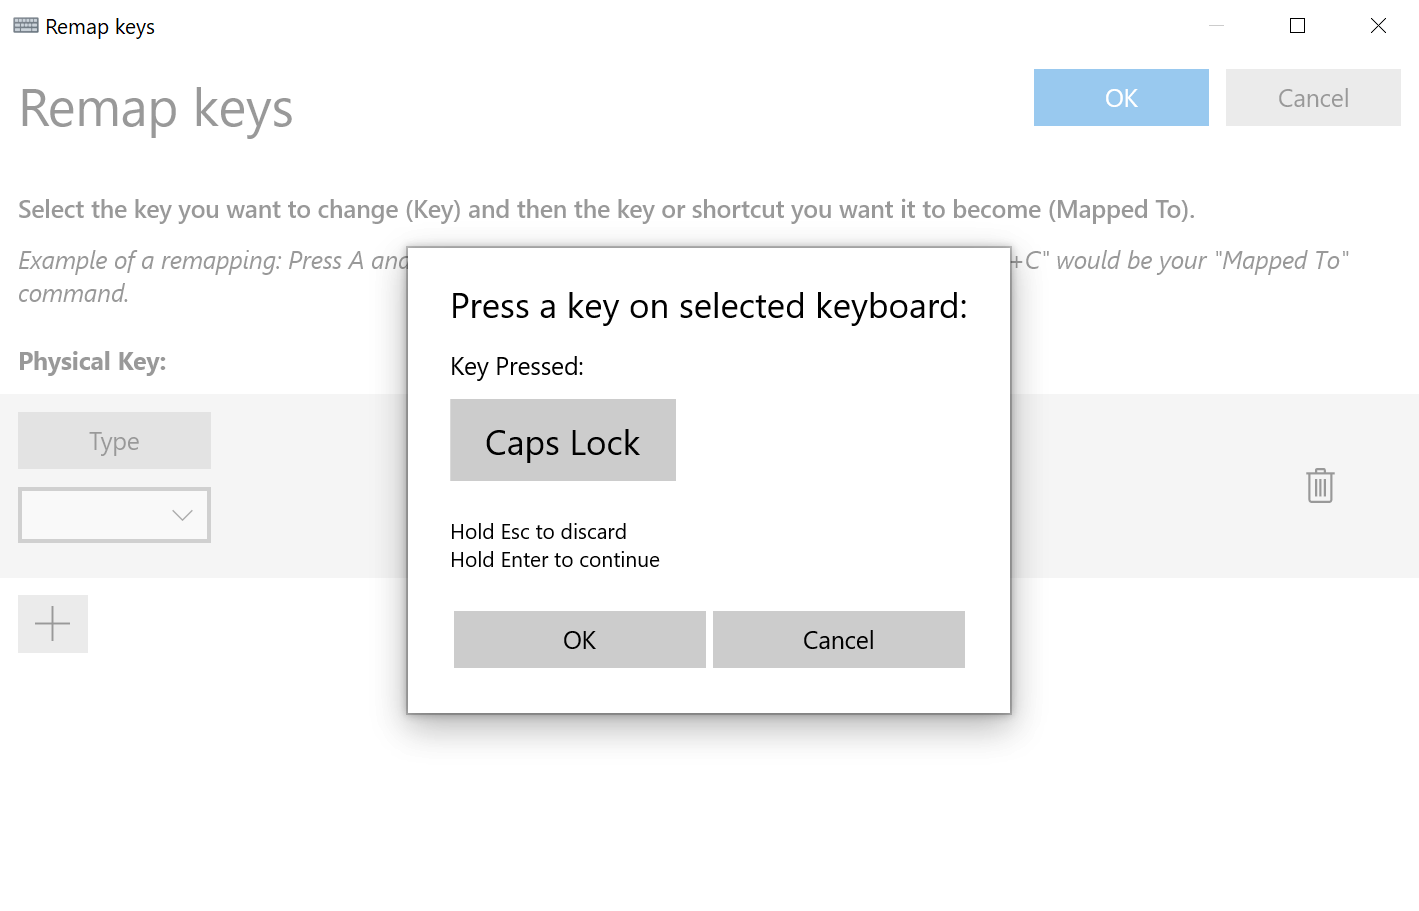
Now you’ll click the “Type” under “Mapped To” and then press another key that you’d like to convert Caps Lock into—in this case we’re going to turn it into a Ctrl button, but you could use it for Shift or any other key you’d like to turn it into. Once you’re done click, OK, and then click OK again to close out of the settings.

As long as PowerToys is running on your system, the Caps Lock key will be remapped to the alternative key that you chose. It’s worth checking out all the other features in PowerToys, because it’s well worth running for any system tweaker.
This does mean, however, that if PowerToys closes, the Caps Lock key will return. It also means that it won’t be disabled on the Login screen, which might be very annoying if you’re the kind of person like me who constantly types your password with the Caps lock on by accident. The solution? Use SharpKeys instead, which we detail below.
How to Disable or Remap Caps Lock Using SharpKeys
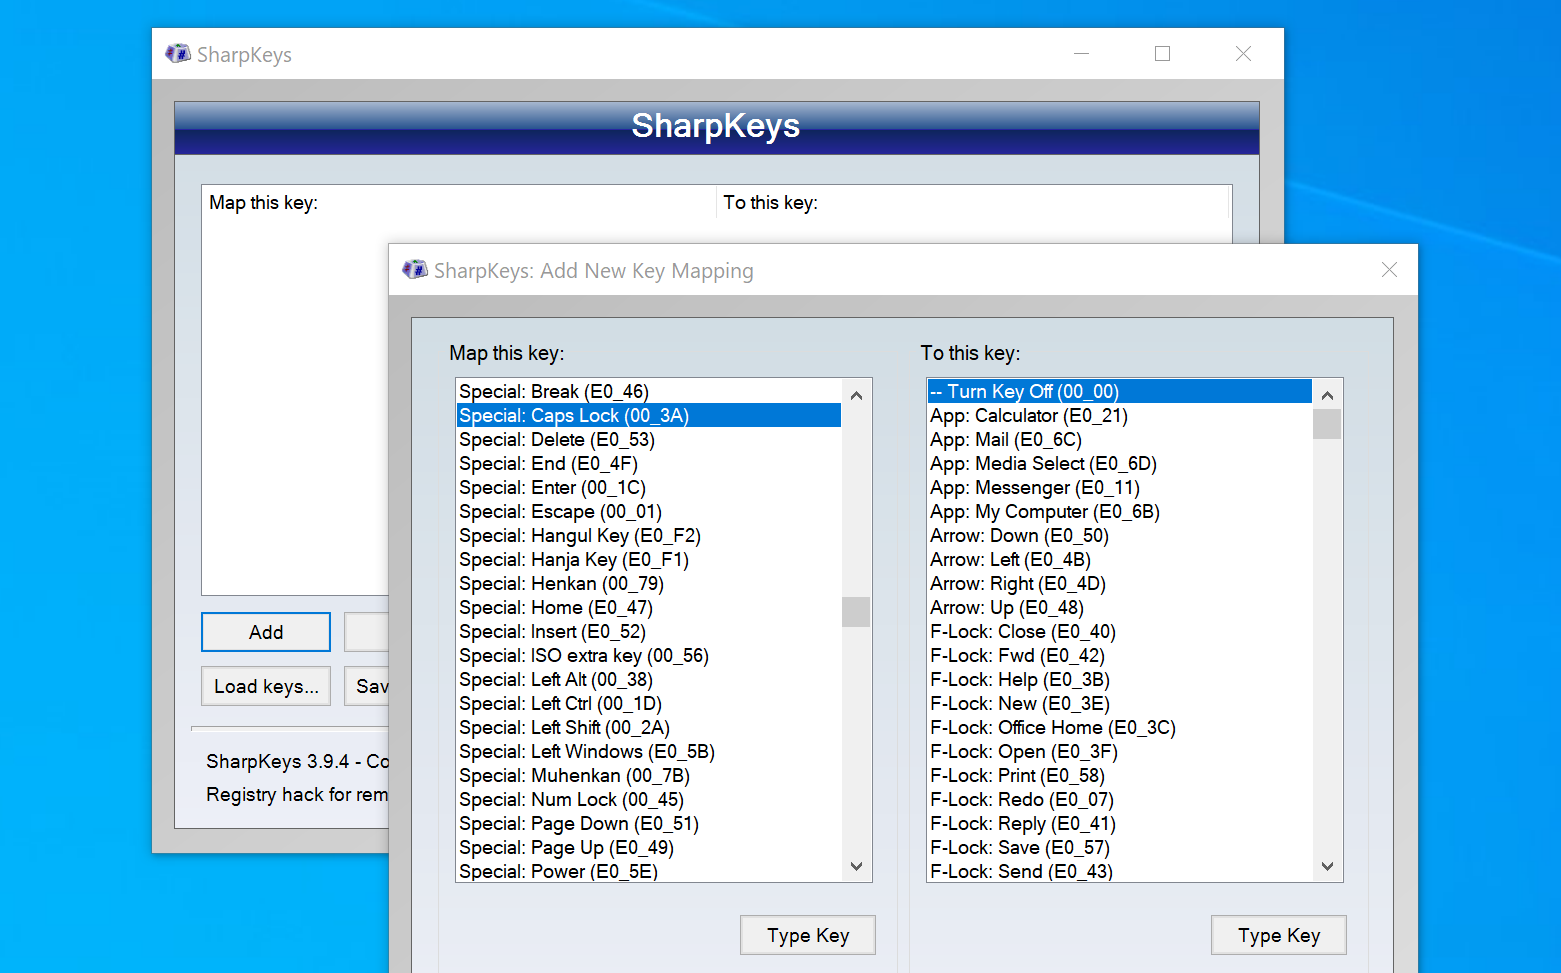
An excellent solution for remapping keys on any version of Windows is Randy’s SharpKeys, which can be downloaded from the Microsoft Store for Windows 10 or 11, or from the project’s Github page for older versions of Windows.
The benefit to SharpKeys over PowerToys? You can remap keys however you like, and they will stay remapped or disabled even if you delete the SharpKeys app entirely—you don’t need any software running in the background.
Once you’ve downloaded and installed SharpKeys, and clicked through the Windows SmartScreen error messages to run it anyway, you can add a new mapping by clicking Add, selecting the key you want to remap (Caps Lock in this case) and then selecting “Turn Key Off” to disable it entirely, or selecting a new key to remap it to. Click OK, reboot your PC, and you’re done.
The one downside to SharpKeys vs the PowerToys utility is that you can’t remap a key combination—using PowerToys you could remap ALT+C to CTRL+C, for example. You can’t do that with SharpKeys.
Under the Hood: How Windows Key Re-Mapping Works
Windows doesn’t have a default setting to allow for disabling the key, so what we have to do is re-map the key to something non-existent so as to completely disable it. To do this manually, you’d open up regedit.exe and browse down to the following key:
HKEY_LOCAL_MACHINESYSTEMCurrentControlSetControlKeyboard Layout

Here’s the format of the binary data in the Scancode Map key, with the important parts in bold and various colors:
00000000 00000000 02000000 00003A00 00000000
Here’s how it works:
- The first 16 zeros are just there to waste space.
- The “02” in bold represents how many keys you are going to re-map plus 1. (It really represents the length of the data, but whatever)
- The orange bolded “0000” is the key we actually want Windows to map TO, which in this case is nothing, or 0.
- The blue bolded “3A00” is the key we are mapping from, in this case the caps lock key.
- The next 8 zeros are there to waste space as the null terminator.
You can map between multiple keys by incrementing the “02” and then adding another of the colorful bold blocks in the middle. The 3A00 in the mix is the scan code. For example, if you wanted to disable the caps lock key and then change scroll lock into a caps lock key:
00000000 00000000 03000000 00003A00 3A004600 00000000
It might seem complicated, but it’s really fairly simple once you start working with it.
Downloadable Registry Hack to Disable or Remap the Caps Lock Key
Now that you’ve learned how these things work internally, you can download and extract the zipfile which contains the following files:
| ChangeCapsToControl.reg | Changes Caps Lock to be a Control key |
| ChangeCapsToShift.reg | Changes Caps Lock to be a Shift key |
| SwitchCapsToScrollLock.reg | Disables Caps Lock and swaps Scroll lock to be Caps Lock |
| KillCapsLock.reg | Disables Caps Lock |
| DisableKeyboardRemap | Uninstalls the preference by deleting the key |
Once you’ve applied one of these registry files, you’ll have to reboot your computer for it to work. To uninstall, you can use the uninstall registry tweak, or you can simply delete the Scancode Map key entirely.
Warning: It’s worth noting that registry hacks can cause problems with your system, and if you have an application that’s already done some keyboard remapping it’s possible that applying these registry hacks could break something. Use with caution.