

For a clean install of Windows 11, follow these steps:
- Download the Media Creation Tool from Microsoft’s website.
- Run mediacreationtool.exe and choose the language and edition you want.
- Select the “USB Flash Drive” option and let it write Windows 11 to an 8GB or larger drive.
- Enter the BIOS on the target PC and change the boot order so Removable Devices comes first.
- Boot with the flash drive connected and follow the Windows 11 setup prompts.
Knowing how to perform a clean install of Windows 11 is useful in a number of situations, not least for avoiding potential errors and conflicts when upgrading from an older version of the OS. It can even breathe new life into a PC plagued by crashes or manufacturer bloatware.
There are several methods available for a clean install of Windows 11, but not all are suitable for every situation. The clean install methods below should cover most, if not all, possible starting points. Of these, creating bootable media on a USB flash drive is the most complicated, but also the one most likely to work for many different setups.
Preparing Your PC for a Clean Install of Windows 11
If you are suitably prepared and have everything you need readily at hand, performing a clean install of Windows 11 is usually stress-free. The whole process has gradually been streamlined over the years, so even if you have never previously installed a Windows OS, problems should be minimal.
Check PC Compatibility
With Windows 11, Microsoft imposed some fairly strict minimum specifications for the devices it can be installed on. This has resulted in many older computers being blocked from accessing the update.
You can use the free PC Health app to check if your PC is compatible with Windows 11. The app was included with the KB5005463 update for Windows 10 in May 2022, so you might be able to find it in the Start Menu. If not, you can download it from the PC Health Check page.

The app is easy to use, but if you need help, our guide to checking if your PC can run Windows 11 explains it in detail. The most common issue you’ll run into, which is usually easy to fix, is TPM 2.0 and Secure Boot not being enabled.
Backup Your Files
If there is one rule more PC users should follow, it is: always back up. And if you don’t perform a full backup regularly, at least ensure you protect your essential files before any major update or system change. And that obviously includes before a clean install of Windows 11.
A cloud storage vault can be your friend here, but copying everything you want to save to a removable USB flash drive will also work. When your important files are safely saved elsewhere, you are ready to choose a clean install method for Windows 11.
Option 1: Clean Install Windows 11 From a USB Drive
Installing Windows 11 from a removable USB drive is the best method if you have a newly built PC or one which doesn’t have a usable operating system (OS) installed. It can also be used to install Windows 11 on a PC that is already up and running with the OS.
You may need access to another computer to create the bootable media on the USB drive (if no usable OS is present) and be able to access the BIOS to change the boot device order.
Creating Windows 11 Bootable Media
There are several methods for creating bootable media on a USB drive, including the Microsoft Media Creation Tool, Rufus, and, if you like to make things complicated, Command Prompt. Here we’ll be using the Media Creation Tool.
Download the tool from the Microsoft website. You’ll find it under the “Create Windows 11 Installation Media” heading. After downloading, go to your downloads folder and double-click the “mediacreationtool.exe” file to open it. Accept the license agreement when prompted, assuming you agree to the terms.

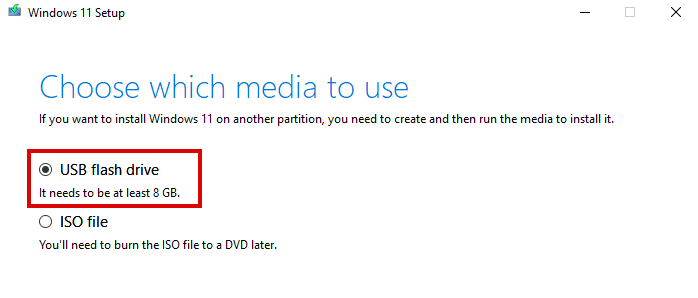
Choose the language and Windows edition you want to use. On the media choice screen, choose “USB Flash Drive.” Insert a blank flash drive with at least 8GB capacity into the USB port on your PC, and click “Next.”
Select your flash drive from the list and click “Next.” Wait for the tool to download Windows 11 and finish the setup of the bootable media.
Booting From the USB Drive
Before inserting the bootable media, you need to edit the BIOS settings to make your computer boot from the USB rather than the OS partition. This might not be necessary with a newly built PC because the USB should be the only bootable device found.
You can access the BIOS by pressing a specific key during boot, commonly F1, F2, or F10. Check your PC or motherboard manufacturer’s website if none of those work.
In the BIOS settings, navigate to the “Boot settings” to find the boot priority or boot order list. You might have to look in “Advanced Options” if you can’t see a dedicated boot setting menu.
Select “Removable Devices” in the list and move it to the top position. This will make your PC attempt to boot from the USB drive before the hard drive.
Save the changes and exit. You can then shut down your PC, insert your USB drive into an available USB port, and restart. Press any key when prompted, and your computer will boot into the Windows 11 setup tool.
Note: Remember to reverse this change to BIOS when the clean install of Windows 11 is complete. If you don’t, your PC will try to boot from any USB drive inserted when it starts up.
Installing Windows 11 From the USB Drive
Select your preferred geographical settings for language, currency/time, and keyboard layout. Click “Next” and then click “Install Now.”

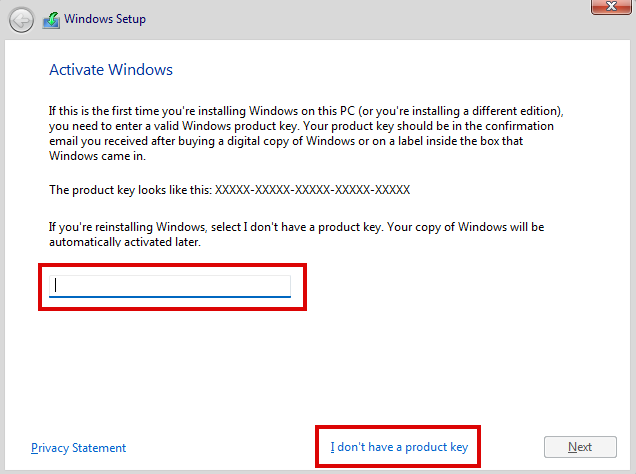
If this is a completely new installation of Windows 11 you’ll need to activate your software by entering a valid product key. If you are installing over a previously activated copy of Windows 11, click “I don’t have a product key.” Reactivation will be taken care of automatically once the installation is complete.
Select the version of Windows 11 you want to install from a list containing Home, Pro, Education, and Enterprise. Click Next and accept the license agreement.
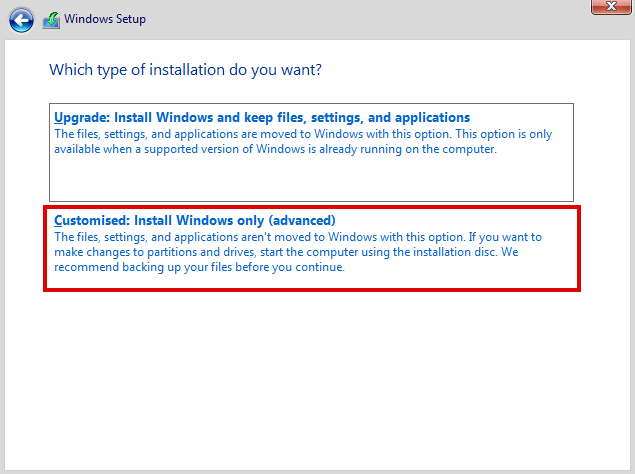
On the next screen choose the “Custom: Install Windows only (advanced)” option. This installs Windows 11 only, ignoring files, settings, and apps, which is what you need for a truly clean install.
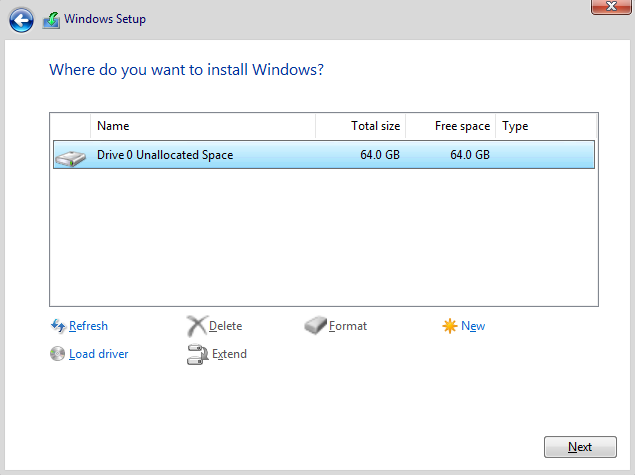
Finally, choose where you want Windows 11 to be installed. Windows files are most commonly installed in Drive 0 Unallocated Space. If your hard drive contains multiple partitions, you will see them all listed here. Delete any you no longer need before choosing the installation location.
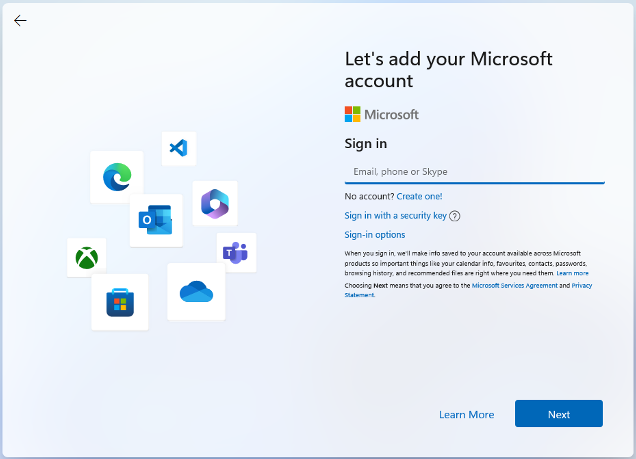
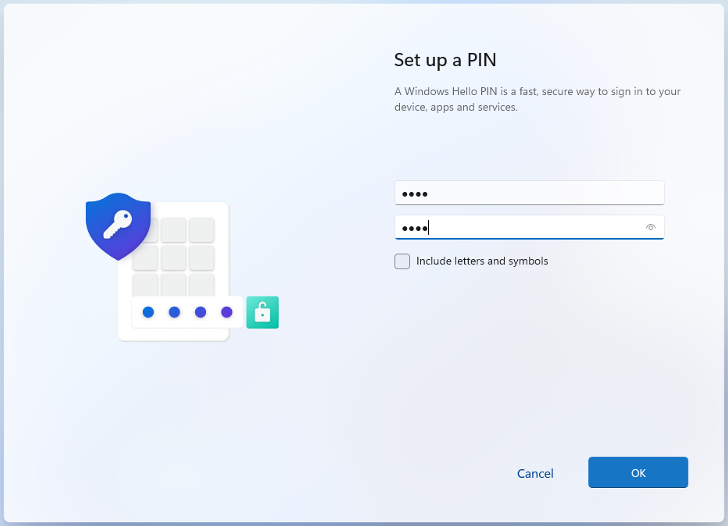
The installation will now begin. After the system files have been installed, you’ll have to go through the Out-of-the-box Experience (OOBE) to choose things like device name, language, and login options. You’ll also need to sign in to your Microsoft account (though it’s sometimes possible to bypass the account login).
Once this is done, you should be up and running with a clean and fresh install of Windows 11.
Option 2: Clean Install Windows 11 Using an ISO File
If you already have Windows 10 or 11 installed and working on your computer, using the ISO file can be a better alternative to installing it from a USB drive. It avoids the necessity of creating bootable media on a USB, and you won’t have to change the boot order in the BIOS.
This method can be used on a computer running Windows 7 or 8/8.1 because it is a clean install rather than an in-place upgrade. But you should double-check hardware compatibility, and take extra care to remove all apps and files to avoid possible software conflicts.
Downloading the Windows 11 ISO File
You can download the Windows 11 Disk Image (ISO) from the Microsoft website. On the site, use the drop-down menu to choose “Windows 11 (Multi-edition ISO)” and click “Download.” Select your desired language and click “Confirm.”
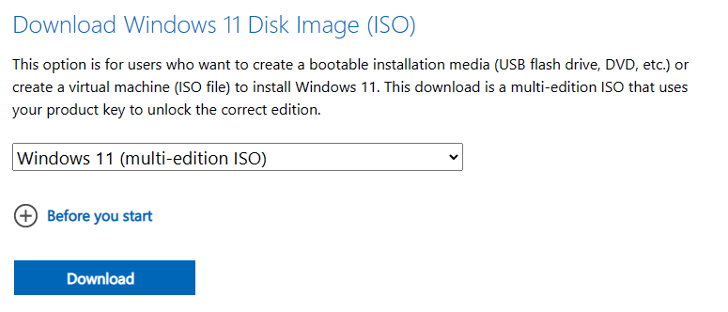
Click the “64-bit Download” button to begin downloading the ISO file. Although the ISO filesize varies between versions, it will be at least 4 to 5GB.
Installing Windows 11 From the ISO File
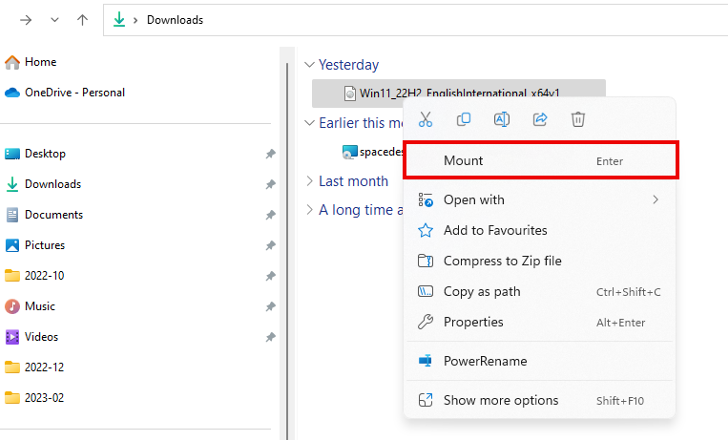
Open File Explorer and navigate to the download location of the ISO file. Right-click on the file and select “Mount” from the context menu.
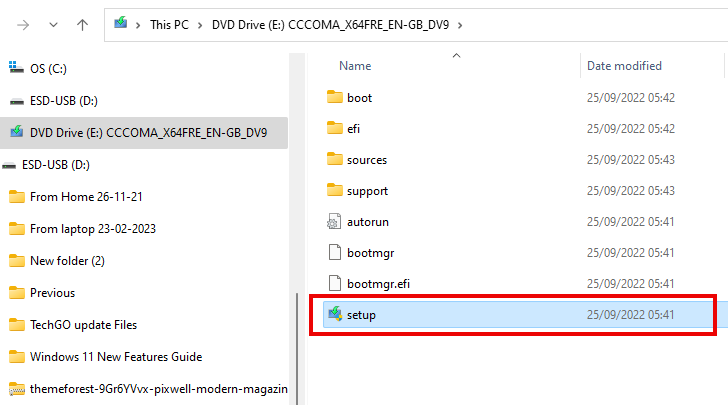
That will create a virtual drive for the disk image, which will appear in the navigation panel of File Explorer. Select the virtual drive and then double-click “Setup.exe” to begin the process.
By default, Windows 11 setup will go online to get updates, drivers, and some optional features. This can help the reinstall go more smoothly, but it will take longer. If you want to defer adding updates, etc., until after the OS is installed, click “Change how Setup downloads updates” and then select “Not right now.”

Follow the setup steps until you reach the Ready to Install screen. Here, click “Change what to keep” and select “Nothing.”

With that done, click “Next” and then “Install.” When the system files have been installed, you’ll see the Out-of-the-box Experience. Click through the various options screens, selecting the Windows 11 preferences you want.
Option 3: Clean Install Windows 11 Using Reset This PC
It’s also possible to initiate a fresh install of Windows 11 using the Reset This PC option, also known as a factory reset. This method differs from installing from a USB or ISO file, as it can only be used to cleanly reinstall Windows 11 on a PC already running the same OS. However, it is simpler than other solutions since all you need is the Settings menu.
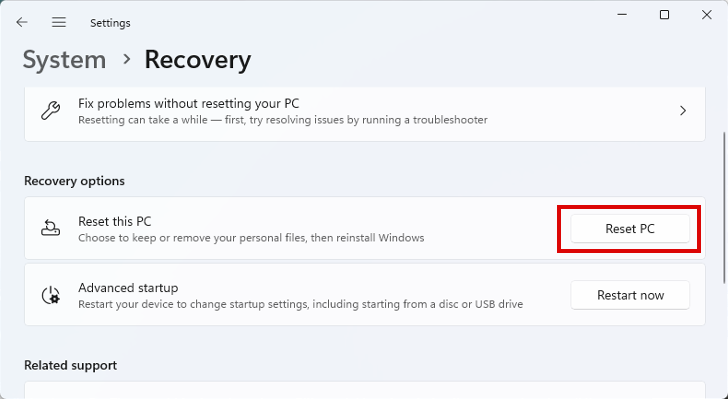
Navigate to Settings > System > Recovery, and look for the Recovery Options section. Click the “Reset PC” button to begin the reinstall process.
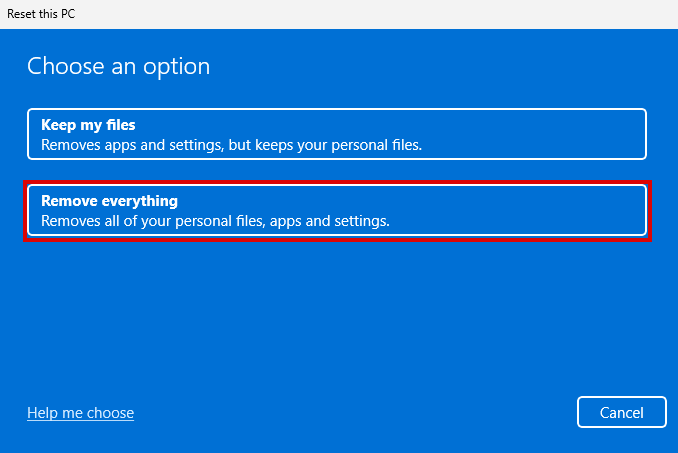
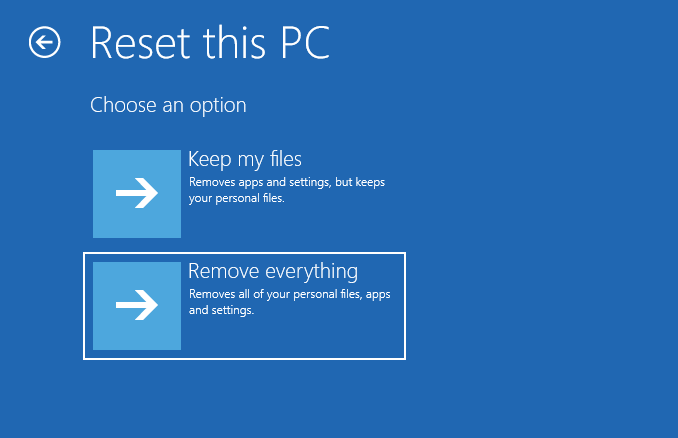
You now have the option to “Keep My Files,” but for a clean reinstall choose the second option, “Remove Everything.” This will delete any files, installed apps, and previously changed settings.
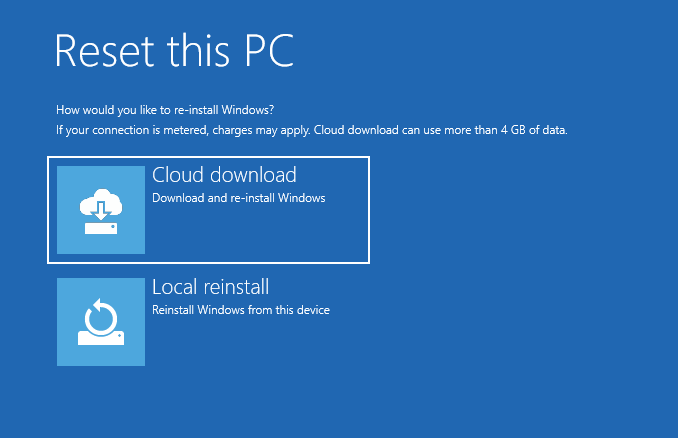
There are two options for reinstalling Windows 11 here. A Local Reinstall reuses the original Windows 11 installation files already on your computer. The Cloud Download will get the required installation files from the Microsoft servers. There are pros and cons to choosing each method.

Should You Use Local Reinstall?
Local Reinstall can be the most convenient choice, particularly if you have a slow Internet connection. It can still take a while, as it needs to find all the required files and reassemble them into a new Windows install.
If you are reinstalling Windows because you have experienced system errors, crashes, and BSODs, reusing the same files could just recycle the same problems and fail to fix the issues. The local reinstall might not even be possible if the existing files are corrupted in some way.
Should You Use Cloud Download?
Cloud Download is often the better choice if you have a good Internet connection. It helps to ensure a clean installation is performed. The installation files can be around 4GB, which is worth knowing if you have a metered connection.
The downside of choosing the Cloud options is that additional Microsoft software can be included. That shouldn’t be a deal-breaker for most people, but it can be frustrating that extras that you don’t want or need are added.
Get Ready to Reset
After choosing the option that is best for you, you’ll see a summary of the current reset settings. Below this is a link to Change Settings. Click this and change the settings as required.

- If “Clean Data” is enabled a more secure wipe of the drive will occur. This can take a long time but is useful when resetting a device you plan to sell or give away.
- If you enable “Download Windows,” the files will be downloaded from the Microsoft servers, even if you selected Local Reinstall in the previous step.
- If there is more than one hard drive in your computer, you should also see the option to “Delete files from all drives.” If you enable this, all installed drives will be wiped, not only the installation drive.

You can now click “Confirm” and wait for the reset process to complete. You will then see the Out-of-the-box Experience, where you can set up the various parameters of your clean install of Windows 11.
Option 4: Cleanly Reinstall Windows 11 From Advanced Startup
The Advanced Startup options are part of what is essentially a boot menu containing several restore, repair, and installation options. One of those options is a reset and clean install of the OS.
You can only use this method to cleanly install Windows 11 if you are already using Windows 11. Use one of the methods above if you are installing from an older version like Windows 7, 8, or 10.
Accessing Advanced Startup Options
You can access the Advanced Startup options, technically called the Windows Recovery Environment or WinRE, in several different ways in Windows 11.
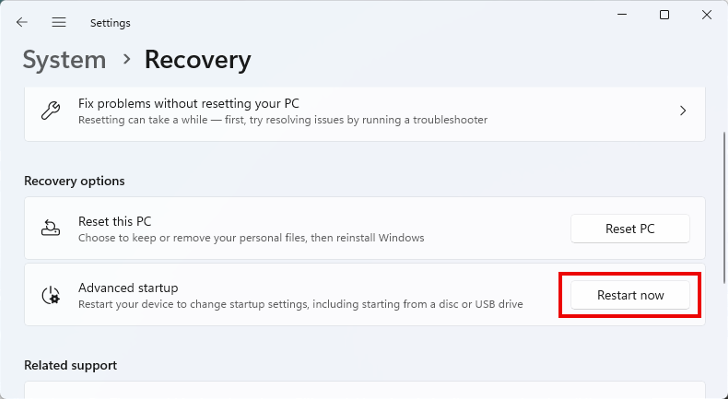
The easiest way to access the menu is through Settings > Recovery. Under the Recovery Options heading, click the “Restart Now” button next to Advanced Startup. Your PC should restart directly into the WinRE menu.
If you can’t access settings for any reason, you can force your PC to boot into WinRE. Shut down the PC and press the power button. As soon as you hear the POST beep, press the power button again to turn the PC off. Repeat this three times. After the third restart, your computer should boot into WinRE.
Reinstalling Windows 11 From Advanced Startup
Now that you’re in the Advanced Startup menu, you can begin the clean installation process.
Select the “Troubleshoot” option and then “Reset This PC.” You then have two options: “Keep My Files” or “Remove Everything.” As this is a clean install, choose the second option.
You’ll then be required to choose the location of the installation file. Choosing “Cloud Download” will grab the Windows 11 ISO from the Microsoft servers, and “Local Reinstall” will look for the necessary files on your computer.
If you have a fairly fast Internet connection, it can be better to choose Cloud Download. That is particularly true if you are performing a clean install to fix problems with Windows 11 system files.
Next, decide if you want all installed drives to be wiped or just the drive where the OS is installed. It isn’t usually necessary to wipe all drives if you will be using the PC after reinstalling Windows 11. You won’t see this step if your computer only has a single hard drive.
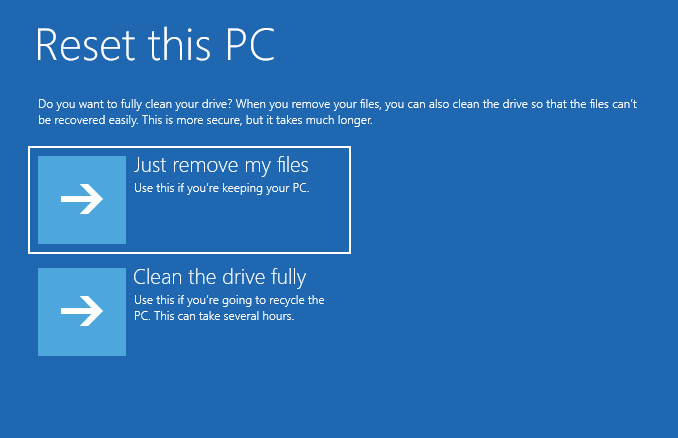
The penultimate step is to decide if you want to “Fully Clean the Drive.” This is the best option if you are planning to sell or give your PC to someone else after the clean install. If not, choosing “Just Remove my Files” will suffice.
Finally, click the “Reset” button and wait for the installation to complete. Be patient, it can take a while. As it’s a clean install, you’ll have to go through the Out-of-the-box Experience (OOBE) to set up the language, keyboard, layout, MS account, etc.