• Skip to main content
  • Skip to secondary menu
  • Skip to primary sidebar
  • Skip to footer
WebSetNet

WebSetNet

Technology News

  • Technology News
    • Mobile
    • Games
  • Internet Marketing
  • System Admin
    • Windows
    • Linux
    • Mac & Apple
    • Website Scripts
      • Wordpress

How to Enable Hardware-Accelerated GPU Scheduling in Windows 11

June 5, 2022 by Martin6

Windows 11 Logo

Windows 11 comes with an advanced setting, called hardware-accelerated GPU scheduling, which can boost gaming and video performance using your PC’s GPU. We’ll show you how to enable the feature and thereby potentially get a performance increase.

What Is Hardware-Accelerated GPU Scheduling?

Usually, your computer’s processor offloads some visual and graphics-intensive data to the GPU to render so that games, multimedia, and other apps run smoothly. The CPU gathers the frame data, assigns commands, and prioritizes them one by one so that the GPU can render the frame.

With the Hardware-Accelerated GPU Scheduling feature, the GPU’s scheduling processor and memory (VRAM) takes over the same work and runs it in batches to render the frames. In that way, your GPU relieves the processor from some work and reduces latency to potentially make your PC run better.

RELATED: How to Choose Which GPU a Game Uses on Windows 10

What You’ll Need to Make This Feature Work

While this feature debuted with Windows 10 May 2020 Update, it still comes disabled in Windows 11. Also, your computer needs to have an NVIDIA (GTX 1000 and later) or AMD (5600 series or later) graphics card with the latest graphics driver.

Unfortunately, there is not yet any specific hardware combination (CPU and GPU) known to eke out the best performance using the feature. So your mileage may vary with this feature depending on the CPU, GPU, and graphics drivers on your PC.

Here’s how you can enable it on your Windows 11 PC.

Enable Hardware-Accelerated GPU Scheduling in Windows 11

Before you begin, it’s a good idea to update the graphics drivers on your PC.

To get started, press Windows+i to open the “Settings” app. From the “System” section, select the “Display” option from the right-hand side.

From "System" select, choose "Display" on the right-hand side.

From the “Related Settings” section, select “Graphics.”

Select the "Graphics" option.

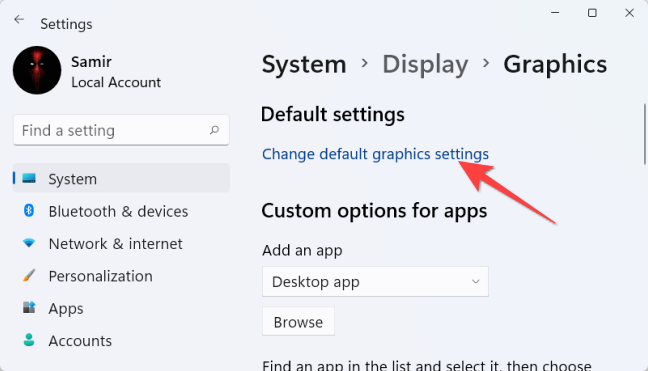
Choose “Change Default Graphics Settings.”
Then, toggle on the switch under “Hardware-Accelerated GPU Scheduling” and select “Yes” from the User Access Control prompt that shows up.
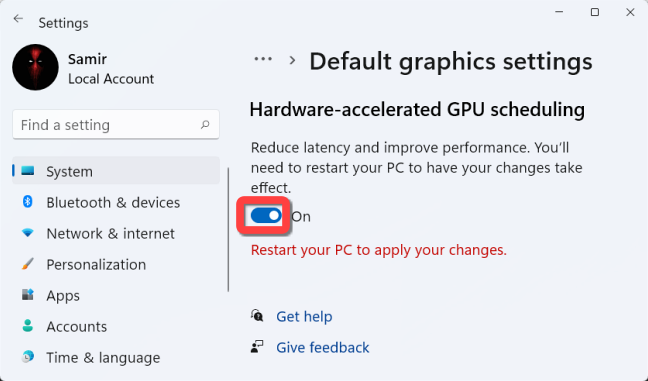
Toggle on to enable the "Hardware-Accelerated GPU Scheduling" feature.

After this, you can close the “Settings” app and restart your PC to apply the change.

Microsoft states that you may not witness any significant changes immediately. Howver, if this feature hinders your PC’s performance instead of improving, you can disable it.

For that, revisit Settings > System > Display > Graphics Settings > and click on “Change Default Graphics Settings.” Then, toggle off the switch under “Hardware-Accelerated GPU Scheduling” and select “Yes” from the User Access Control prompt.

Toggle off to disable the "Hardware-Accelerated GPU Scheduling" feature.

That’s it! You can check if it improves the games and apps experience on your Windows 11 PC.

Original Article

Related posts:

  1. Best Employee Scheduling Software
  2. Best Windows laptop in 2022
  3. The ultimate guide to fixing problems with the May 2020 Update
  4. These are the best graphics cards for gaming in 2022
  5. How to Enable Hardware-Accelerated GPU Scheduling in Windows 11
  6. Intel releases last Haswell IGP drivers for Windows 7 and 8
  7. Running out of storage? Try these tips to free up space on Windows 10
  8. Google Nest Thermostat tips and tricks: Get the most out of your learning thermostat
  9. AMD Ryzen 7 1800X CPU Review
  10. AMD Ryzen 5 2400G and Ryzen 3 2200G APU Review

Filed Under: Windows

Primary Sidebar

Trending

  • How to fix Windows Update Error 80244019
  • Windows 10 Update keeps failing with error 0x8007001f – 0x20006
  • How To Change Netflix Download Location In Windows 10
  • Troubleshoot Outlook “Not implemented” Unable to Send Email Error
  • How do I enable or disable Alt Gr key on Windows 10 keyboard
  • How To Install Android App APK on Samsung Tizen OS Device
  • 3 Ways To Open PST File Without Office Outlook In Windows 10
  • FIX: Windows Update error 0x800f0986
  • How to Retrieve Deleted Messages on Snapchat
  • Latest Samsung Galaxy Note 20 leak is a spec dump revealing key features
  • Install Android 7.0 Nougat ROM on Galaxy Core 2 SM-G355H
  • 192.168.1.1 Login, Admin Page, Username, Password | Wireless Router Settings
  • Websites to Watch Movies Online – 10+ Best Websites Without SignUp/Downloading
  • How to Backup SMS Messages on Your Android Smartphone
  • How to delete a blank page at the end of a Microsoft Word document
  • Fix: The Disc Image File Is Corrupted Error In Windows 10
  • Android 11 Custom ROM List – Unofficially Update Your Android Phone!
  • Samsung Galaxy Z Fold 3 could be scheduled for June 2021, with S Pen support

Footer

Tags

Amazon amazon prime amazon prime video Apple Application software epic games Galaxy Note 20 Galaxy S22 Plus Galaxy S22 Ultra Google Sheets headphones Huawei icloud Instagram instant gaming ip address iPhone iphone 12 iphone 13 iphone 13 pro max macOS Microsoft Microsoft Edge Mobile app office 365 outlook Pixel 6 Samsung Galaxy Samsung Galaxy Book 2 Pro 360 Samsung Galaxy Tab S8 Smartphone speedtest speed test teams tiktok Twitter vpn WhatsApp whatsapp web Windows 10 Windows 11 Changes Windows 11 Release Windows 11 Update Windows Subsystem For Android Windows 11 Xiaomi

Archives

  • June 2022
  • May 2022
  • April 2022
  • March 2022
  • February 2022
  • January 2022
  • September 2021
  • August 2021
  • July 2021
  • June 2021
  • May 2021
  • April 2021
  • March 2021
  • February 2021
  • January 2021
  • December 2020
  • November 2020
  • October 2020
  • September 2020
  • August 2020
  • July 2020

Meta

  • Log in
  • Entries feed
  • Comments feed
  • WordPress.org