
Enabling TPM 2.0 (Trusted Platform Module) and Secure Boot on an ASRock motherboard is an essential step for modern computing, particularly for gamers and security-conscious users. TPM 2.0 offers hardware-based security features, crucial for safeguarding sensitive data and ensuring system integrity. Secure Boot, on the other hand, prevents unauthorized software from booting on your system, further enhancing its security.
These features have become increasingly important, as demonstrated by games like Riot’s Valorant, which require TPM 2.0 and Secure Boot to be enabled for the game to start. This necessity reflects a broader trend where software and games are leveraging these security measures to ensure a secure and stable operating environment.
Understanding BIOS and UEFI firmware
Before we go into the steps for enabling TPM 2.0 and Secure Boot, it’s crucial to understand the role of BIOS (Basic Input/Output System) and UEFI (Unified Extensible Firmware Interface) firmware in this process. ASRock motherboards, like many modern systems, use UEFI firmware, an advanced replacement for the older BIOS firmware.
UEFI provides a more user-friendly interface and supports larger hard drives, faster boot times, and enhanced security features, including TPM and Secure Boot. It’s the UEFI settings that we’ll be navigating to enable these features. In the next section, we will start with the first step to access the UEFI settings on your ASRock motherboard.
Pro tip: How to Allocate More RAM to a Game in Windows 11 or 10
Step 1: Accessing the UEFI settings on ASRock motherboard
The first step in enabling TPM 2.0 and Secure Boot on an ASRock motherboard is to access the UEFI (Unified Extensible Firmware Interface). The UEFI is a firmware interface that allows you to configure various settings for your computer’s hardware. Here’s how you do it:
- Begin by restarting your computer. As it starts up, you need to enter the UEFI settings. This is typically done by pressing a specific key during the boot process.
- As your computer starts, pay attention to the on-screen prompts. Most ASRock motherboards prompt you to press the F2 or Del key to enter the UEFI settings. This needs to be done before your operating system starts loading. If you miss the timing, simply restart your computer and try again.
- Once in the UEFI settings, you’ll see a graphical interface that’s quite different from the old text-based BIOS screens. Use your keyboard (and sometimes your mouse) to navigate through the menus.

The UEFI interface can vary slightly depending on the model of your ASRock motherboard and the firmware version. If you encounter any difficulties, refer to your motherboard’s manual for specific instructions related to your model. It’s also important to proceed with caution. Any changes you make in the BIOS or UEFI can significantly affect your computer’s operation.
Useful guide: Using Onboard Graphics And Graphics Card Simultaneously
Step 2: Enabling TPM 2.0 on ASRock motherboard
Once you’ve accessed the UEFI settings, the next step is to enable TPM 2.0. TPM (Trusted Platform Module) is a hardware-based security feature that provides cryptographic functions and is used for secure boot, disk encryption, and more. Follow these steps to enable TPM 2.0 on your ASRock motherboard:
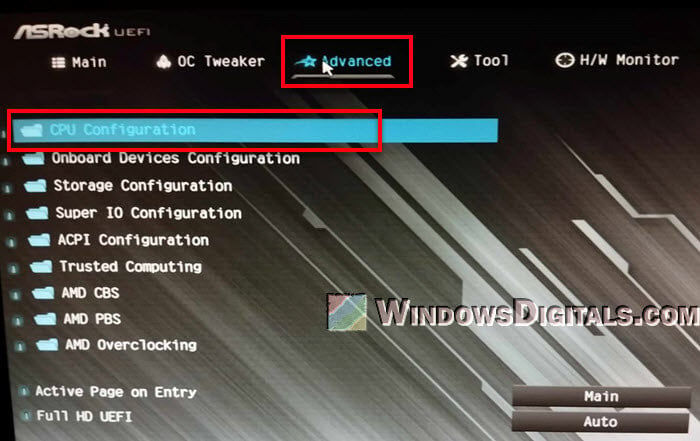
- Within the UEFI interface, navigate to the Advanced tab or section. This is where you’ll typically find various configuration settings.
- Select the CPU Configuration settings. The exact location and naming can vary, so if you’re having trouble, consult your motherboard’s manual.
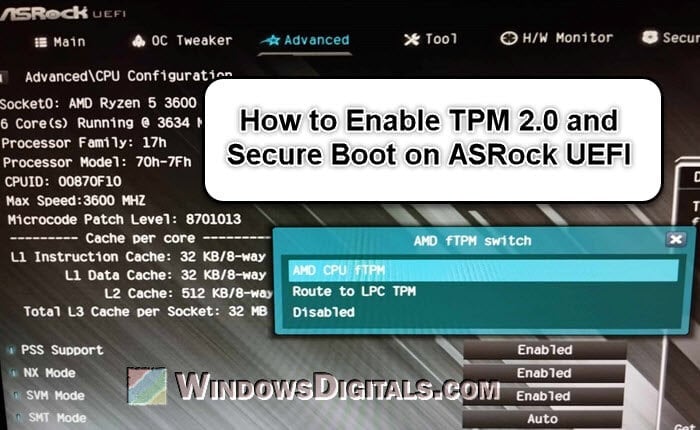
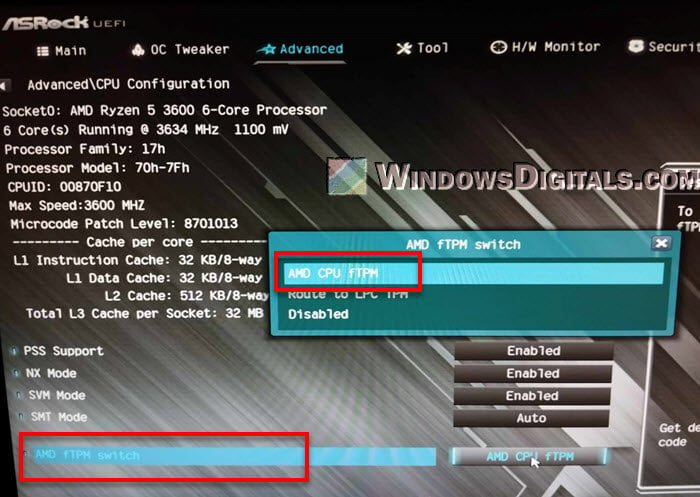
- Under the CPU Configuration settings, you may find an option labeled AMD fTPM (Firmware TPM for AMD CPUs), TPM 2.0, TPM State, or Intel PTT (Platform Trust Technology for Intel CPUs). Select this option and change the setting to “AMD CPU fTPM“, or simply “Enabled“.
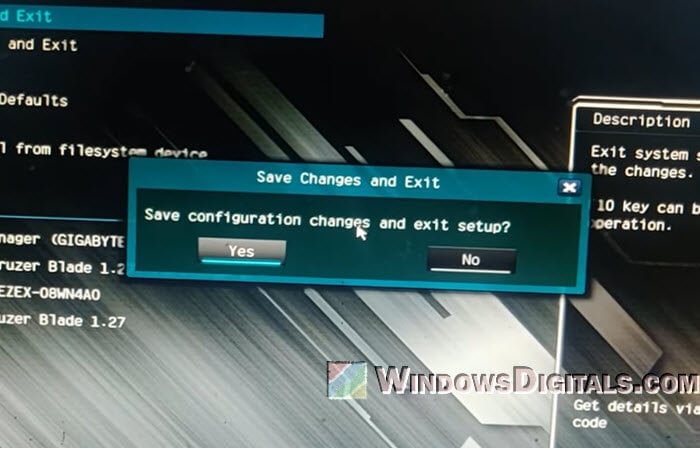
- After enabling TPM, make sure to save the changes. This is usually done by pressing F10 or navigating to the Exit tab and selecting Save Changes and Exit. Your computer will reboot for the changes to take effect.
It’s important to note that enabling TPM might require a firmware update, especially on older motherboards. If TPM 2.0 is not available or not functioning on your ASRock motherboard, check the manufacturer’s website for a firmware update that could add or enhance this functionality.
Linked issue: Windows 11 Not Activated After BIOS Update
Step 3: Enabling Secure Boot on ASRock motherboard
After enabling TPM 2.0, the next step is to activate Secure Boot. Secure Boot is a UEFI feature that helps to ensure that your PC boots using only firmware that is trusted by the manufacturer. This is key to preventing malicious software from infecting the boot process. Here’s how to enable Secure Boot on your ASRock motherboard:
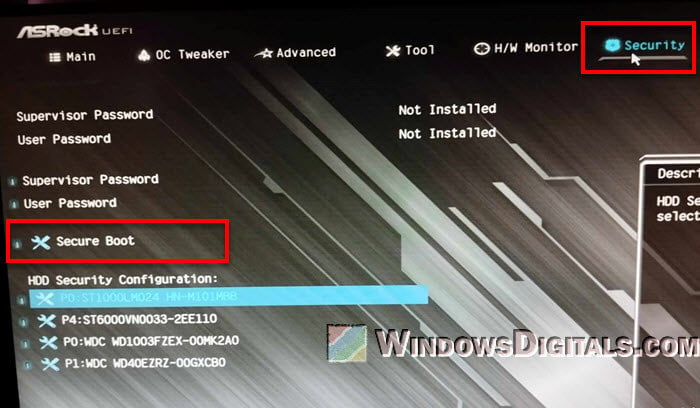
- In the UEFI settings, look for the Security tab or section. This is where Secure Boot settings are typically located.
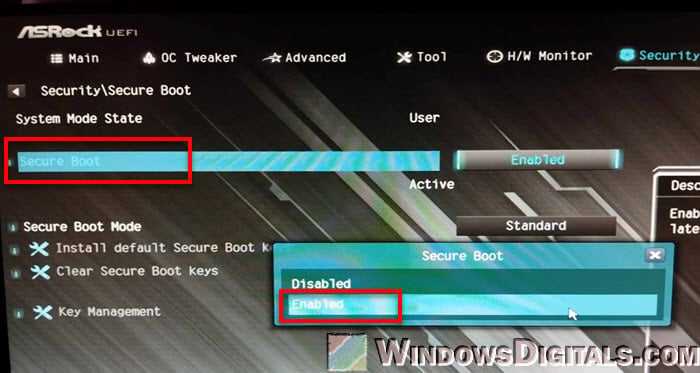
- Within the Security options, find the Secure Boot setting and select it.
- Once you’re there, before you can change the settings for “Secure Boot”, you will first need to set the “Secure Boot Mode” to “Standard“.
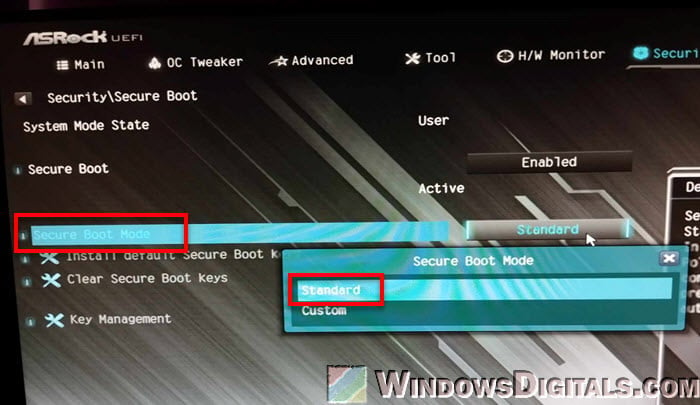
- After that, you can change the Secure Boot setting from “Disabled” to “Enabled“. In some rare cases, you may need to set the OS Type to Windows UEFI mode or similar to fully enable Secure Boot functionality.
- Like with the TPM setting, remember to save your changes. Press F10 or navigate to the Exit tab and choose Save Changes and Exit. Your computer will reboot with Secure Boot enabled.
Please note that enabling Secure Boot might interfere with the booting of operating systems that are not UEFI-compliant or with bootloaders that are not recognized as secure. If you are running a dual-boot system or using an older operating system, ensure compatibility before enabling Secure Boot.
Some common issues you might encounter
Enabling TPM 2.0 and Secure Boot on an ASRock motherboard is usually straightforward, but sometimes you might encounter issues. Here are some common troubleshooting tips:
Updating UEFI firmware
If TPM 2.0 or Secure Boot options are not visible in your UEFI settings, your motherboard’s firmware may need an update. Visit the ASRock website, find your motherboard model, and download the latest UEFI firmware. Updating can resolve many compatibility issues.
Compatibility mode
Some systems may require changes in boot mode from Legacy to UEFI to enable Secure Boot. This change is often found under the Boot tab in the UEFI settings.
Operating system issues
If your operating system fails to boot after enabling these settings, it may not be compatible with Secure Boot or UEFI mode. Windows 10 and later versions are generally compatible, but older versions or some Linux distributions may have issues.
Resetting UEFI settings
If you’re unable to boot after making changes, most motherboards allow you to reset the UEFI settings to default by pressing a specific key combination. Refer to your motherboard’s manual for instructions.
Might be useful: How to Clear CMOS without Removing Battery or Jumper Cap
Consult the manual
Each motherboard model may have slightly different UEFI layouts and options. Refer to your motherboard’s manual for specific guidance.
Please note that enabling TPM and Secure Boot is a significant change to your system’s security settings. If you’re unsure or encounter persistent issues, consider seeking assistance from a professional or the ASRock support community.
Summing up
To recap, enabling TPM 2.0 and Secure Boot on your ASRock motherboard is really about keeping your computer safe and up-to-date. It’s like adding an extra lock on your door to keep out unwanted visitors. This is especially important if you’re into games like “Valorant“, which need these security features to run properly. Think of it as a simple but powerful step to make sure your computer only runs software that it’s supposed to, keeping you safe from harmful programs.
Keep in mind, technology is always moving forward, and staying secure is key. By turning on TPM and Secure Boot, you’re not just following the latest trends; you’re taking a big step towards protecting your computer and your personal information. If you ever get stuck or something doesn’t seem right, a quick check of your motherboard’s manual or a visit to ASRock’s website can usually help you out.