
When your Wi-Fi keeps disconnecting on a Windows 11 PC, try restarting the router, forgetting and rejoining your network, making your network “Private,” updating your network adapter drivers, using “Network Adapter” troubleshooter, or restarting “WLAN AutoConfig” service.
Does your PC automatically disconnect you from your Wi-Fi network every now and then? Your router may have an issue, or your PC’s network settings might be incorrect. Here are a few ways to resolve this problem on your Windows 11 computer.
Why Does My Wi-Fi Keep Disconnecting?
Just like when your phone is disconnecting from Wi-Fi, here are many possible reasons Windows 11 keeps disconnecting from your wireless network. Wi-Fi routers can have issues for all sorts of reasons, but your PC’s network adapter may also be acting up, and on a laptop your power-saving plan may be limiting your wireless connection—to name a few causes.
In most cases, it’s usually a software issue, which you can fix by changing a few options here and there on your PC.
Resolve an Intermittent Wi-Fi Connection on Windows 11
Since there are so many possible reasons for the Wi-Fi disconnection issue on your Windows 11 PC, follow the most basic tips given below first, then try more advanced options if the basic ones don’t fix your problem.
Restart Your Router
To rule out any possibility of a minor glitch on your router, restart your router. This will reboot all your router features, fixing any minor problems with them. Restarting your router also causes your PC to reconnect to your Wi-Fi network, which can help fix minor connection problems between your router and your computer.
Restarting a router is as easy as pressing the power button on the device. If yours doesn’t have the button, feel free to unplug the device instead, waiting at least 10 seconds before plugging back in.
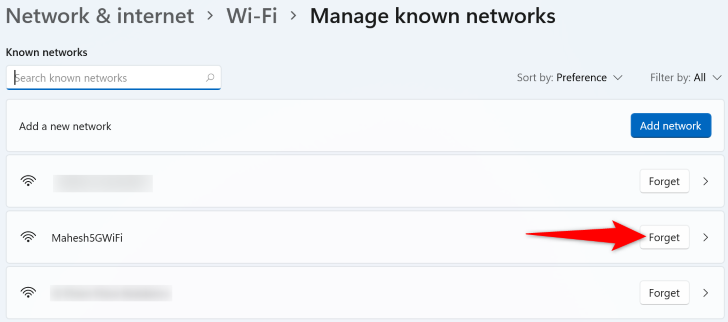
Forget and Reconnect to Your Wi-Fi Network
If your issue persists, delete your saved Wi-Fi network from your PC and then reconnect to it. This can resolve any issues with your connection sessions.
To do that, head into Settings > Network & Internet > Wi-Fi > Manage Known Networks. Then, next to your network, click “Forget.”
Rejoin your network by clicking the Wi-Fi icon in your system tray and choosing your network on the list. You’ll have to enter your network password before you can establish a connection.
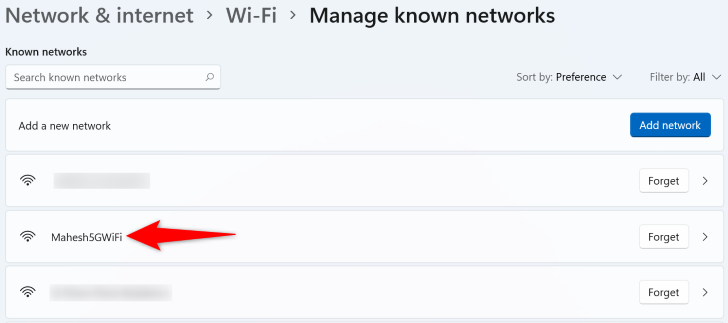
Choose Private Mode for Your Wi-Fi Network
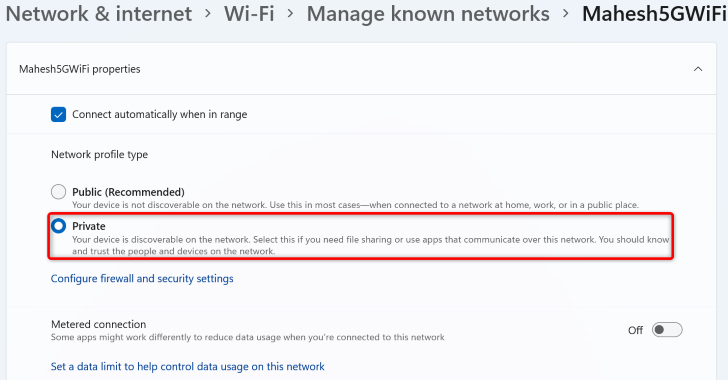
By default, when you connect your Windows 11 PC to a Wi-Fi network, your PC uses “Public” mode. This is to ensure your PC is not discoverable on the network, thus keeping your privacy.
However, when you face a connectivity issue, it’s worth changing that mode to “Private.” This makes your PC discoverable on the network and enables file and printer sharing. As long as you’re on a trusted network, you’re safe using this mode. If you’re on a public network, like a coffee shop, then you’re better off skipping to the next fix.
To make that change, navigate to Settings > Network & Internet > Wi-Fi > Manage Known Networks. Select your network on the list.
In the “Network Profile Type” section, choose “Private.”
Update Your Network Adapter Drivers
Your network adapter may be using faulty or outdated drivers, causing the Wi-Fi connection drop issue. In this case, update drivers for your wireless adapter, and your issue will likely be fixed.
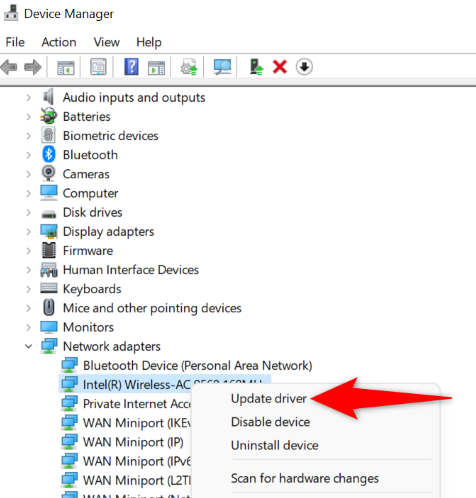
To do that, first, open Device Manager. Do this by right-clicking the “Start” menu and choosing “Device Manager.”
On the Device Manager window, expand “Network Adapters.” Then, right-click your wireless adapter and choose “Update Driver.”
Select “Search Automatically for Drivers.”
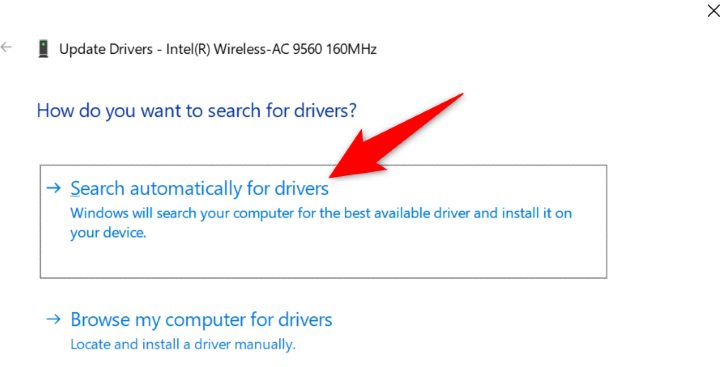
Install the available drivers, and you’re done.
Use Network Adapter Troubleshooter
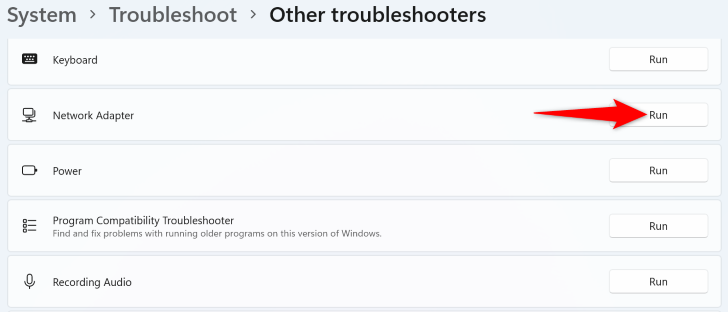
Windows 11 has many troubleshooters, one of which is a “Network Adapter” troubleshooter. You can use this tool when you’re experiencing issues with your network connections. This tool finds the issues with your adapter and offers help to fix those issues.
To run the tool, navigate to Settings > Troubleshoot > Other Troubleshooters. Then, next to “Network Adapter,” click “Run.”
On the “Network Adapter” window, select “Wi-Fi” and click “Next.”
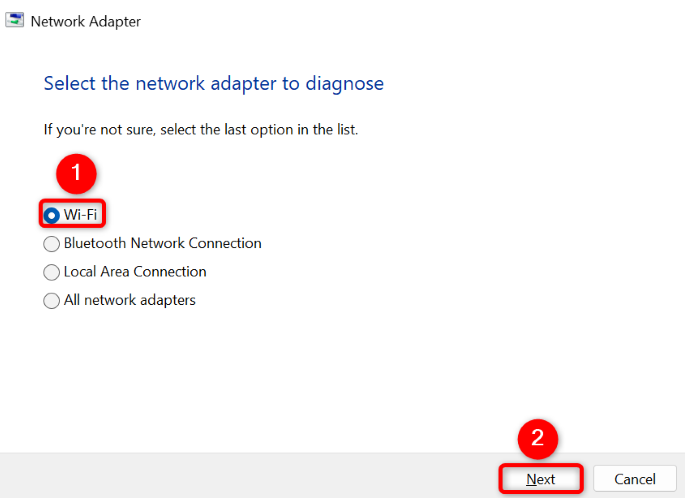
Follow the on-screen instructions, and any issues with your network adapter will be fixed.
Restart Windows’ WLAN AutoConfig Service
“WLAN AutoConfig” is a Windows service that runs in the background, allowing you to make network connections. This service is responsible for providing logic to your PC to connect to your wireless networks.
It’s possible this service isn’t working correctly or has stopped working, causing your PC to disconnect from your Wi-Fi network every now and then.
To fix that, restart the service. Do that by first opening “Run” using Windows+R. In the open box, type the following and press Enter:
services.msc
In the list on the right pane, find the “WLAN AutoConfig” service. Right-click it and choose “Restart.”
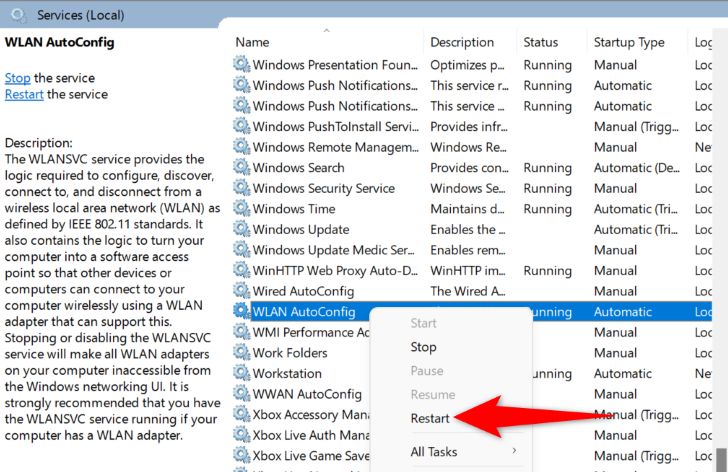
Windows will stop and then start the service, then you can try connecting to Wi-Fi again.
Prevent Power Management From Turning Off Your Network Adapter
Windows 11’s power management settings can turn off your various devices, including your network adapter, to save energy. You should disable this option for your network adapter when you’re facing connectivity issues.
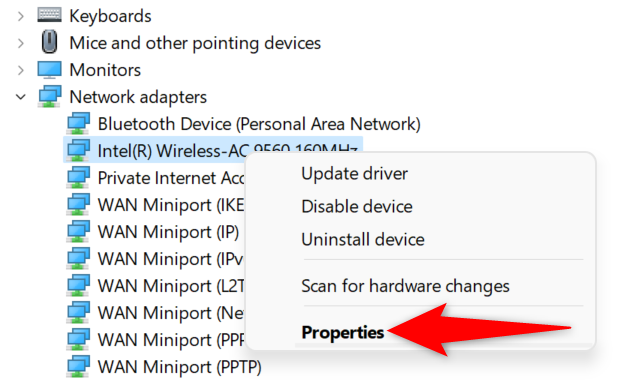
To do that, right-click the “Start” menu icon and choose “Device Manager.” In the open window, expand “Network Adapters,” right-click your adapter, and choose “Properties.”
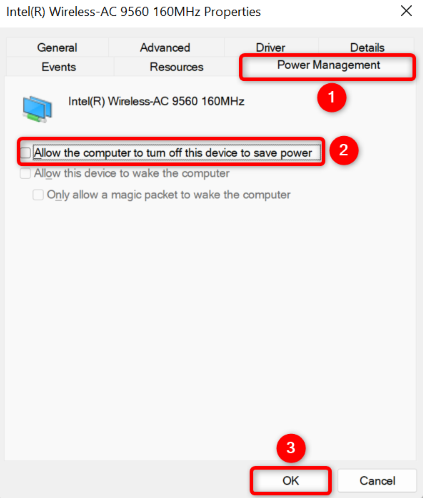
In “Properties,” open the “Power Management” tab. Then, untick the “Allow the Computer to Turn Off This Device to Save Power” option. Save your changes by clicking “OK.”
Change Power Settings for Your Network Adapter
Your PC’s current power plan may be configured in such a way that it degrades your network adapter’s performance, causing the disconnection issue. In this case, fix the issue by allowing your adapter to perform at its best in your power plan settings.
To do that, open “Start,” find “Edit Power Plan”, and click it. Then, select “Change Advanced Power Settings.”
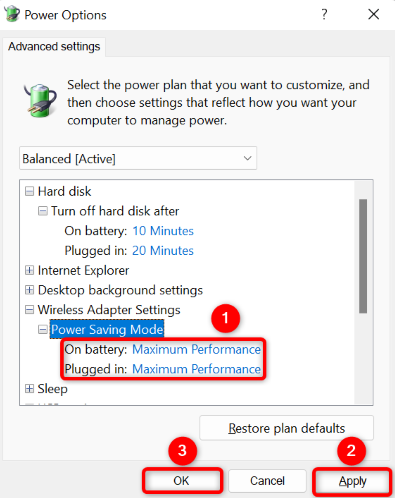
In the “Power Options” window, expand Wireless Adapter Settings > Power Saving Mode. Here, in the drop-down menus given next to “On Battery” and “Plugged In,” choose “Maximum Performance.”
Then, at the bottom, select “Apply” and “OK.”
Your PC’s power plan now won’t affect your network adapter’s performance, possibly resolving your Wi-Fi disconnection problem.
Reinstall Your Network Adapter Drivers
If your Wi-Fi connection still drops, uninstall and reinstall your network adapter drivers to fix any issues with them. Newer drivers often have patches for the bugs found in older drivers.
Start by opening Device Manager. Here, expand “Network Adapters,” right-click your adapter, and choose “Uninstall Device.”
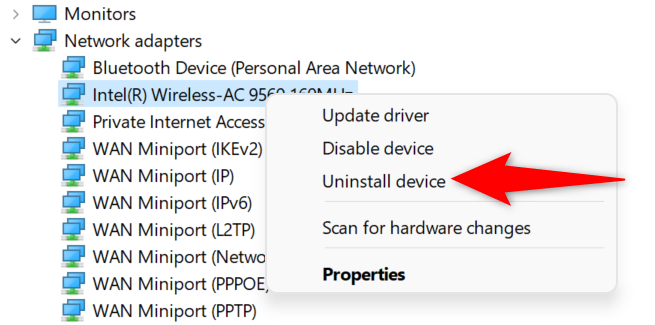
Enable the “Attempt to Remove the Driver for This Device” option, then click “Uninstall.”
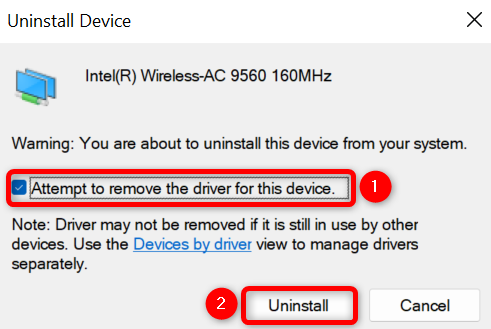
Allow Device Manager to finish uninstalling your network adapter. Then, reboot your PC, and Windows will automatically install the required drivers for your adapter. You’re then free to test your Wi-Fi connection again.
Reset Network Settings on Windows 11
If your PC still randomly disconnects you from your Wi-Fi network, there’s a chance your network settings aren’t correctly configured. Unless you know the exact setting causing the problem, reset all your network settings to the defaults to resolve your issue.
To do that, head into Settings > Network & Internet > Advanced Network Settings > Network Reset. Then, next to “Network Reset,” click “Reset Now.”
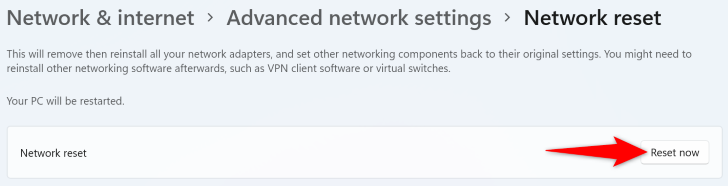
In the open prompt, choose “Yes.” When your network settings are reset, reconnect to your Wi-Fi network.
If all of those fixes didn’t work, it’s possible you simply need to upgrade your network hardware. Many Wi-Fi problems come down to outdated routers, but you can easily fix that problem by shopping our guide to the best Wi-Fi routers available. There are also several excellent budget routers to choose from, if you want to save a few dollars.
Alternatively, if you think your router is not making the Wi-Fi disconnect, it’s possible getting a new Wi-Fi adapter for your Windows 11 PC will make your connection more stable. You can also bypass the problem entirely by switching to an Ethernet connection—you just need a good Ethernet cable and an available port.