
How to Install Invoice Ninja on Ubuntu 16.04
Invoice Ninja is a web-based open source software for invoicing, payments, time tracking and much more. You can create Invoices online in seconds, interact with payments gateways like Stripe, PayPal, WePay, and others. Invoice Ninja can show you a live invoice preview in PDF format. You can change the company logo in templates easily yourself. Invoice Ninja is based on PHP, build with the Laravel Framework and can be installed on Linux and Windows.
In this tutorial, I will show you how to install Invoice Ninja on Ubuntu 16.04. I will use Nginx as the web server and MariaDB as Database system.
Prerequisite
- Ubuntu 16.04 server.
- Root privileges.
Step 1 – Install Nginx
In this step, we will install the Nginx web server. Connect to your server with your ssh root account (or login with another user and use ‘sudo -s’ to become root) and update the repository.
ssh [email protected]
apt-get update
Install Nginx with the apt command below:
apt-get install -y nginx
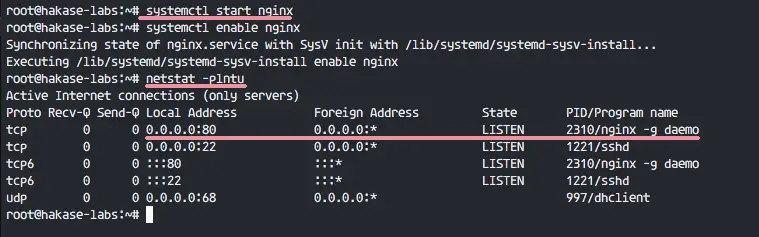
When the nginx installation is finished, start Nginx and add it to start at boot time.
systemctl start nginx
systemctl enable nginx
Make sure nginx is running. Check the port used by nginx, the default web server port is 80.
netstat -plntu
Step 2 – Install and Configure MariaDB Server
After installing Nginx, we need to install the package mariadb-server on the system. It’s available in the Ubuntu repository. Install mariadb-server and its dependencies with the command below.
apt-get install -y mariadb-server
When the installation is done, start the mariadb service and enable it to start at boot time with these systemctl commands.
systemctl restart mysql
systemctl enable mysql
MariaDB is started, now you can set the root password for mariadb with the command below.
mysql_secure_installation
Set your new MariaDB root password.
Set root password? [Y/n] Y
New password:
Re-enter new password:
Remove anonymous users? [Y/n] Y
Disallow root login remotely? [Y/n] Y
Remove test database and access to it? [Y/n] Y
Reload privilege tables now? [Y/n] Y
Next, try to connect with the mysql shell as root user.
mysql -u root -p
TYPE YOUR ROOT PASSWORD
You will see MySQL shell when everything worked correctly.
Now we need to create a new database and a new user for Invoice Ninja. I will create a new database named ‘ninjadb‘, a new user ‘ninja‘ with password ‘aqwe123‘. Please choose a different and secure password for your installation!
Create them with the mysql query below. Create a new database, create new user and password, grant database to the new user with a password.
create database ninjadb;
create user [email protected] identified by ‘aqwe123’;
grant all privileges on ninjadb.* to [email protected] identified by ‘aqwe123’;
flush privileges;
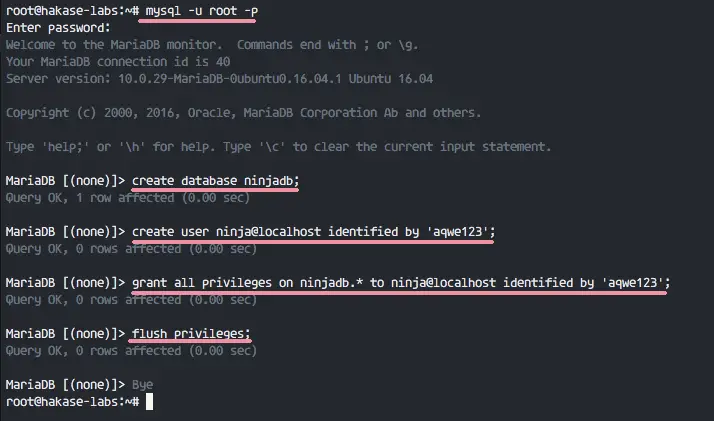
MariaDB has been installed and a new database and user for Invoice Ninja were created.
Step 3 – Install and Configure PHP7.0-FPM
Invoice Ninja is based on PHP, so we need to install PHP to the system. We will use PHP7.0-FPM for this Invoice Ninja installation.
Install PHP7.0-FPM and other PHP extensions needed by Invoice Ninja with the command below.
apt-get install -y php7.0-fpm php7.0-gd php7.0-xml php7.0-mysql php7.0-zip php7.0-mbstring php7.0-mcrypt php7.0-curl php7.0-gmp
After the installation, go to the PHP configuration directory and edit the php.ini file.
cd /etc/php/7.0/
vim fpm/php.ini
Uncomment the CGI line below and change the value to 0.
cgi.fix_pathinfo=0
Save and exit.
Edit php.ini file in the cli directory.
vim cli/php.ini
Uncomment the CGI line below and change the value to 0.
cgi.fix_pathinfo=0
Save and exit.
Next, start PHP7.0-FPM and enable it to start at boot time.
systemctl restart php7.0-fpm
systemctl enable php7.0-fpm
By default, PHP7.0-FPM is running with a socket file, check it with the command below and you will see the PHP socket file as shown in the screenshot.
netstat -pl
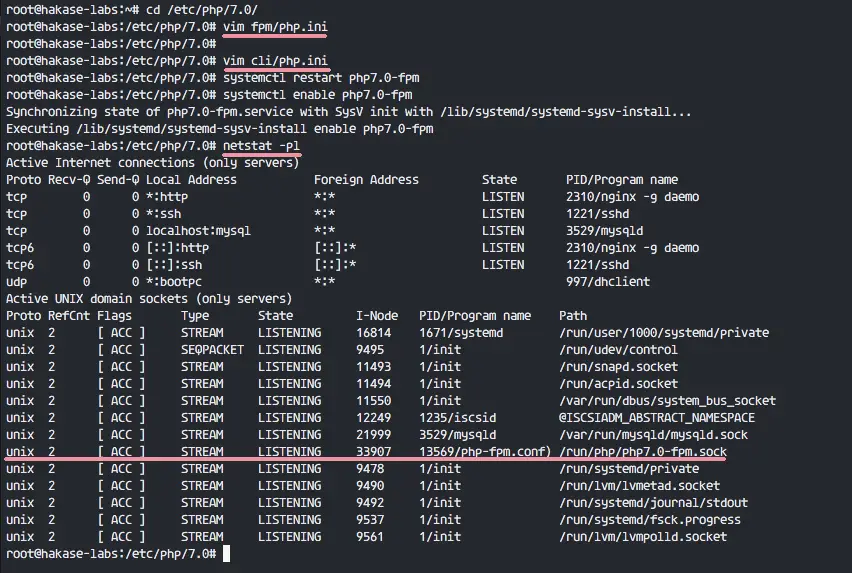
PHP7.0-FPM and all extensions needed by Invoice Ninja are installed.
Step 4 – Install and Configure Invoice Ninja
In this step, we will download and configure Invoice Ninja. First, install unzip on your system.
apt-get install -y unzip
Go to the ‘/var/www’ directory and download the Invoice Ninja source code with the wget command.
cd /var/www/
wget https://download.invoiceninja.com/ninja-v3.1.0.zip
Extract the Invoice Ninja zip file and go to the ‘ninja’ directory.
unzip ninja-v3.1.0.zip
cd ninja/
For the Laravel project, we need to install the composer dependency manager for PHP. It’s available in the Ubuntu repository, so we can install it with the apt command.
apt-get install -y composer
Next, install Invoice Ninja dependencies with the composer command below.
composer install –no-dev -o
- –no-dev : Disables installation of require-dev packages
- -o : Optimize autoloader during autoloader dump
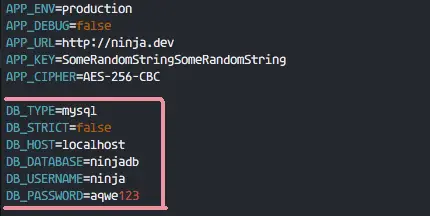
When the dependency installation is done, copy the .env file and edit with vim.
cp .env.example .env
vim .env
Change the value of database settings below.
DB_DATABASE=ninjadb
DB_USERNAME=ninja
DB_PASSWORD=aqwe123
Save and exit.
Next, edit the database configuration in the config directory.
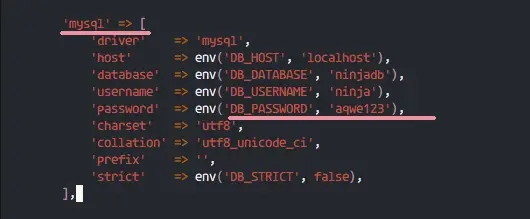
vim config/database.php
We are using MariaDB/MySQL database, go to the MySQL line 55.
‘database’ => env(‘DB_DATABASE’, ‘ninjadb’),
‘username’ => env(‘DB_USERNAME’, ‘ninja’),
‘password’ => env(‘DB_PASSWORD’, ‘aqwe123’),
Replace the password with the one that you have set for the ninja user!
Save and exit.
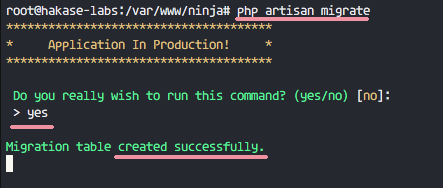
All configuration files are edited. Next, migrate the database with the command below.
php artisan migrate
You will be asked to run the command, type ‘yes‘ and press Enter.
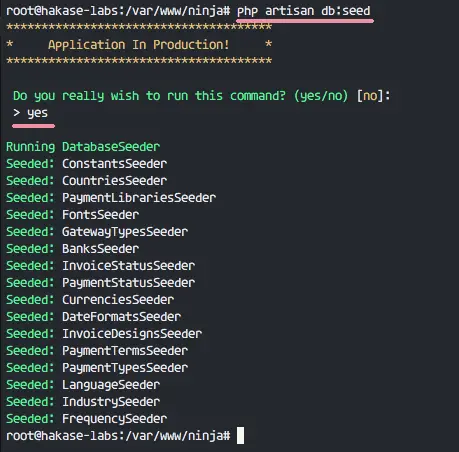
Next, seed the database with all records.
php artisan db:seed
Type ‘yes‘ and press Enter to confirm.
Generate a new application key for the Laravel project Invoice Ninja.
php artisan key:generate
You will see the application key.
Edit the app.php file with vim.
vim config/app.php
Go to the APP_KEY line 85 and paste the key we generated.
‘key’ => env(‘APP_KEY’, ‘base64:0o5QLWbNeDCNer064+600Hl8oJ20OPCIymadKJQ1RGo=’),
Save and exit.
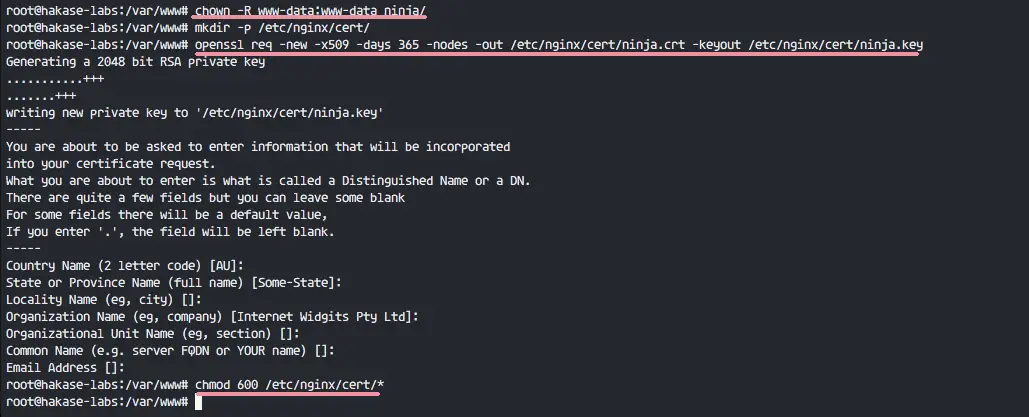
Finally, change the owner of ‘/var/www/ninja‘ directory to ‘www-data‘ user and group.
cd /var/www/
chown -R www-data:www-data ninja/
Invoice Ninja is configured and ready for the installation.
Step 5 – Configure SSL and Virtual Host
In this step, we will generate an SSL Certificate file with the OpenSSL command and create new virtual host configuration for Invoice Ninja. If you are on a live server, you can use a free SSL from Let’s Encrypt instead of generating a self-signed SSL cert with OpenSSL.
Create a new ‘cert‘ directory for the SSL files.
mkdir -p /etc/nginx/cert/
Run the openssl command below to generate the certificate files.
openssl req -new -x509 -days 365 -nodes -out /etc/nginx/cert/ninja.crt -keyout /etc/nginx/cert/ninja.key
Change the permission of the certificate files to ‘600’.
chmod 600 /etc/nginx/cert/*
Next, go to the Nginx directory and create a new virtual host configuration file named ‘ninja‘.
cd /etc/nginx/
vim sites-available/ninja
Paste virtual host configuration below.
server {
# Your Domain Name - hakase-labs.co
listen      80;
server_name ninja.co www.ninja.co;
# Rewrite redirect to https
add_header Strict-Transport-Security max-age=2592000;
rewrite ^ https://$server_name$request_uri? permanent;
}
server {
# Your Domain Name - hakase-labs.co
listen      443 default;
server_name ninja.co www.ninja.co;
# Enable SSL for Invoice Ninja
ssl on;
ssl_certificate     /etc/nginx/cert/ninja.crt;
ssl_certificate_key /etc/nginx/cert/ninja.key;
ssl_session_timeout 5m;
ssl_ciphers               'AES128+EECDH:AES128+EDH:!aNULL';
ssl_protocols              TLSv1 TLSv1.1 TLSv1.2;
ssl_prefer_server_ciphers on;
# Invoice Ninja web root files
root /var/www/ninja/public;
index index.html index.htm index.php;
charset utf-8;
location / {
try_files $uri $uri/ /index.php?$query_string;
}
location = /favicon.ico { access_log off; log_not_found off; }
location = /robots.txt  { access_log off; log_not_found off; }
# Access and Error Log for Invoice Ninja
access_log  /var/log/nginx/ininja.access.log;
error_log   /var/log/nginx/ininja.error.log;
sendfile off;
# Handle PHP Applications
location ~ .php$ {
fastcgi_split_path_info ^(.+.php)(/.+)$;
fastcgi_pass unix:/run/php/php7.0-fpm.sock;
fastcgi_index index.php;
include fastcgi_params;
fastcgi_param SCRIPT_FILENAME $document_root$fastcgi_script_name;
fastcgi_intercept_errors off;
fastcgi_buffer_size 16k;
fastcgi_buffers 4 16k;
}
location ~ /.ht {
deny all;
}
}
Save and exit.
Enable the ninja virtual host and test the Nginx configuration, make sure there is no error.
ln -s /etc/nginx/sites-available/ninja /etc/nginx/sites-enabled/
nginx -t
Now restart the nginx web server.
systemctl restart nginx
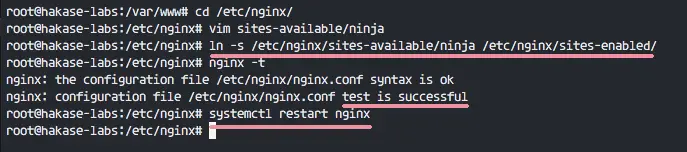
The Invoice Ninja virtual host configuration is finished.
Step 6 – Finishing the Installation and Testing
Open your web browser and type in the Invoice Ninja URL: ninja.co. You will be redirected to the https connection and setup page.
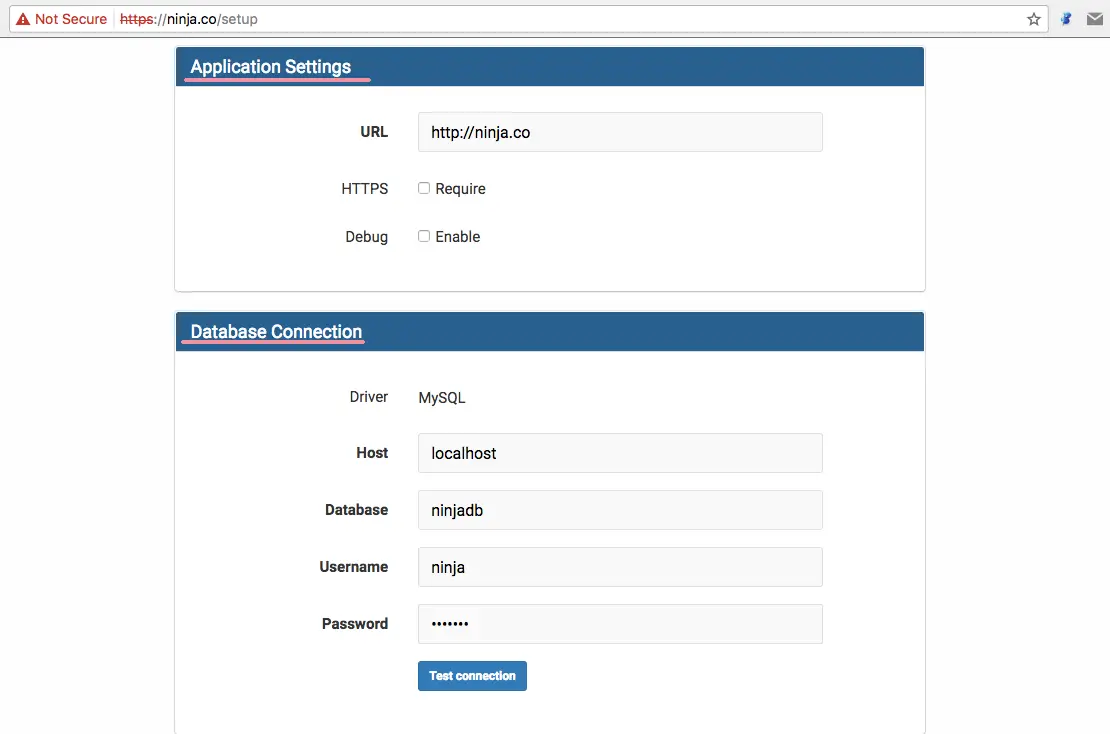
Type in the Application Settings, Database Connection, Email Settings, User Details and check the Invoice Ninja TOS.
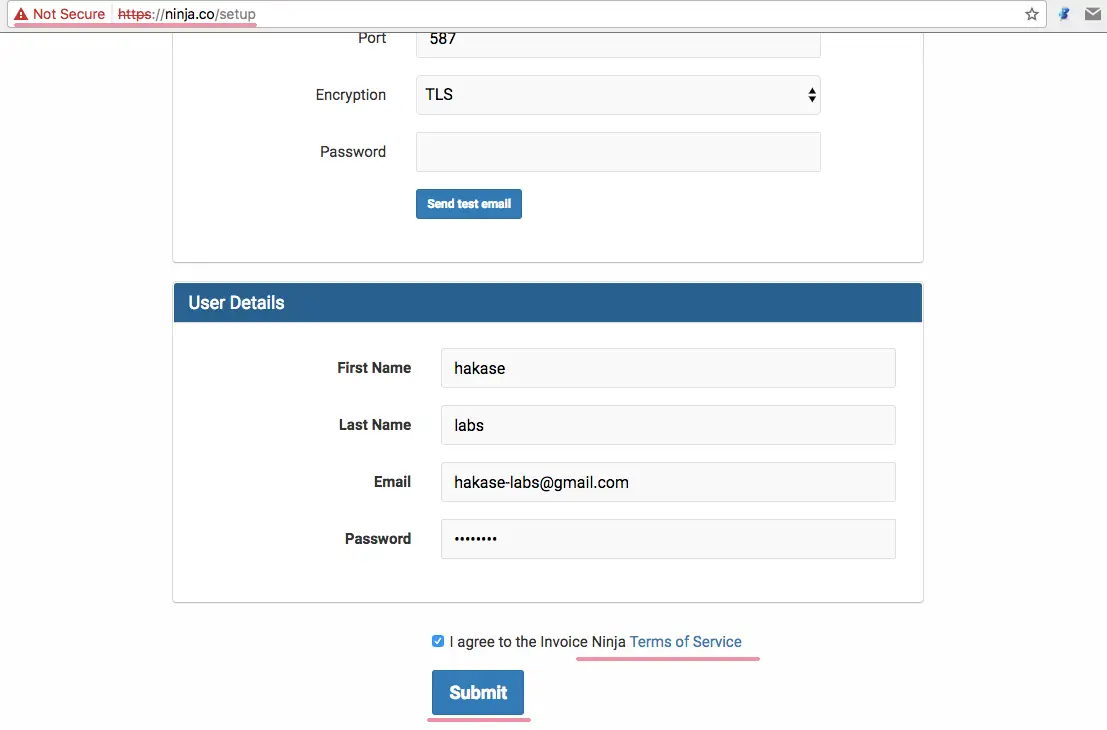
Click ‘Submit‘ and you will be redirected to the login page of Invoice Ninja.
Type in your email and password, then press ‘LOGIN‘.
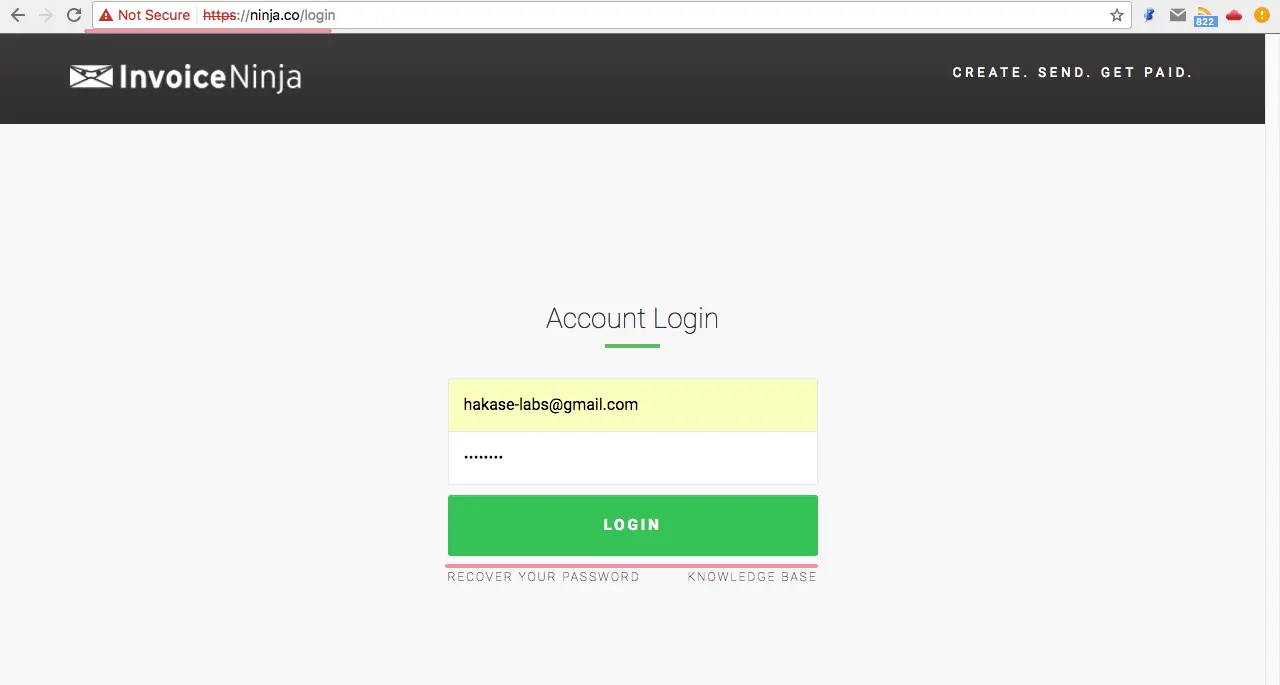
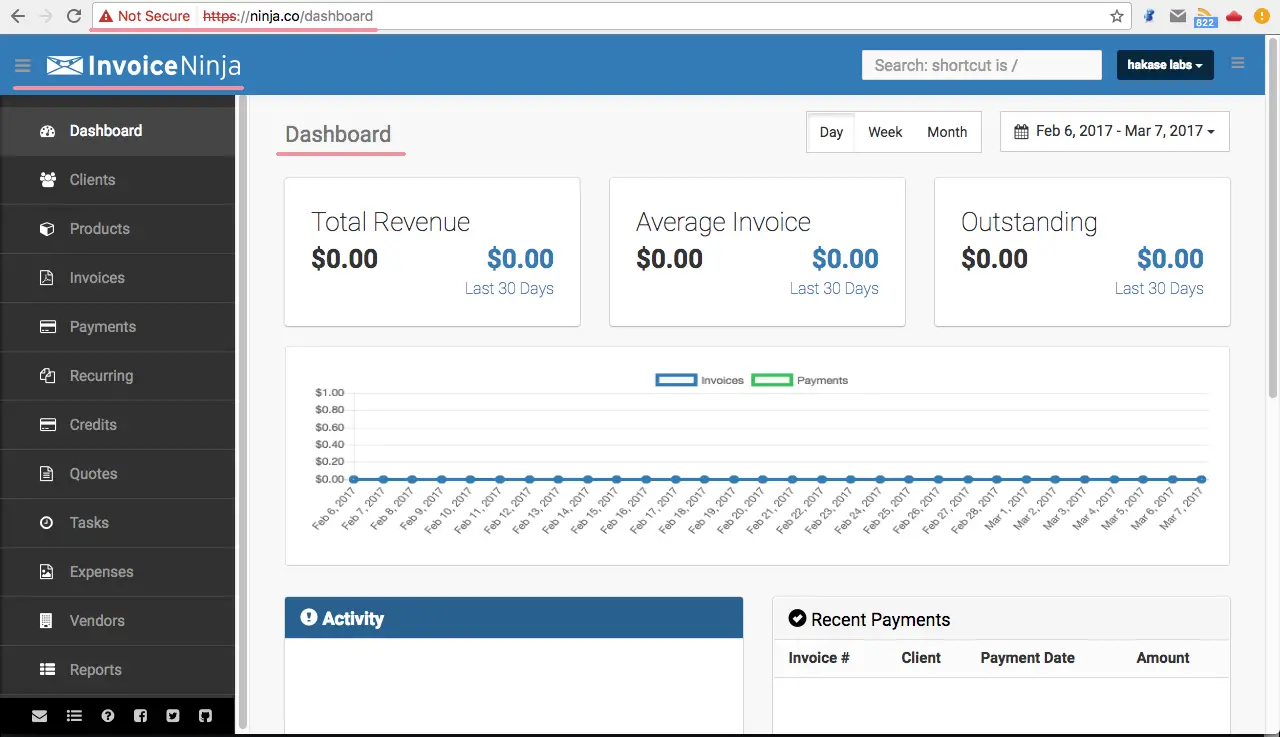
You will see the Invoice Ninja Dashboard.
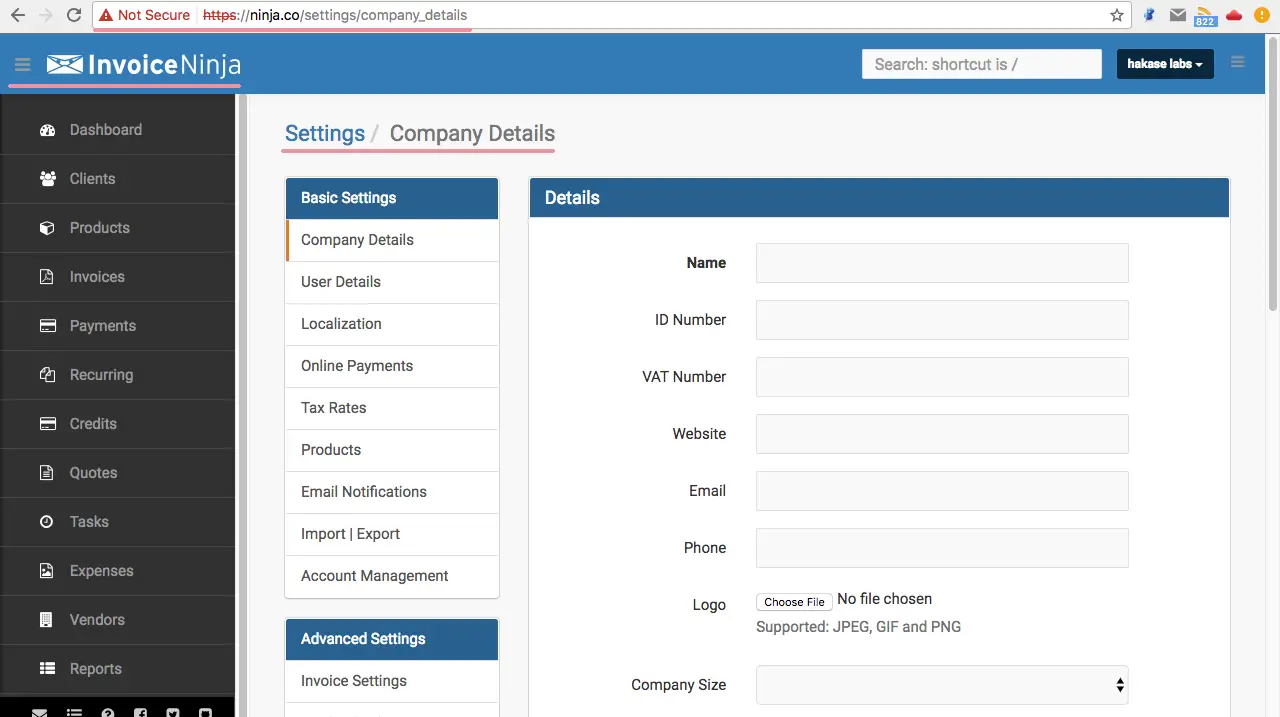
Invoice Ninja Settings Page.
Invoice Ninja Installed with Nginx and MariaDB on Ubuntu 16.04.