
Undoubtedly, Linux Mint is one of the best Linux distributions for beginners. It is easy to use, doesn’t consume lots of system resource and has tons of software available.
Linux Mint 20 is released. There are some performance improvements and several new features in Mint 20.
There are various ways to install Linux Mint:
- Install Linux Mint in VirtualBox in Windows like a regular desktop application.
- Install Linux Mint in dual boot mode with Windows keeping both Windows and Linux Mint on the same computer.
- Replace all other operating systems and install Linux Mint as the only OS on your computer.
In this tutorial, I’ll show you how to install Linux Mint removing other operating systems from your computer.
Install Linux Mint by replacing Windows or any other operating system

I am using Linux Mint 20 Cinnamon edition. However, the steps work for other Mint versions and desktop variants like Xfce and MATE. The screenshot might look a little bit different but the steps remain the same.
Requirements:
- A USB of at least 4 GB in size. You may also use a DVD.
- Active internet connection for downloading Linux Mint ISO and live-USB making tool. Internet is not required for installing Linux Mint.
- This is optional but if you have important data on the system where you are going to install Linux Mint, you should copy the files on an external disk.
Minimum system requirements for Linux Mint 20 default Cinnamon edition:
- Minimum 1 GB RAM (2 GB recommended for a comfortable usage).
- Minimum 15 GB of disk space (20 GB recommended).
- Minimum 1024×768 resolution (on lower resolutions, press ALT to drag windows with the mouse if they don’t fit in the screen).
Warning!
This method of installing Linux Mint formats your entire disk. That means any data present on the system will be wiped out.
For this reason, please save your data on an external USB disk so that you can copy it back after installing Mint.
Step 1: Download Linux Mint ISO
Go to Linux Mint website and download Linux Mint in ISO format. This file is used for creating the installation USB.
You’ll find three variants:
- Cinnamon
- MATE
- Xfce
If you do not know about them, go with the default Cinnamon edition. When you click on that, you’ll find various mirror websites and torrent link to download the ISO file.
If you have a good internet connection for downloading 2 GB of file without any issue, use a mirror which is closer to your country of residence (for faster download).
If you do not have a good, consistent internet connection, opt for the torrent version (if you know what torrent is).

Step 2: Create a live USB of Linux Mint
Now that you have downloaded the ISO, it is time for creating a live USB of Linux Mint.
You’ll need a dedicated software that creates a live USB. There are several such tools available for free. You can use Etcher which is available on Windows, Linux and macOS.
If you are using Windows, you can also use Rufus. In the example here, I have used Rufus.
Download Rufus and run the .exe file and you’ll see a screen like the below image.
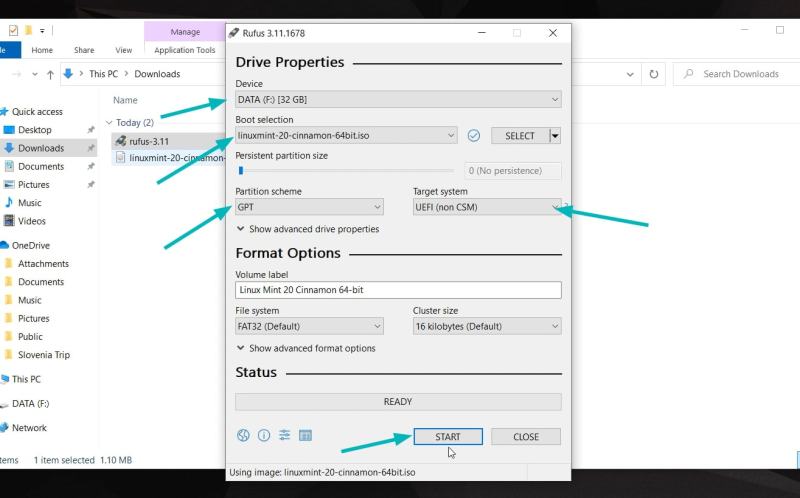
You select the ISO. You may confuse over the partitioning scheme. Almost all the computers in last 7 years or so use GPT partitioning scheme. Older computers may use the MBR partitioning. You should check which one your system uses to be sure.
If you choose the incorrect partitioning scheme, you may not be able to Linux Mint. In that case, come back to this step and recreate the USB by choosing the other partitioning scheme.
Step 3: Boot from the live Linux Mint USB
Once you have successfully created the Linux Mint USB, it is time to use it for installing the awesome Linux Mint.
Plug in the live USB of Linux Mint and restart your system. At the boot screen when you see the logo of your computer manufacturer, press F2 or F10 or F12 to enter the BIOS settings.
In here, you should make sure that booting for USB or removable media is on the top of the boot order.

This screen may look different for different manufacturers. You’ll have to find this setting on your own or search the internet.
Make the changes, save and exit.
Step 4: Install Linux Mint
Now you should boot into the live Linux Mint environment. You’ll see a screen like this that gives you a couple of options. Go with the first option.

In a few seconds you’ll be inside the Linux Mint live environment. It may take more time if you have USB 2.
You’ll see a “Install Linux Mint” icon on the desktop. Click on it to start the installation procedure.

It will ask you to choose some basic configurations like language and keyboard layout. Choose the most appropriate ones for your system.

Avoid connecting to internet during installation
I strongly advise NOT connecting to internet while installing Linux Mint. This way the installation is quicker as it does not try downloading updates while installation.
Not connecting to the internet may also save you a few unpleasant surprises. I encountered a “‘grub-efi-amd64-signed’ package failed to install into /target” error and my installation failed. I plugged out the live USB and tried installing it again without connecting to the internet and the error didn’t appear this time.
The next screen is the most important part of Linux Mint installation. You are going to format the entire hard disk and install Linux Mint. Linux Mint will be the only operating system on your computer.
Again, this means that you’ll lose all the data on the disk. Please copy important files on an external disk.
In this method, Linux Mint handles everything on its own. It creates an ESP partition for EFI boot manager of about 500 MB and the rest of the disk is allocated to root partition. The root consists a swapfile for swap usage and your home directory. This is the easiest setup with no extra effort.

You’ll be warned that disk will be formatted. Hit continue and you’ll have to select timezone in the next. You may change it later as well.

After that, you’ll face a screen that asks you to set username and password. Use an easy to remember password because you’ll have to use it all the time.

Things are pretty straightforward from here. You just have to wait for like 5-10 minutes for the installation to complete.


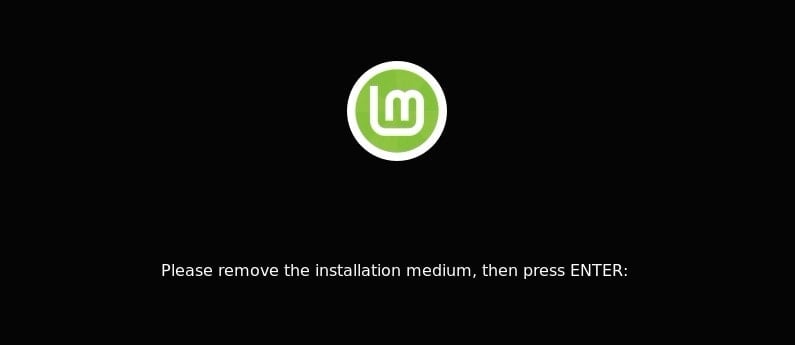
Once the installation finishes, it will ask you to restart the system. Restart it.

When the system turns off, it also asks you to remove the live USB and press enter.
Well, that’s it. You’ll now boot into Linux Mint. Enter your password you had created earlier and you’ll enter Linux Mint to see a welcome screen like this:

Enjoy Linux Mint
Since you just installed it, do read our recommendation of things to do after installing Linux Mint 20.
I hope this tutorial helped you in installing Linux Mint 20 easily. If you face any issues or difficulties or if you have any confusion, feel free to leave a comment below.