
How to Install Magento 2.1 on CentOS 7
Magento is an open source shop (e-commerce software) and content management system for e-commerce websites based on the PHP Zend Framework. Magento applies the conventions of Object Oriented Programming and MVC (Model-View-Controller) architecture and uses MySQL/MariaDB as the database. The software developed has been started in 2008 by Varien Inc. In the past years, Magento has become a trusted platform for e-commerce software that powers online businesses all over the world.
In this tutorial, I will guide you trough the Magento 2.1 installation. We will install Magento 2.1 with Nginx and Php7.0-fpm and MySQL as the database. For this purpose, I will use a CentOS 7 server with SELinux enabled.
Step 1 – Install Nginx
In this step, we will install Nginx from the epel-repository. Epel is not available by default, so we need to install the epel-repository before installing Nginx.
Install the epel-repository with this yum command.
yum -y install epel-release
Now we can install Nginx from the epel-repository.
yum -y install nginx
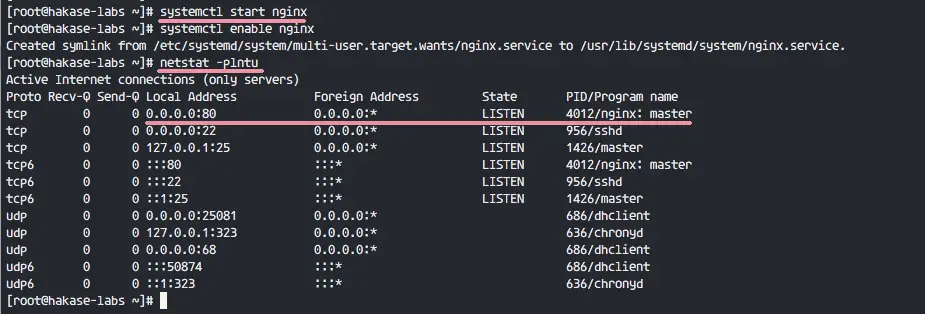
After the installation is complete, start Nginx and add it to start at the boot time.
systemctl start nginx
systemctl enable nginx
Nginx is started on port 80, you can check that with the netstat command below.
netstat -plntu
In case you see the result ‘command not found’, you can install net-toolslike this.
yum -y install net-tools
Step 2 – Install and Configure PHP-FPM
In this tutorial, we will be using PHP-FPM 7 for the Magento installation. I will use PHP 7 packages from the Webtatic repository.
Download and add a new webtatic repository to the system.
rpm -Uvh https://mirror.webtatic.com/yum/el7/webtatic-release.rpm
Now run the command below to install PHP-FPM7 with all packages and extension needed for the Magento installation.
yum -y install php70w-fpm php70w-mcrypt php70w-curl php70w-cli php70w-mysql php70w-gd php70w-xsl php70w-json php70w-intl php70w-pear php70w-devel php70w-mbstring php70w-zip php70w-soap
When a PHP-FPM7 installation is complete, we need to configure it. We will configure the php.ini file and the php-fpm configuration ‘www.conf’ file.
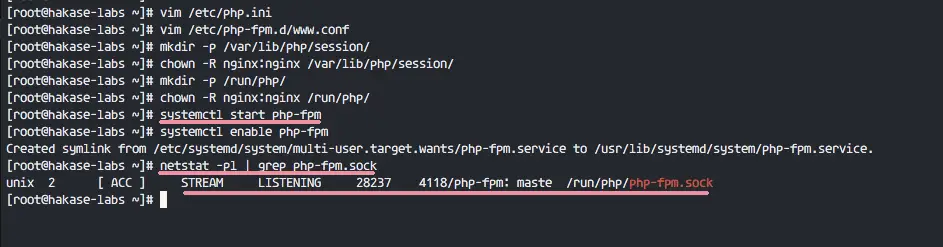
Edit php.ini with vim.
vim /etc/php.ini
Uncomment the cgi.fix_pathinfo line 762 and change value to 0.
cgi.fix_pathinfo=0
Configure memory limit, max execution time and enable the zlib output compression, make sure you set the values as shown below.
memory_limit = 512M
max_execution_time = 1800
zlib.output_compression = On
Uncomment session path directory and change the directory as below.
session.save_path = “/var/lib/php/session”
Save and exit.
Next, edit the php-fpm configuration file www.conf with vim command.
vim /etc/php-fpm.d/www.conf
PHP-FPM7 will run under the ‘nginx’ user and group, change the value to ‘nginx’ for the user and group lines.
user = nginx
group = nginx
We will run php-fpm under a socket file, not a server port. Change the value of the listen line to the path of the socket file.
listen = /var/run/php/php-fpm.sock
The socket file needs to be owned by the ‘nginx’ user and group, uncomment the listen lines and change the values as shown below.
listen.owner = nginx
listen.group = nginx
listen.mode = 0660
Finally, uncomment the PHP-FPM environment lines 366-370.
env[HOSTNAME] = $HOSTNAME
env[PATH] = /usr/local/bin:/usr/bin:/bin
env[TMP] = /tmp
env[TMPDIR] = /tmp
env[TEMP] = /tmp
Save and exit.
Next, create a new directory for the session path and the php sock file location. Then change the owner to the ‘nginx’ user and group.
Create a new directory for session path.
mkdir -p /var/lib/php/session/
chown -R nginx:nginx /var/lib/php/session/
Create a new directory for php-fpm socket file location.
mkdir -p /run/php/
chown -R nginx:nginx /run/php/
PHP-FPM7 configuration is complete, start the daemon now and enable it to start at boot time with the systemctl command below.
systemctl start php-fpm
systemctl enable php-fpm
When there are no errors, you can use the command below to check if php-fpm is running under the socket file.
netstat -pl | grep php-fpm.sock
Step 3 – Install MySQL 5.7 Server
Magento 2.1 requires a current MySQL version, you can use MySQL 5.6 or 5.7 for the installation. In this tutorial, we will use MySQL 5.7 which can be installed from the official MySQL repository. So we need to add the new MySQL repository first.
Download and add the new MySQL repository for MySQL 5.7 installation.
yum localinstall https://dev.mysql.com/get/mysql57-community-release-el7-9.noarch.rpm
Now install MySQL 5.7 from the MySQL repository with the yum command below.
yum install mysql-community-server
When the installation is complete, start mysql and add it to start at boot time.
systemctl start mysqld
systemctl enable mysqld
MySQL 5.7 has been installed with a default root password, it is stored in the mysqld.log file. Use the grep command to see the default password for MySQL 5.7. Run the command below.
grep ‘temporary’ /var/log/mysqld.log

Now you see the current MySQL root password, you should change the default password.
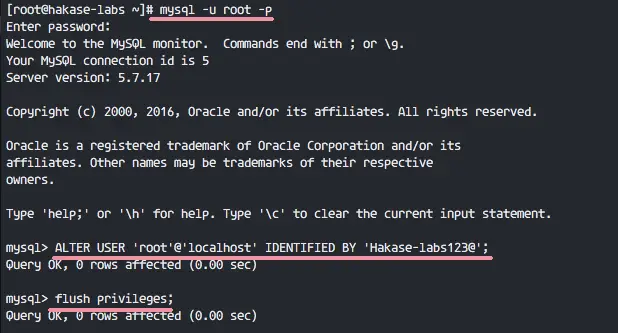
Connect to the mysql shell with user root and default password.
mysql -u root -p
TYPE DEFAULT PASSWORD
Change default root password with the query below. I will use the new password ‘Hakase-labs123@’ here. Please choose a secure password.
ALTER USER ‘root’@’localhost’ IDENTIFIED BY ‘Hakase-labs123@’;
flush privileges;
The default MySQL root password has been changed. Next we need to create a new user and a new database for Magento installation.
We will create a new database named ‘magentodb’ and a new user ‘magentouser’ with password ‘Magento123@’. Then grant all privileges of the database to the new user. Run the mysql query below.
create database magentodb;
create user [email protected] identified by ‘Magento123@’;
grant all privileges on magentodb.* to [email protected] identified by ‘Magento123@’;
flush privileges;
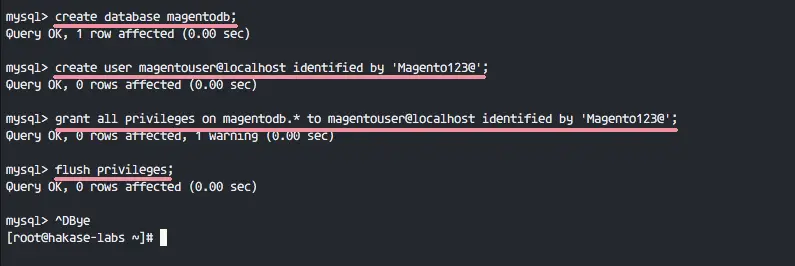
MySQL 5.7 installation and configuration is finished and a database for the Magento installation has been created.
Step 4 Install and Configure Magento
In this step, we will start to install and configure Magento. For the web root directory, we will use the ‘/var/www/magento2’ directory. We need PHP composer for the Magento package installation.
Install PHP Composer
We will use Composer for PHP package dependency installation. Install composer with the curl command below.
curl -sS https://getcomposer.org/installer | sudo php — –install-dir=/usr/bin –filename=composer
When the installation is complete, you can check the composer version as shown below.
composer -v
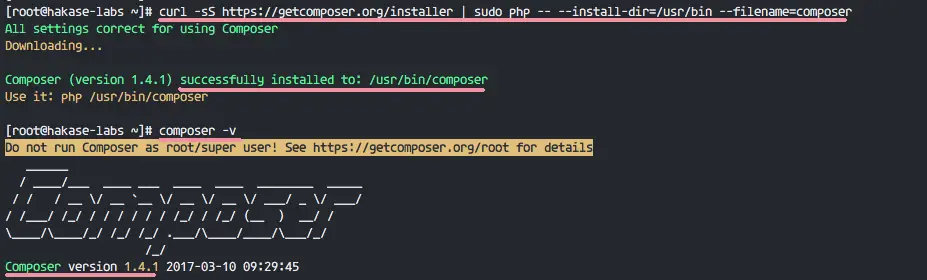
PHP Composer has been installed.
Download and Extract Magento
Go to the ‘/var/www’ directory and download the Magento code with the wget command.
cd /var/www/
wget https://github.com/magento/magento2/archive/2.1.zip
Install unzip with yum.
yum -y install unzip
Extract Magento code and rename the directory to ‘magento2’ directory.
unzip 2.1.zip
mv magento2-2.1 magento2
Install PHP Dependencies
Go to the magento2 directory and install all Magento dependencies with the composer command.
cd magento2
composer install -v
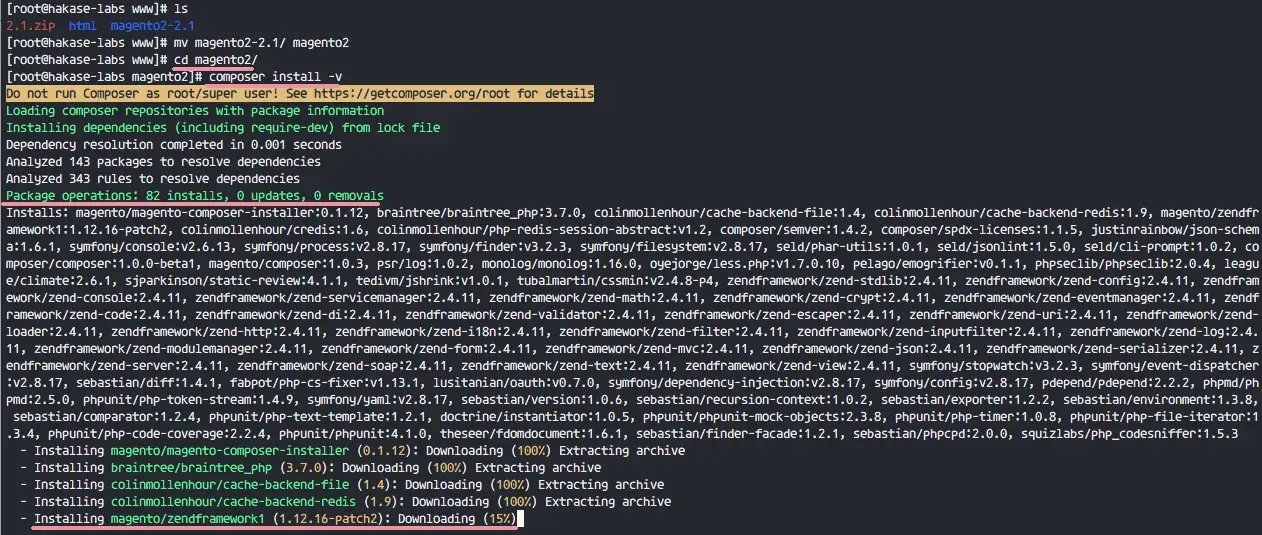
Wait for PHP Dependency installation to finish.
Configure Magento Virtual Host
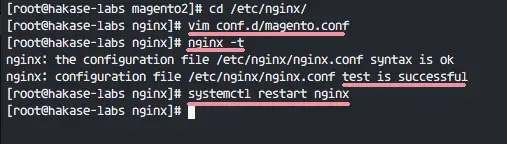
Go to the Nginx directory and create a new virtual host configuration file named ‘magento.conf’ in the ‘conf.d’ directory.
cd /etc/nginx/
vim conf.d/magento.conf
Paste the virtual host configuration below.
upstream fastcgi_backend {
server  unix:/run/php/php-fpm.sock;
}
server {
listen 80;
server_name magento.hakase-labs.com;
set $MAGE_ROOT /var/www/magento2;
set $MAGE_MODE developer;
include /var/www/magento2/nginx.conf.sample;
}
Save and exit.
Now test the configuration. When there is no error, restart Nginx service.
nginx -t
systemctl restart nginx
Install Magento 2.1
Go to the magento2 directory to install Magento on the command line.
cd /var/www/magento2
Run the command below, make sure you have correct configuration. The values that need to be changed by you are explained below.
bin/magento setup:install –backend-frontname=”adminlogin”
–key=”biY8vdWx4w8KV5Q59380Fejy36l6ssUb”
–db-host=”localhost”
–db-name=”magentodb”
–db-user=”magentouser”
–db-password=”Magento123@”
–language=”en_US”
–currency=”USD”
–timezone=”America/New_York”
–use-rewrites=1
–use-secure=0
–base-url=”http://magento.hakase-labs.com”
–base-url-secure=”https://magento.hakase-labs.com”
–admin-user=adminuser
–admin-password=admin123@
[email protected]
–admin-firstname=admin
–admin-lastname=user
–cleanup-database
Change value for:
- –backend-frontname: Magento admin login page “adminlogin”
- –key: generate your own key
- –db-host: Database host localhost
- –db-name: database name ‘magentodb’
- –db-user: database user ‘magentouser’
- –db-password: database password ‘Magento123@’
- –base-url: Magento URL
- –admin-user: Your admin user
- –admin-password: Your Magento admin password
- –admin-email: Your email address
When you have no error in the command, you will see results below.

Magento 2.1 is installed. Run the command below to change the permission for the etc directory and change the owner of the magento2 directory to the ‘nginx’ user.
chmod 700 /var/www/magento2/app/etc
chown -R nginx:nginx /var/www/magento2
Configure Magento Cron
This cronjob is needed for the Magento indexer. Create a new cronjob as ‘nginx’ user (because magento running under nginx user and group).
crontab -u nginx -e
Paste the configuration below.
* * * * * /usr/bin/php /var/www/magento2/bin/magento cron:run | grep -v "Ran jobs by schedule" >> /var/www/magento2/var/log/magento.cron.log
* * * * * /usr/bin/php /var/www/magento2/update/cron.php >> /var/www/magento2/var/log/update.cron.log
* * * * * /usr/bin/php /var/www/magento2/bin/magento setup:cron:run >> /var/www/magento2/var/log/setup.cron.log
Save and exit.
Step 5 – Configure SELinux and Firewalld
In this tutorial, we will leave SELinux in ‘Enforcing’ mode. Run the commands below to check the SELinux status.
sestatus
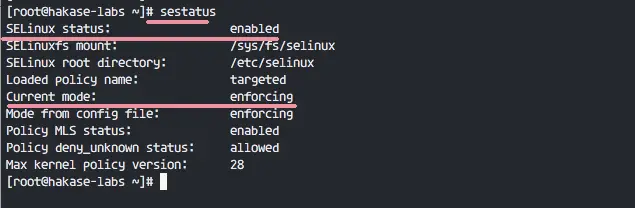
SELinux is in ‘Enforcing’ mode.
Install the SELinux management tool ‘policycoreutils-python’ with the yum command below.
yum -y install policycoreutils-python
Go to the ‘/var/www/’ directory.
cd /var/www/
Run the commands below to change the security context for the Magento files and directories.
semanage fcontext -a -t httpd_sys_rw_content_t ‘/var/www/magento2(/.*)?’
semanage fcontext -a -t httpd_sys_rw_content_t ‘/var/www/magento2/app/etc(/.*)?’
semanage fcontext -a -t httpd_sys_rw_content_t ‘/var/www/magento2/var(/.*)?’
semanage fcontext -a -t httpd_sys_rw_content_t ‘/var/www/magento2/pub/media(/.*)?’
semanage fcontext -a -t httpd_sys_rw_content_t ‘/var/www/magento2/pub/static(/.*)?’
restorecon -Rv ‘/var/www/magento2/’
SELinux configuration is done. Now we need to configure firewalld.
Install firewalld package if you do not have it on your server already.
yum -y install firewalld
Start the firewall and add firewalld to start at boot time.
systemctl start firewalld
systemctl enable firewalld
Open the ports for HTTP and HTTPS so we can access the Magento URL from a web browser.
firewall-cmd –permanent –add-service=http
firewall-cmd –permanent –add-service=https
firewall-cmd –reload
See the open ports for services with the command below.
firewall-cmd –list-all
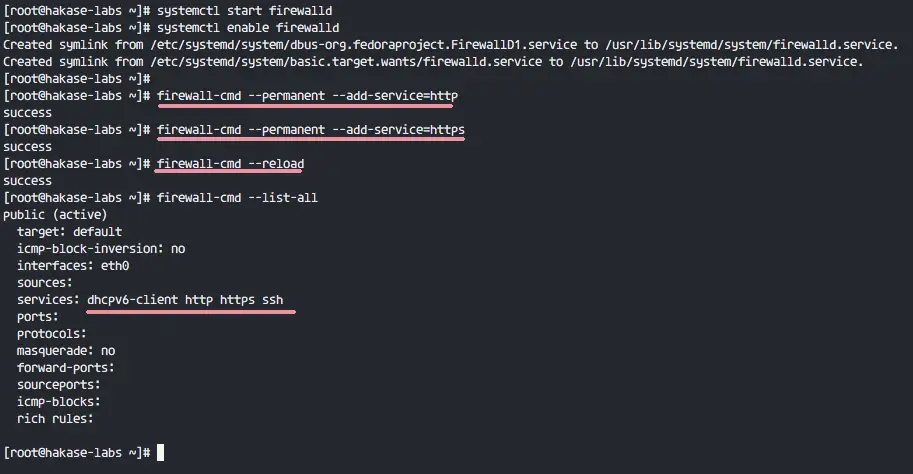
HTTP and HTTPS are ready for connections.
Step 6 – Testing
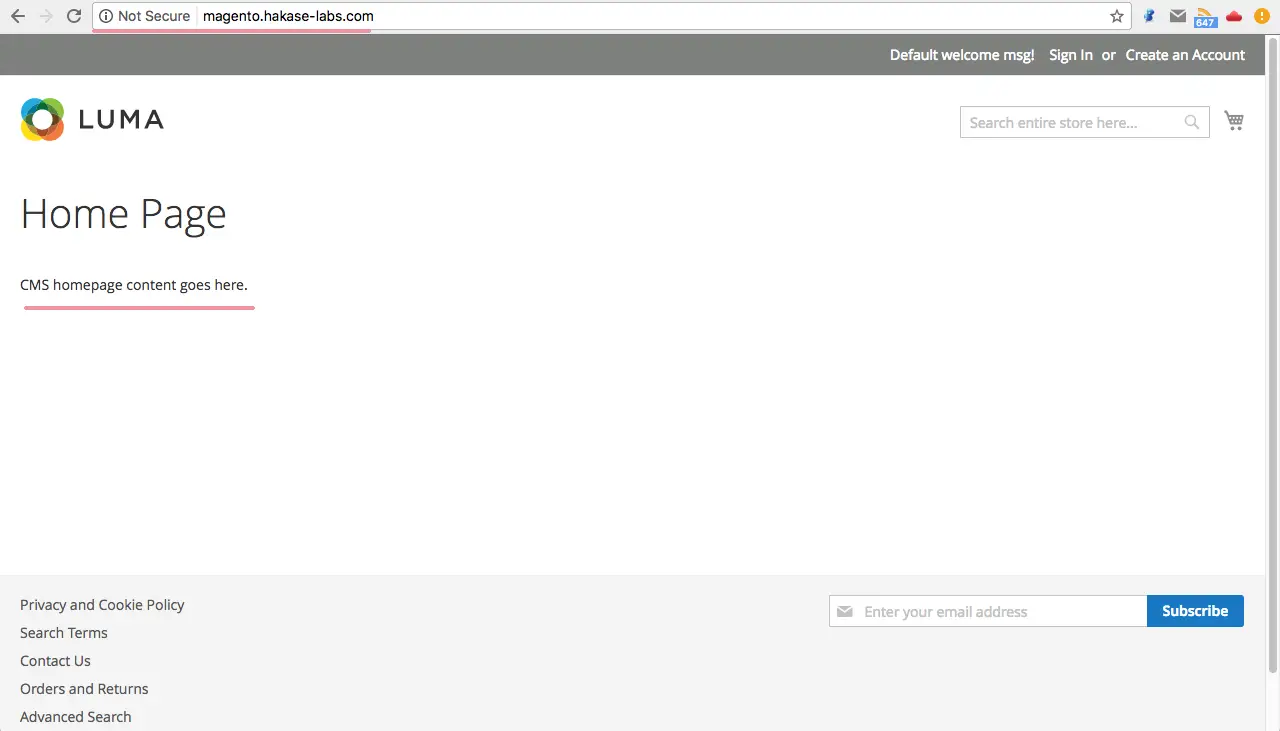
Open your web browser and then browse the Magento URL. Mine is:
magento.hakase-labs.com
And you will see default Magento home page.
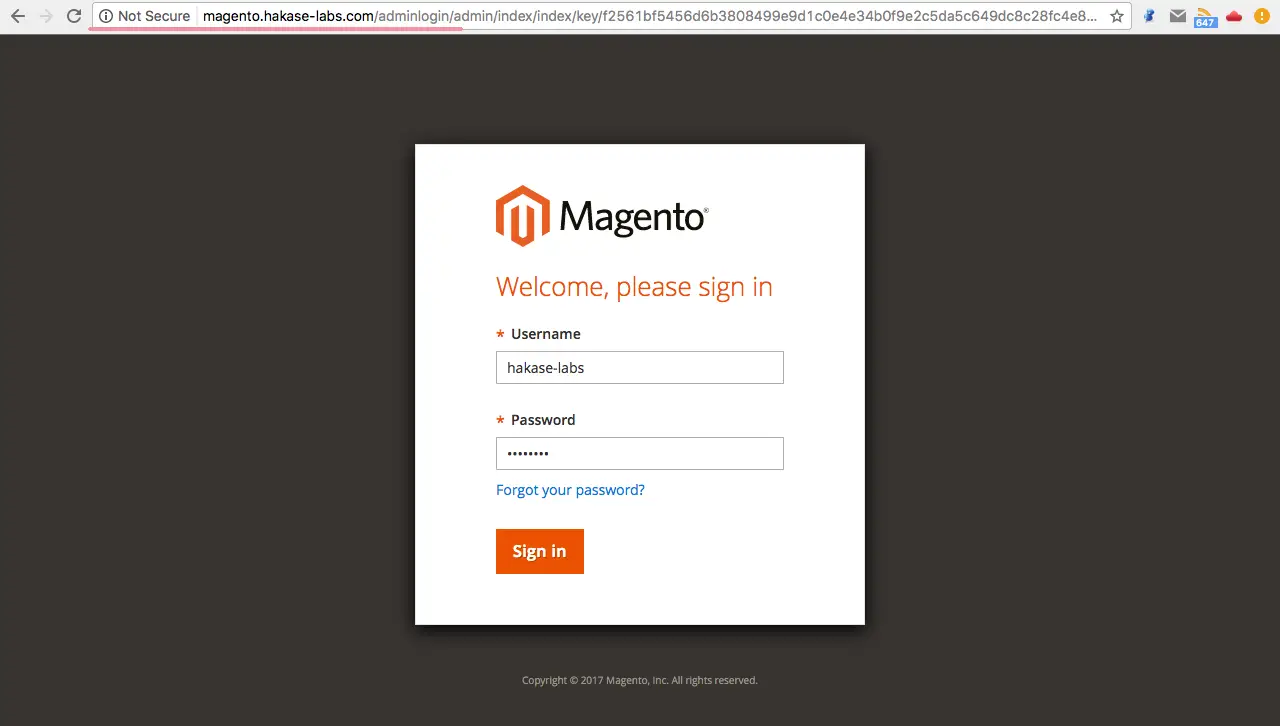
Next, login to the admin dashboard by opening the adminlogin URL.
magento.hakase-labs.com/adminlogin
Login with your admin user and password.
Magento admin dashboard.
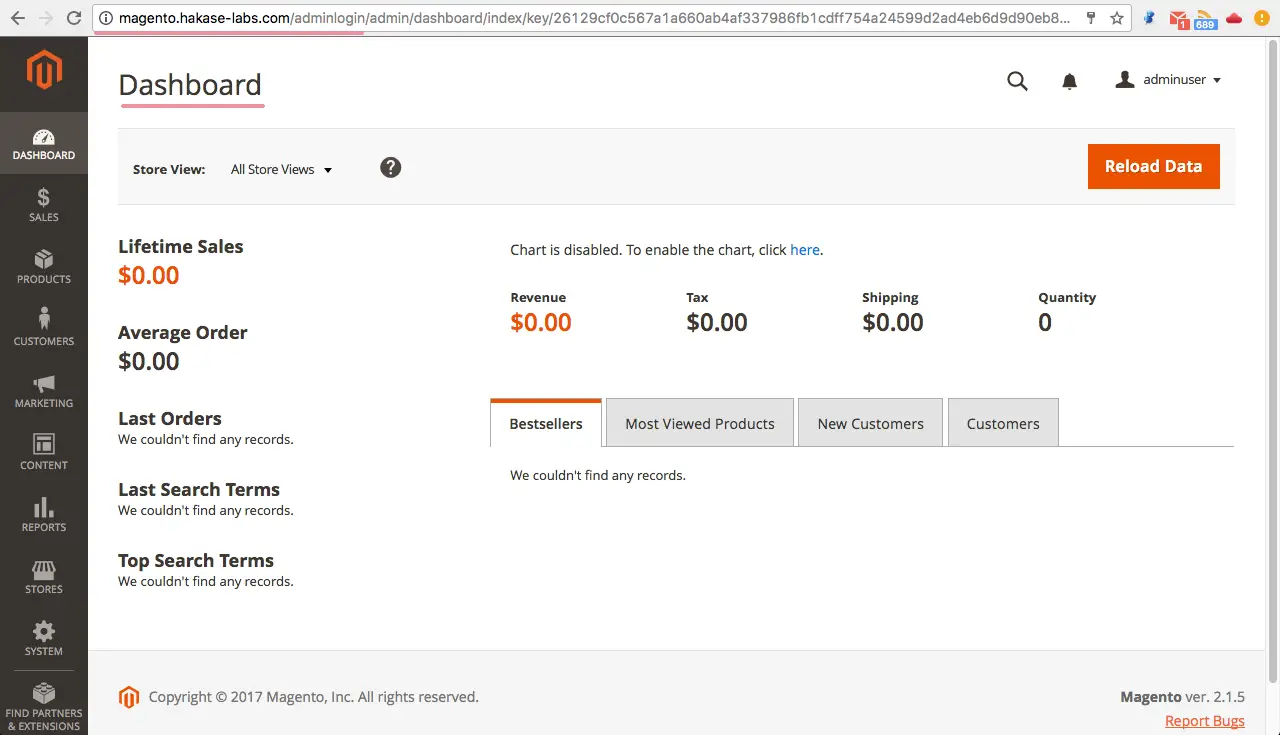
Magento 2.1 has been installed successfully with Nginx, PHP-FPM7 and MySQL 5.7 on a CentOS 7 server.