
In this tutorial, we will explain how to install Magento 2.3.2 on Debian 10 VPS with Nginx.
 Magento is an open-source e-commerce platform written in the PHP language. It is a powerful and one of the most popular solutions for self-hosted online stores due to its simplicity and user-friendliness. Magento allows us to host a fully-functional online shopping cart system without any programming knowledge. Magento also allows us to complement the core files and extend the functionality of Magento by adding new modules. Magento comes with a rich set of features including Website management, SEO, Order management, Customer service tools, Marketing tools, a Checkout system, as well as Payment and Shipping systems. Let’s get started with the installation.
Prerequisites:
- A Debian 10 VPS with root access enabled or a user with sudo privileges.
- Minimum 2GB RAM – We’ll be using our SSD 2 VPS plan.
- PHP version 7.1.3+ and PHP 7.2.x.
- A static IP address is configured and assigned to your VPS.
Step 1: Log in via SSH and Update Packages
Log in to your Debian 10 VPS with SSH as the root user:
ssh [email protected]IP_Address -p Port_number
Replace “root” with a user that has sudo privileges if necessary. Additionally, replace “IP_Address” and “Port_Number” with your server’s respective IP address and SSH port number.
Next, let’s make sure that we’re on Debian 10. You can do that like this:
# lsb_release -a
You should get this as the output:
Distributor ID: Debian
Description:    Debian GNU/Linux 10 (buster)
Release:        10
Codename:       buster
Then, run the following command to make sure that all installed packages on the server are updated to their latest available versions:
# apt update && apt upgrade
Step 2: Install Nginx, MariaDB, and PHP
Install Nginx, MariaDB and other required packages with the following command:
apt-get install nginx mariadb-server git curl software-properties-common -y
By default, Debian 10 ships with PHP version 7.3. But, Magento 2.3 does not support PHP 7.3. So, we will need to install PHP 7.2 and other required extensions.
Of course, Magento will eventually release a version that works with PHP 7.3. If you are installing Magento with a version that supports PHP 7.3, then you should skip this step.
You can install PHP 7.2 from the SURY repository. To add SURY repository, first download and GPG key with the following command:
wget https://packages.sury.org/php/apt.gpg
apt-key add apt.gpg
Next, add the SURY repository to APT with the following command:
echo "deb https://packages.sury.org/php/ $(lsb_release -sc) main" | tee /etc/apt/sources.list.d/php.list
Next, update the repository and install PHP 7.2 along with all required extensions with the following commands:
apt-get update -y
apt-get install php7.2 php7.2-fpm php7.2-common php7.2-mbstring php7.2-xmlrpc php7.2-soap php7.2-gd php7.2-xml php7.2-intl php7.2-mysql php7.2-cli php7.2-ldap php7.2-zip php7.2-curl php7.2-bcmath php7.2-imagick php7.2-xsl php7.2-intl -y
Next, open php.ini file and change the default PHP settings:
nano /etc/php/7.2/fpm/php.ini
Change the following settings:
memory_limit = 256M
upload_max_filesize = 128M
zlib.output_compression = On
max_execution_time = 15000
date.timezone = America/Chicago
Save and close the file.
Step 3: Create a Magento Database
Secure your MariaDB installation by using the mysql_secure_installation script. This script will remove anonymous users, disallow root login remotely, and remove the test database.
mysql_secure_installation
You should answer all the questions as shown below:
Enter current password for root (enter for none): Press [Enter] since no password is set by default
Set root password? [Y/n]: N (Optional)
Remove anonymous users? [Y/n]: Y
Disallow root login remotely? [Y/n]: Y
Remove test database and access to it? [Y/n]: Y
Reload privilege tables now? [Y/n]: Y
Once MariaDB is secured, log in to MariaDB shell:
mysql -u root -p
Provide your MariaDB root password when prompted (if you set one), then create a database and user for Magento:
MariaDB [(none)]> CREATE DATABASE magentodb;
MariaDB [(none)]> CREATE USER 'magentouser'@'localhost';
MariaDB [(none)]> SET PASSWORD FOR 'magentouser'@'localhost' = PASSWORD('Str0n9PasSworD');
Make sure to use a unique password for the database user.
Next, grant all the privileges to Magento Database with the following command:
MariaDB [(none)]> GRANT ALL ON magentodb.* TO 'magentouser'@'localhost' IDENTIFIED BY 'Str0n9PasSworD' WITH GRANT OPTION;
Next, flush the privileges and exit from the MariaDB shell with the following command:
MariaDB [(none)]> FLUSH PRIVILEGES;
MariaDB [(none)]> EXIT;
Once you have done, you can proceed to the next step.
Step 4: Download Magento
At the time of writing this article, the latest stable version of Magento is version 2.3.2.
First, go to the GitHub repository and download the latest version of Magento with the following command:
cd /var/www/html
git clone https://github.com/magento/magento2.git
Next, check the latest version of Magento with the following command:
cd magento2/
git checkout 2.3.2
Next, we will need to install Composer to install all necessary Magento components. You can install Composer by just running the following command:
curl -sS https://getcomposer.org/installer | php -- --install-dir=/usr/bin --filename=composer
Next, install all the PHP dependencies required by Magento with the following command:
cd /var/www/html/magento2
composer install
Once all the dependencies have been installed without any error, change the ownership of the magento2 directory to www-data with the following command:
chown -R www-data:www-data /var/www/html/magento2/
Step 5: Configure Nginx for Magento
Next, we will need to configure Nginx for Magento store. First, create a new Nginx virtual host configuration file with the following command:
nano /etc/nginx/sites-available/magento.conf
Then add the following content:
upstream fastcgi_backend {
         server  unix:/run/php/php7.2-fpm.sock;
}

server {
    listen 80;
    index  index.php index.html index.htm;
    server_name domain-name.com;

    set $MAGE_ROOT /var/www/html/magento2;
    set $MAGE_MODE developer;
    include /var/www/html/magento2/nginx.conf.sample;
}
Make sure to replace domain-name.com with your registered domain name.
Save and close the file. Then, check Nginx for any syntax error:
nginx -t
You should get the following output:
nginx: the configuration file /etc/nginx/nginx.conf syntax is ok
nginx: configuration file /etc/nginx/nginx.conf test is successful
Next, activate the Nginx virtual host with the following command:
ln -s /etc/nginx/sites-available/magento.conf /etc/nginx/sites-enabled/
Finally, restart Nginx and PHP-FPM service to apply all the configuration changes:
systemctl restart nginx
systemctl restart php7.2-fpm
Step 6: Access Magento Web Installation Wizard
Now, open your web browser and open the URL http://domain-name.com. You should see Magento setup wizard as shown below:
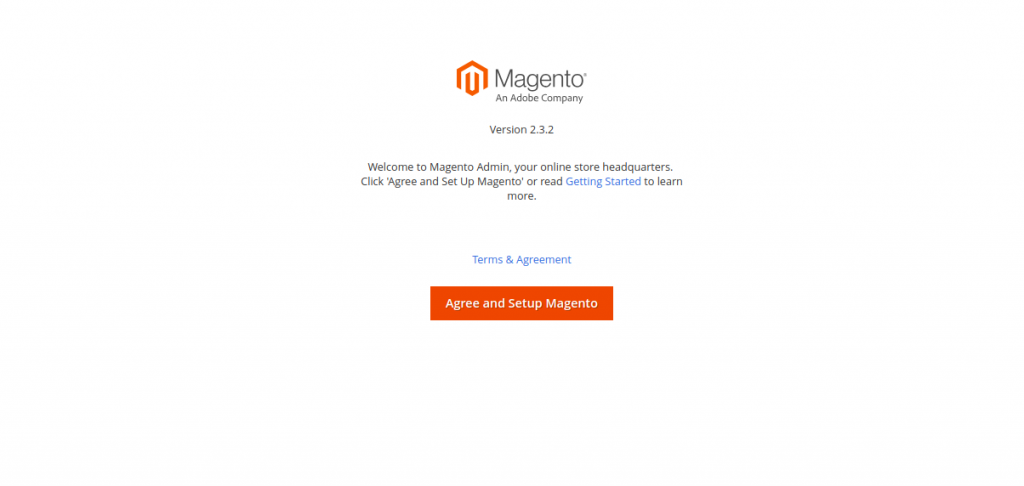
Click on the Agree and Setup Magento button. You should see the Magento Readiness check wizard:
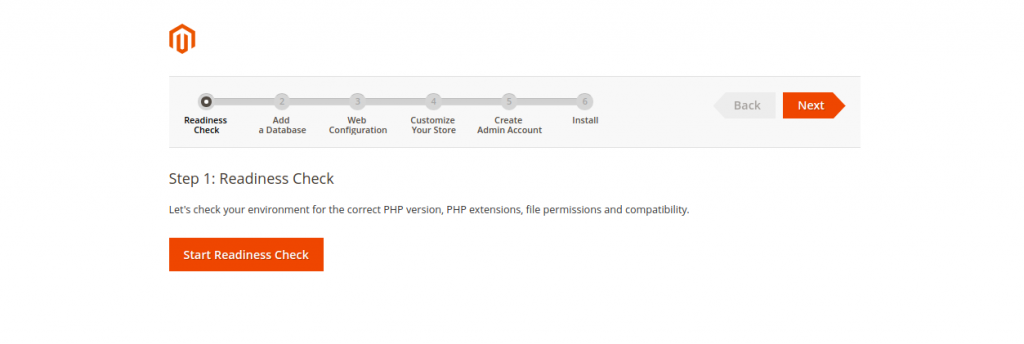
Now, click on the Start Readiness Check to check the correct PHP version, PHP extensions, and file permissions. Once the Readiness check has been completed successfully, you should see the following page:
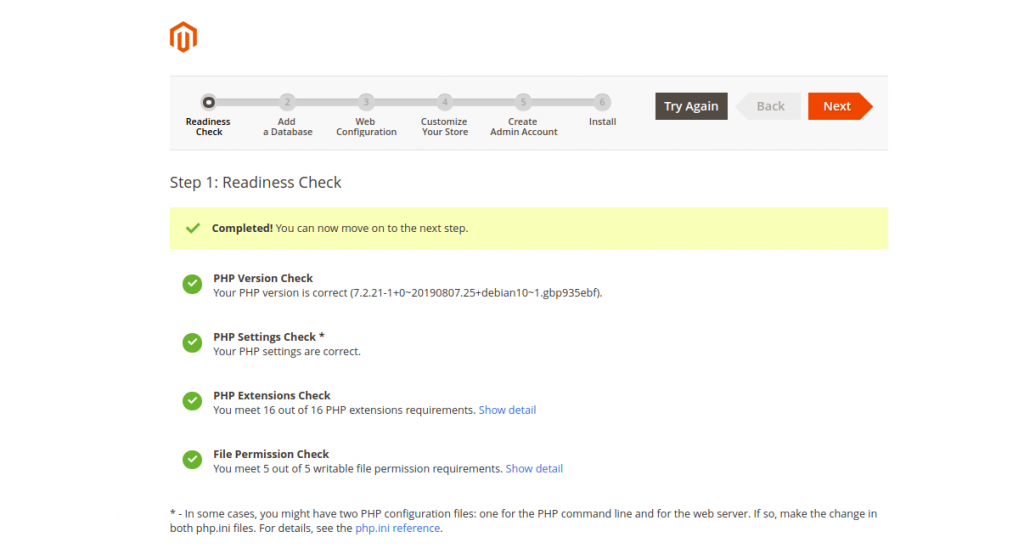
Then click on the Next button. You should see the database configuration page:
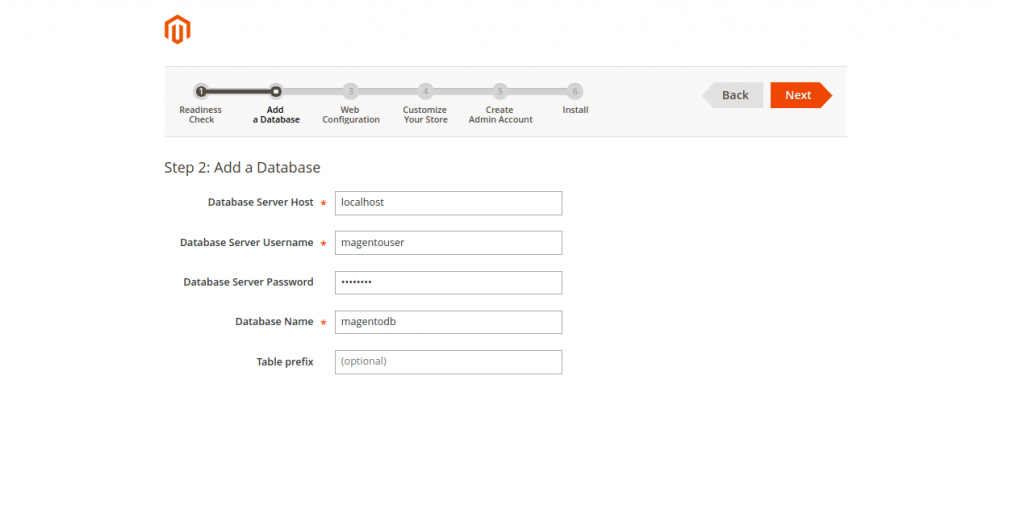
Provide the Magento database details that we set earlier, then click on the Next button. You should see the Magento Web configuration wizard:
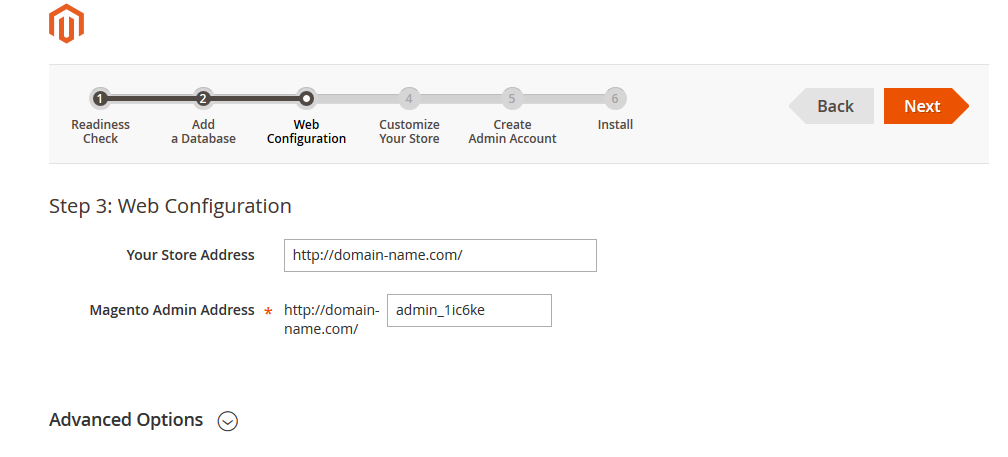
Provide your store address and Magento admin address. Then, click on the Next button. You should see the following page:
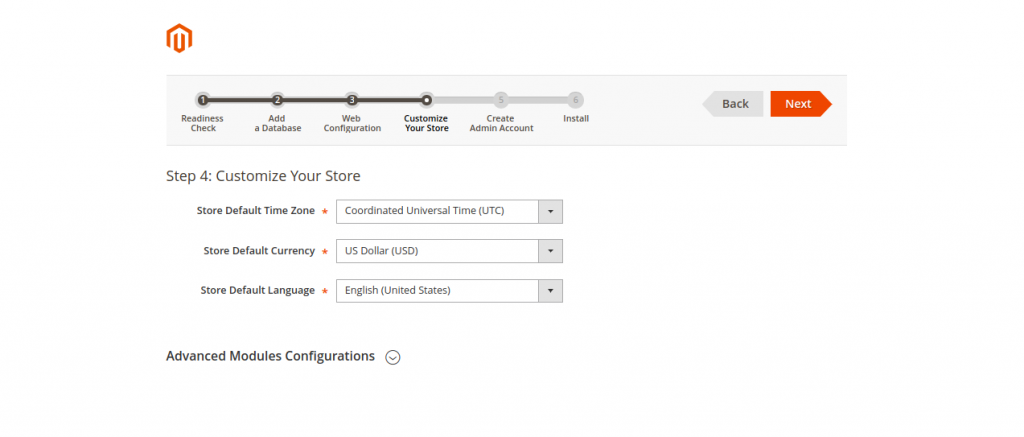
Now, select your time zone, currency, language and click on the Next button. You should see the Magento admin setup wizard:
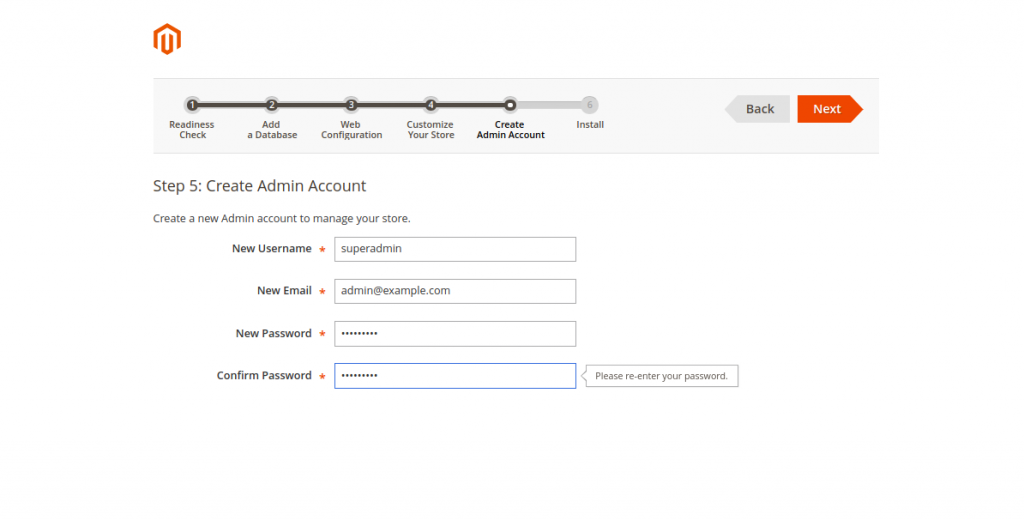
Provide your admin username, password, and email, then click on the Next button. You should see the following page:
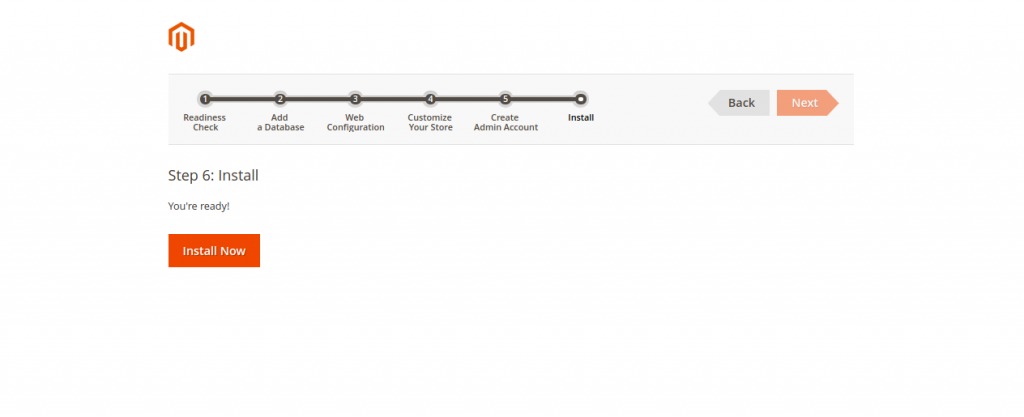
Finally, click on the Install Now button to start the Magento installation. Once the installation has been completed successfully, you should see the following page:
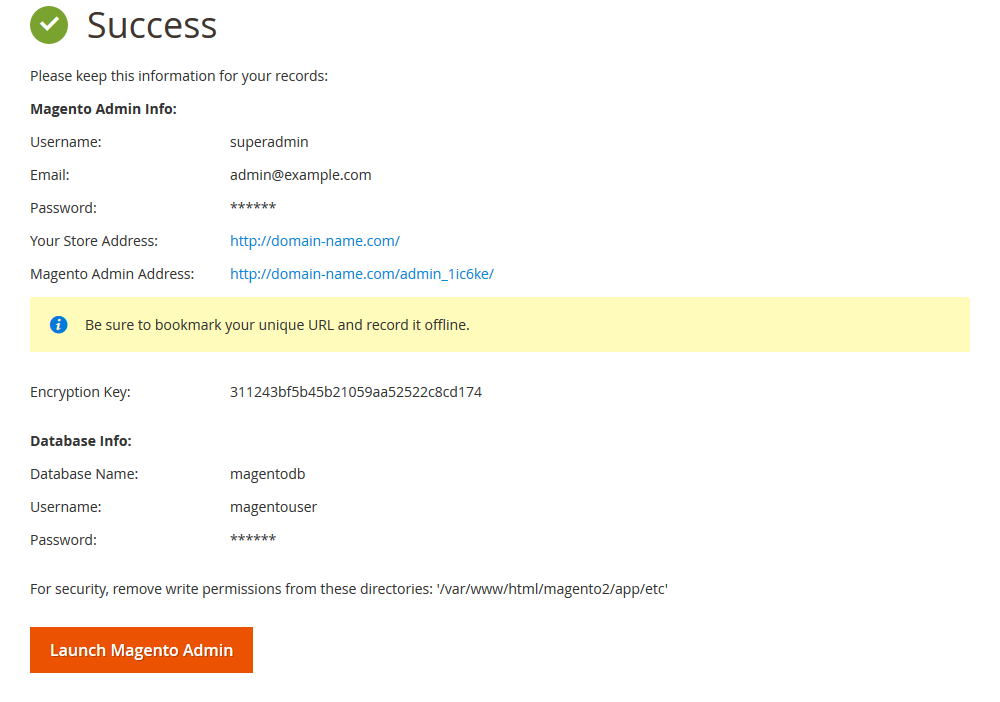
Once Magento has been installed successfully, click on the Launch Magento Admin button, you will be redirected to the Magento admin interface:
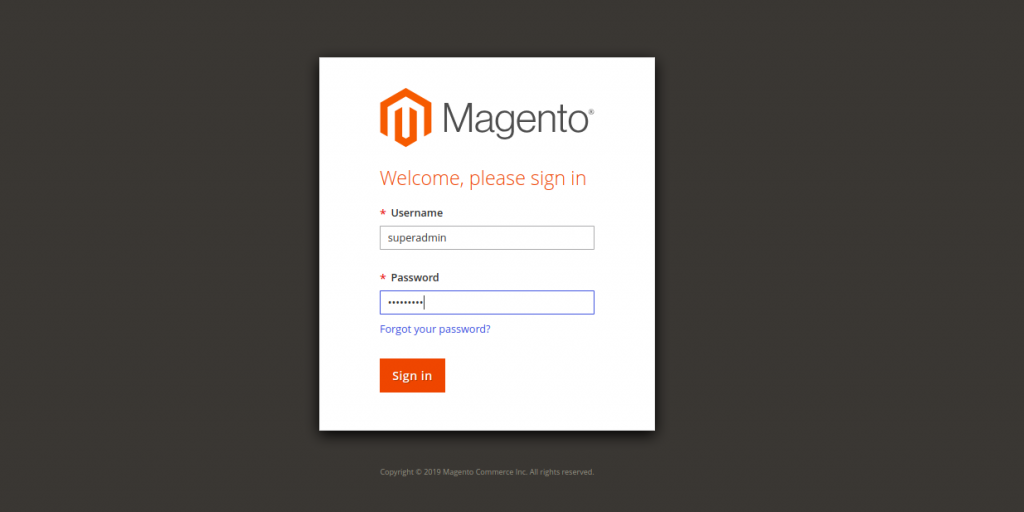
Provide your Magento username and password – click on the Sign In button. You will be redirected to the Magento dashboard in the following screen:
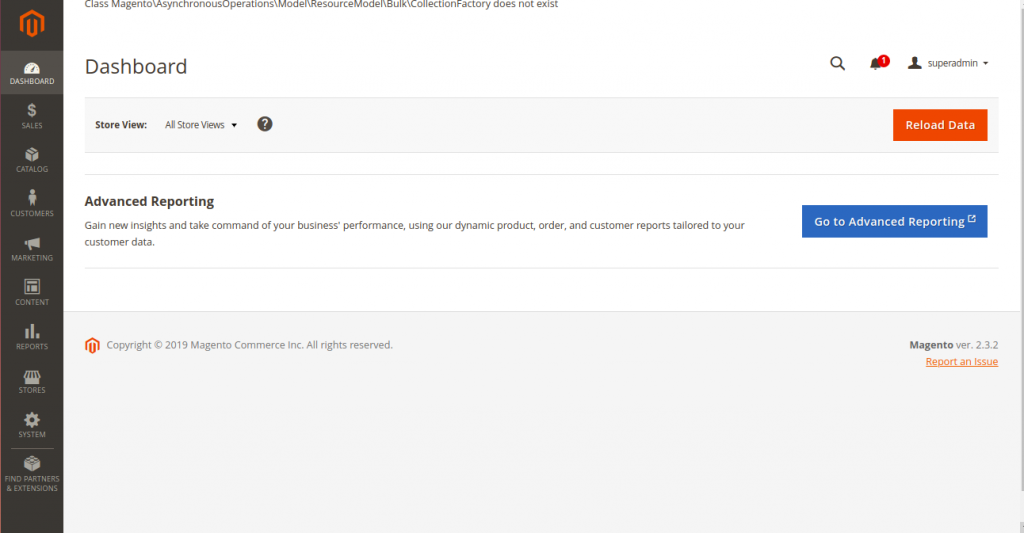
Congratulations! The installation is now complete. However, there is still one more thing that needs to be done.
Step 7: Configure Cron Job For Magento
There are many configurations and features in Magento 2 which needs cron job for the proper working of your Magento. List of the tasks handled by cron in Magento 2 are: Newsletters, Reindexing, Updating of currency rates, Alerts/Notifications, Catalog price rules and many more.
To create the Magento crontab, run the following command with the www-data user as shown below:
cd /var/www/html/magento2
sudo -u www-data php bin/magento cron:install
You can now see the installed cron job with the following command:
crontab -u www-data -l
You should get the following output:
#~ MAGENTO START f73db5f5dcf223372d4c9fab56bef0c1730eece898fad5cbee0c313b46b0dd1f
* * * * * /usr/bin/php7.2 /var/www/html/magento2/bin/magento cron:run 2>&1 | grep -v "Ran jobs by schedule" >> /var/www/html/magento2/var/log/magento.cron.log
* * * * * /usr/bin/php7.2 /var/www/html/magento2/update/cron.php >> /var/www/html/magento2/var/log/update.cron.log
* * * * * /usr/bin/php7.2 /var/www/html/magento2/bin/magento setup:cron:run >> /var/www/html/magento2/var/log/setup.cron.log
#~ MAGENTO END f73db5f5dcf223372d4c9fab56bef0c1730eece898fad5cbee0c313b46b0dd1f
That’s it. You have successfully installed and configured Magento on a Debian 10 VPS with the Nginx web server. You can now host your own online store within minutes and start customizing your store as per your requirements.