
OpenLiteSpeed is an open source HTTP server developed by LiteSpeed Technologies. It is a high performance and lightweight HTTP server which comes with a Web-based GUI for administration. OpenLiteSpeed can handle more than hundred thousand concurrent connections with low resource usage (CPU and RAM), and supports many OS like Linux, Mac OS, FreeBSD, and SunOS. The server can be used to run website scripts written in PHP, Ruby, Perl, and Java.
In this tutorial, we will show you how to install OpenLiteSpeed Web server, and then configure latest PHP version PHP 7.1. Please note that we will be using the Ubuntu 16.04 server for this guide.
Prerequisite
- Ubuntu 16.04 server
- Root privileges
What we will do:
- Install OpenLiteSpeed Web server on Ubuntu 16.04
- Install PHP 7.1 OpenLiteSpeed version
- Configure UFW Firewall
- Configure OpenLiteSpeed admin user
- Configure OpenLiteSpeed and PHP 7.1
- Configure OpenLiteSpeed on port 80
- Testing
Step 1 – Install OpenLiteSpeed on Ubuntu 16.04
In this first step, we will install the OpenLiteSpeed server on the Ubuntu 16.04 system. LiteSpeed provides repositories for Linux installation on Debian and Redhat based operating systems.
So firstly, download the bash script for adding the LiteSpeed repository to the Ubuntu system.
wget -O – http://rpms.litespeedtech.com/debian/enable_lst_debain_repo.sh | bash

When that’s done, install the OpenLiteSpeed Web server using the following apt command.
sudo apt install openlitespeed -y
After the OpenLiteSpeed installation is complete, you will get the result as shown below.

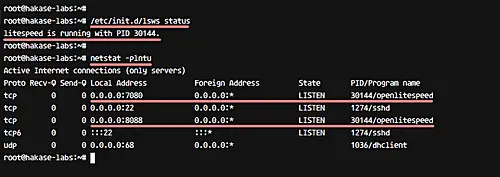
Now check the OpenLiteSpeed service status and make sure it’s up and running.
/etc/init.d/lsws status
Also, make sure you get the OpenLiteSpeed PID (Process ID) number.
By default, OpenLiteSpeed will be using 2 ports after installation – port 8088 as its default HTTP port, and port 7080 for the OpenLiteSpeed admin page. Check those ports using the netstat command and make sure the state is ‘LISTEN’.
netstat -plntu
So the OpenLiteSpeed Web server has been installed on Ubuntu 16.04.
Step 2 – Install PHP 7.1 OpenLiteSpeed version
In this step, we will install PHP 7.1 for LiteSpeed. OpenLiteSpeed provides its own PHP packages version named ‘lsphp’ or ‘PHP LSAPI (LiteSpeed Server Application Programming Interface)’.
LSAPI is the interface between PHP and OpenLiteSpeed, it is designed for high performance. LSAPI bindings exist for PHP, Ruby, and Python only.
Install lsphp OpenLiteSpeed using the following command:
sudo apt install lsphp71 lsphp71-common lsphp71-mysql lsphp71-dev lsphp71-curl lsphp70-dbg -y
So this way, you can install PHP 7.1 for OpenLiteSpeed.
Step 3 – Configure UFW firewall
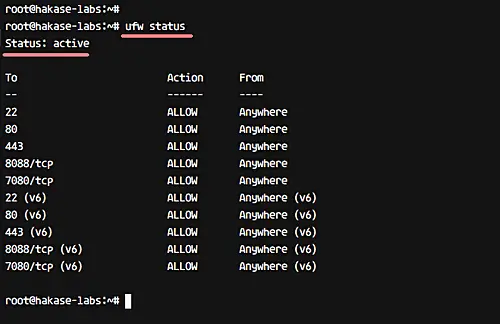
Now we will configure the firewall for Ubuntu system. We will open new ports for HTTP, HTTPS, SSH, as well as the OpenLiteSpeed default port 8088 and the admin panel port 7081.
The default firewall configuration tool for Ubuntu is UFW. Install it from the default ubuntu repository using the following command.
sudo apt install ufw -y
After the installation is complete, add new firewall rules using the following commands.
ufw allow ssh
ufw allow http
ufw allow https
ufw allow 8088/tcp
ufw allow 7080/tcp
Now enable the UFW firewall using command below.
ufw enable
Type ‘y‘ and press Enter for activating the UFW firewall and enabling it to run automatically at the boot time.

The UFW firewall configuration has been completed. Check it using the following command and make sure all ports are on the list.
ufw status
Step 4 – Configure OpenLiteSpeed Admin
The OpenLiteSpeed Web server provides a web based admin panel for configuration. And in this step, we will configure the admin user and password to login to the OpenLiteSpeed admin panel.
Go to the OpenLiteSpeed configuration directory and execute the bash file for generating the admin password.
cd /usr/local/lsws/admin/misc
sh admpass.sh
Type your admin user and password, and you will get the result as below.

Next, test login to the OpenLiteSpeed admin panel using the new username and password. Visit the server IP address with port 7080, mine is:
https://hakase-labs.co:7080/
Then type your admin user and password, and finally click ‘Login’.

Now you should see the OpenLiteSpeed admin dashboard.

Step 5 – Configure OpenLiteSpeed and PHP 7.1
In this step, we will configure PHP 7.1 for OpenLiteSpeed web server. By default, it uses PHP 7.0, so we will change the default PHP version for OpenLiteSpeed Web server with PHP 7.1.
After logging in to the OpenLiteSpeed admin dashboard, click the ‘Server Configuration’ option in the left panel and then click the ‘External App’ tab. Now, click the ‘Add’ button on the right to add new PHP version.

For the external app ‘Type’, choose the ‘LiteSpeed SAPI App’ and click ‘Next’.

Now input all of the configuration along with the corresponding values
 Name: lsphp71
Address: uds://tmp/lshttpd/lsphp.sock
Notes: lsphp71 for OpenLiteSpeed
Max Connections: 35
Initial Request Timeout (secs): 60
Retry Timeout (secs): 0
Command: $SERVER_ROOT/lsphp71/bin/lsphp
Click the ‘Save’ button on the right.

And now we’ve two version of PHP on the OpenLiteSpeed Web server. Next, go to the ‘Script Handler’ tab and change the default PHP version used by the Web server.
Click on the ‘Edit’ button.

Change the ‘Handler Name’ to the ‘lsphp71’ and click ‘Save’.
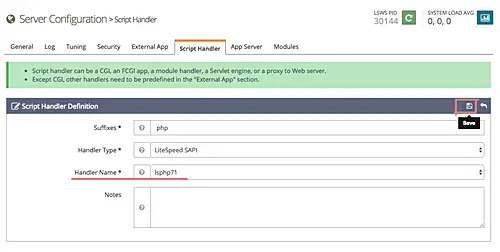
So this completes the PHP 7.1 configuration for OpenLiteSpeed.
Step 6 – Configure OpenLiteSpeed on port 80
In this step, we will change the default OpenLiteSpeed port 8088 to the HTTP port 80.
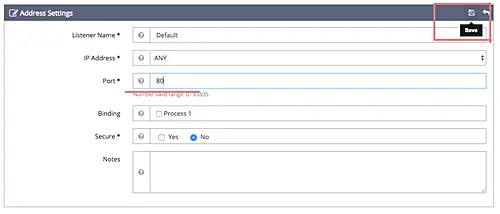
Go to the ‘Listeners’ section and you will get the default listener. Here, click the ‘View’ button.

Now click ‘Edit’ for editing the default Listener port.

Change the ‘Port’ value 8088 to the HTTP port 80, and click ‘Save’.
And lastly, we need to restart the OpenLiteSpeed web server. For this, click on the system hostname ‘Hakase-labs’, and then click the ‘Graceful Restart’ button and finally click ‘Go’.

The OpenLiteSpeed now is running on the default HTTP port 80.
Step 7 – Testing
Testing OpenLiteSpeed home page
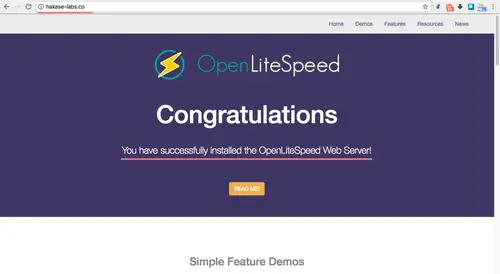
Test the OpenLiteSpeed homepage by visiting the server IP address or domain name.
http://hakase-labs.co/
Shown below is the default OpenLiteSpeed page.
Testing using cURL command
Test using the curl command with default HTTP port 80, and make sure you get the ‘LiteSpeed’ on the server value as result.
curl -I hakase-labs.co

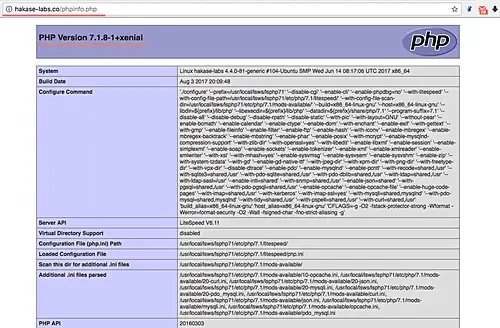
Testing PHP version using PHP info
Test the PHP version using PHP info from the Web browser.
http://hakase-labs.co/phpinfo.php
And you should get the PHP info as below.
So the OpenLiteSpeed Web server with PHP 7.1 installation and configuration has been completed.