
Rancher is an open source container management platform. It allows you to run and manage Docker and Kubernetes containers with ease. Rancher provides infrastructure services such as multi-host networking, load balancing, and volume snapshots.
In this tutorial, I will show you how to install and configure Rancher on Ubuntu 16.04 LTS. We will install Rancher on an Ubuntu server, enable local authentication, add the rancher host, and then try to run single container application from Rancher Dashboard.
Prerequisites
- Ubuntu Server 16.04
- hakase-labs – 192.168.33.10
- rancher-host01 – 192.168.33.11
- Root privileges
What we will do?
- Install Docker on Ubuntu 16.04
- Install Rancher Server
- Enable Local Authentication Rancher Server
- Add New Host
- Deploy New Container
Step 1 – Install Docker on Ubuntu 16.04
Rancher can be installed as a set of Docker Containers – one container as a management server and another as an agent. And we need the Docker installed on all our rancher hosts.
Update your Ubuntu repository and upgrade all packages.
sudo apt update
sudo apt upgrade
Now install docker using the apt command below.
sudo apt install -y docker.io
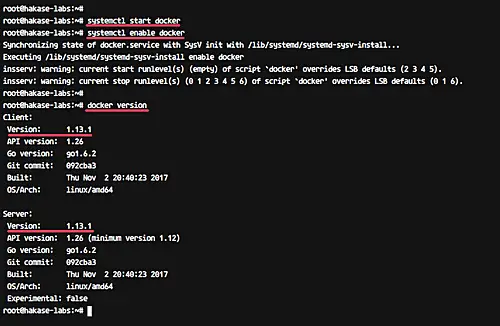
After the installation is complete, start the docker service and enable it to run everytime at system boot.
systemctl start docker
systemctl enable docker
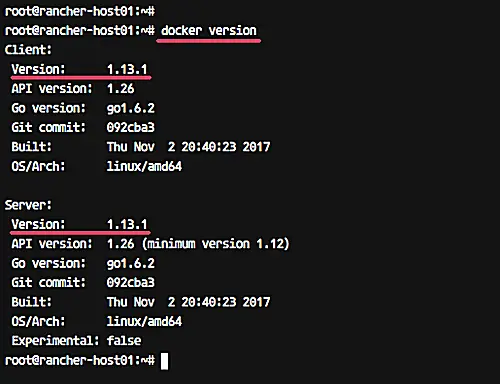
The Docker is now installed and running on our rancher host – check it using the command below.
systemctl status docker
docker –version
And you should get the result as shown below.
Step 2 – Install Rancher Server
To run and install Rancher, we just need to run the Rancher container on our host. In this step, we will install Rancher server single container on our ‘host01’ server.
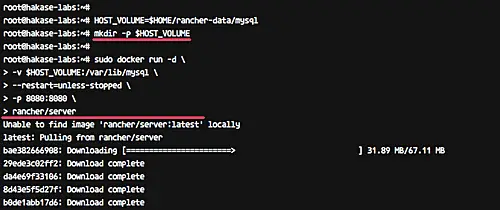
Before installing Rancher server on the ‘hakase-labs’ server, we will create and define a new directory as a Rancher database volume.
Run the following commands.
HOST_VOLUME=$HOME/rancher-data/mysql
mkdir -p $HOST_VOLUME
Now install Rancher server using the docker command below.
sudo docker run -d
-v $HOST_VOLUME:/var/lib/mysql
–restart=unless-stopped
-p 8080:8080
rancher/server
Wait for the Rancher server installation.
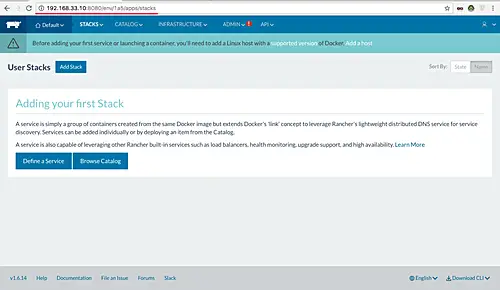
When the installation is complete, Rancher server is accessible from the web browser.
Open your web browser and type the server IP address with port 8080.
http://192.168.33.10:8080/
And you will get the Rancher first page installation as below.
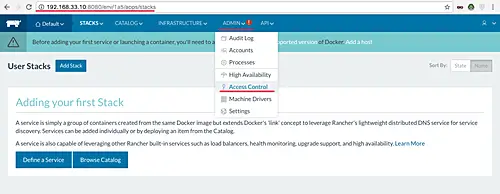
Step 3 – Configure Rancher Access Control
After the Rancher installation, we need to configure the Rancher Access Control. The Access Control allows you to manage users who have the access permissions to your Rancher server.
Rancher supports many access control providers, including Active Directory, Azure AD, Github, OpenLDAP, SAML, and Local Authentication.
For this guide, we will enable the local authentication for our Rancher server installation.
Open your web browser and type the server IP address with port 8080.
http://192.168.33.10:8080/
Move the cursor to the ‘ADMIN’ menu and click the ‘Access Control’.
Now we want to use the ‘Local Authentication’ method. Click the ‘LOCAL’ on the page, then type your username and password.
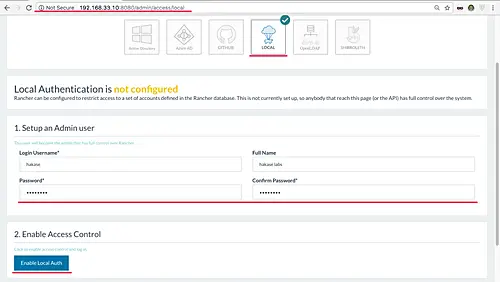
And click ‘Enable Local Auth’ button.
And you will be redirected to the Rancher Dashboard with Local Authentication enabled.
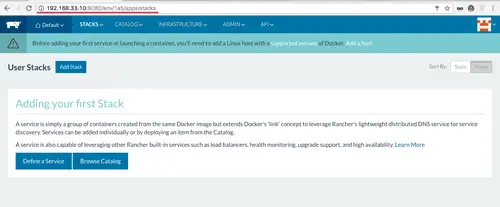
Step 4 – Add New Host
Hosts are the most basic unit of resource within Rancher and represented as any Linux server (a virtual or physical server with Docker installed on it).
In this step, we will add new host ‘rancher-host01’ with Ubuntu as an operating system and 2GB RAM.
Connect to the ‘rancher-host01’ server using the ssh.
ssh [email protected]
Install latest Docker version to the server using the apt command.
sudo apt install docker.io
After the installation is complete, start the docker service and enable it to launch everytime at system boot.
systemctl start docker
systemctl enable docker
The Docker has been installed on the ‘rancher-host01’ server.
Next, we will add the rancher-host01 to the Rancher Server.
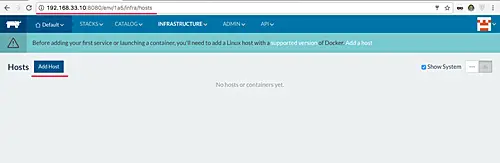
Open the Rancher Dashboard, move your cursor to the ‘INFRASTRUCTURE’ menu and click ‘Hosts’.
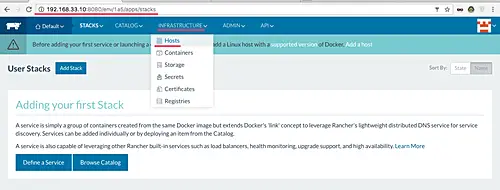
Now click ‘Add Host’ button.
For the Host Registration URL, we will use default as below.
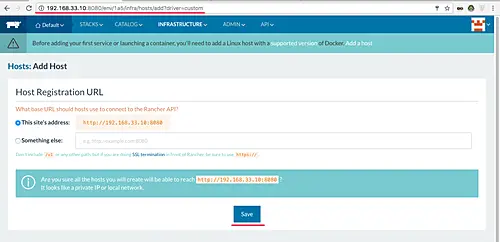
Click the ‘Save’ button.
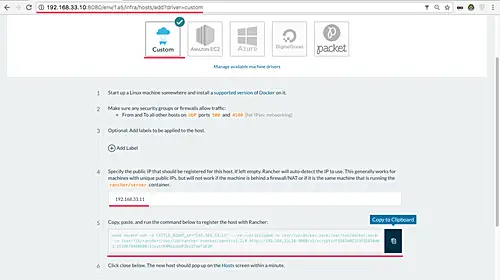
Now select the Host type. Rancher support for many Host type including Amazon EC2, Azure, DigitalOcean, and Rackspace Hosts.
Choose the ‘Custom’ host, type the ‘hots02’ IP address, and copy the docker command in the box.
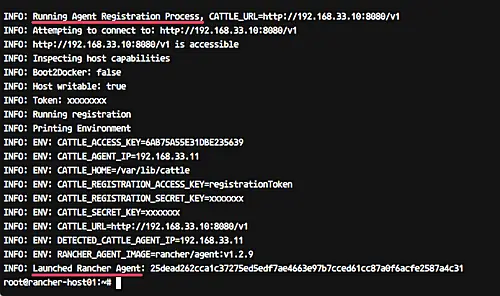
Now open the rancher-host01 terminal shell and paste the command as an example below.
sudo docker run -e CATTLE_AGENT_IP=”192.168.33.11″ –rm –privileged -v /var/run/docker.sock:/var/run/docker.sock -v /var/lib/rancher:/var/lib/rancher rancher/agent:v1.2.9 http://192.168.33.10:8080/v1/scripts/C7871D15E9CE6FFA892F:1514678400000:T9qDygb2pHroTMBuqA9Jylol8tU
The command will download and create new container Rancher Agent on the rancher-host01 server.
And when it’s complete, you will get the result as below.
Now back to the Rancher Dashboard Host Add page and click the ‘Close’ button.
And you will get the page as below.
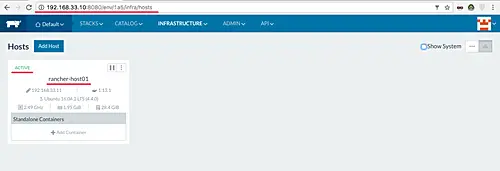
rancher-host01 has been added to the Rancher server, and we’re now ready to run container managed by Rancher server.
Step 5 – Test Create New Container through Rancher Catalog
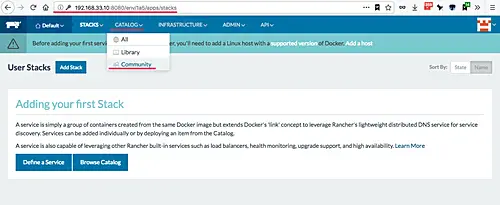
Rancher provides a catalog for applications. The application templates make it easy to deploy new applications.
Rancher provides two types of catalogs. The Library catalog, which contains templates from the Rancher certified catalog, and the Community catalog, which contains templates from the Rancher Community-catalog.
In this step, we will try to deploy a simple blog platform ‘Ghost’ as a container through the Rancher Catalog Community Templates.
On the Rancher Dashboard, move the cursor to the ‘CATALOG’ menu and click the Community Catalog.
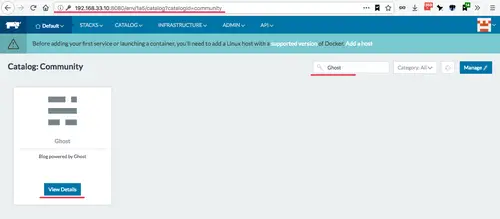
I the ‘Search’ box – type the application name that we want to install (‘Ghost’), then click the ‘View Details’ button.
Give the new Ghost container a name and description.
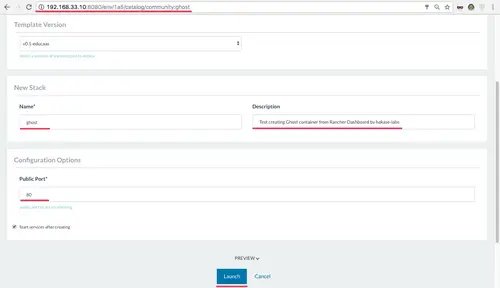
Then click the ‘Launch’ button.
When it’s complete, you will get the result as below.
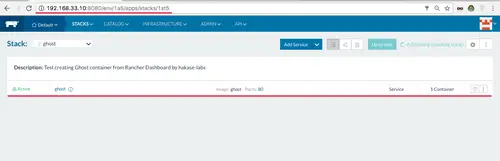
The ‘Ghost’ container has been created and is now running on the Rancher agent server.
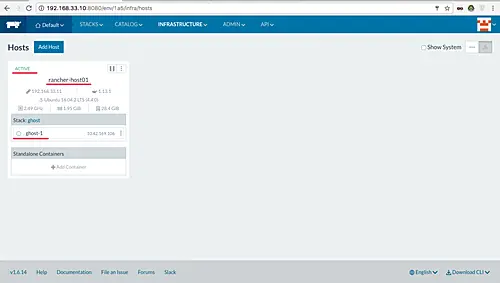
Now move your cursor to the ‘INFRASTRUCTURE’ menu and click the ‘Host’. And make sure you get the ‘ghost’ container is running on the ‘host2’ server.
To verify the Ghost container installation, open your web browser and type the ‘rancher-host01’ IP address and you will get the ghost blog default homepage.
http://192.168.33.11/

Rancher server and Rancher agent installation on Ubuntu 16.04 has been completed successfully.
Reference