
Tripwire is a free and open source Intrusion Detection System (IDS). It’s a security tool for monitoring and alerting file changes on the system. Tripwire is a powerful IDS that protects your system against unwanted changes. You can monitor your system files, including website files. So when there is any unwanted file change in any of the files that are being monitored, tripwire will check your system and will alert you (if that setup is in place).
In this tutorial, we will show you how to install and configure Tripwire Host Based IDS on Ubuntu 16.04. We will also show you how to configure tripwire to monitor and detect modified files on the system.
What we will do
- Install Tripwire
- Configure Tripwire policy for Ubuntu system
- Verify Tripwire configuration
- Add new ruleset to Tripwire policy
- Setup Tripwire notification and cron
Prerequisites
- Ubuntu 16.04 Server
- Root privileges
Step 1 – Install Tripwire
The first step is to install tripwire to the system. The tool is available in the official Ubuntu repository – just update your Ubuntu repository and install Tripwire using the following commands.
sudo apt update
sudo apt install -y tripwire
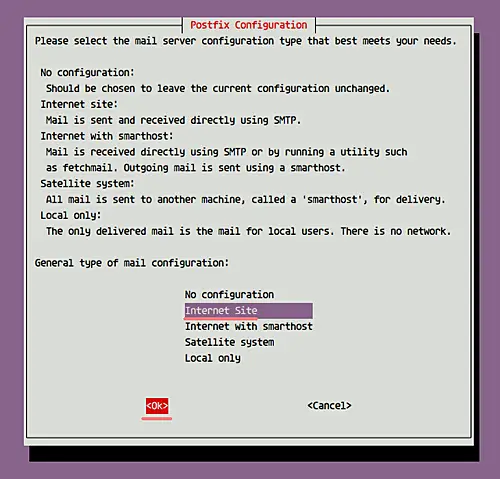
During the installation, you will be asked about Postfix SMTP configuration. Choose ‘Internet Site‘ and click ‘OK‘ to continue with the installation.
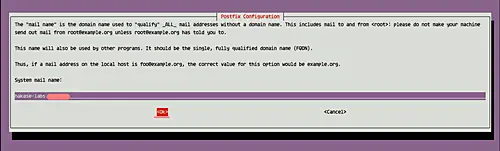
For the mail system name, leave default (as shown below), and choose ‘OK‘ to continue.
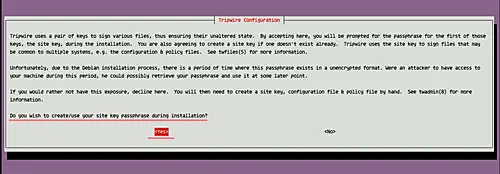
Next, you’ll will be asked about Tripwire configuration.
Create new ‘site-key‘ for Tripwire – choose ‘Yes‘ and press Enter to continue.
Now for the ‘local-key‘, choose ‘Yes‘ and press Enter again.

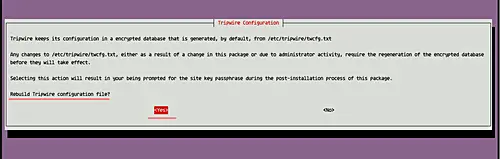
For the Rebuild Tripwire Configuration option, choose ‘Yes‘.
Same for Rebuild Tripwire Policy option – choose ‘Yes‘.

Now you will be prompted for the ‘site-key‘ passphrase. Type a password and choose ‘OK‘.
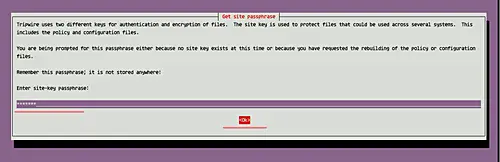
Repeat the ‘site-key‘ passphrase.

Then for the ‘local-key‘ passphrase, type a password and choose ‘OK‘.

Repeat the ‘local-key‘ passphrase.

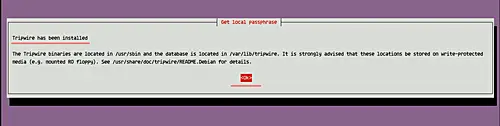
And now tripwire installation on Ubuntu 16.04 has been completed.
Step 2 – Configure Tripwire policy for Ubuntu system
In this step, we will configure Tripwire for our Ubuntu system. All Tripwire-related configuration is located in the ‘/etc/tripwire’ directory.
After Tripwire installation, we need to initialize the database system. Run the following command for it.
sudo tripwire –init
You will be asked about your local-key passphrase – type your local-key passphrase and press Enter.
And you will likely get the error ‘No such directory‘, as shown below.

To solve this error, we need to edit Tripwire configuration file and regenerate the configuration.
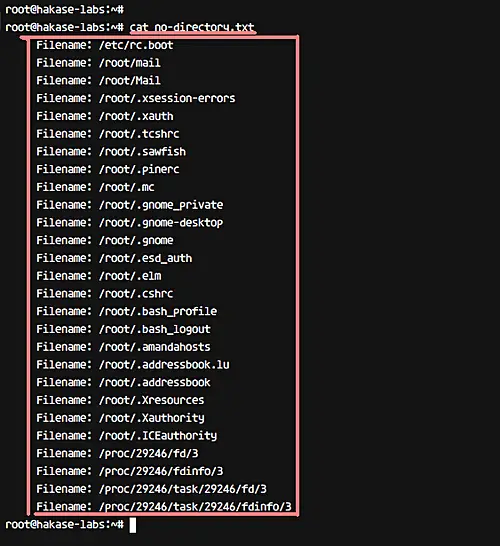
Before editing the Tripwire configuration, we need to check which directory doesn’t exist, something that you can do using the following command.
sudo sh -c “tripwire –check | grep Filename > no-directory.txt”
Now you can see all directories and files that do not exist in the following way.
cat no-directory.txt
Next, go to the Tripwire configuration directory and edit the configuration file twpol.txt.
cd /etc/tripwire/
vim twpol.txt
On the ‘Boot Scripts’ rule, comment the line as below.
(
rulename = "Boot Scripts",
severity = $(SIG_HI)
)
{
/etc/init.d             -> $(SEC_BIN) ;
#/etc/rc.boot           -> $(SEC_BIN) ;
/etc/rcS.d              -> $(SEC_BIN) ;
On the ‘System Boot Changes’ rule, comment as below.
(
rulename = "System boot changes",
severity = $(SIG_HI)
)
{
#/var/lock               -> $(SEC_CONFIG) ;
#/var/run                -> $(SEC_CONFIG) ; # daemon PIDs
/var/log                -> $(SEC_CONFIG) ;
On the ‘Root config files’ rule, make the following change.
(
rulename = "Root config files",
severity = 100
)
{
/root                           -> $(SEC_CRIT) ; # Catch all additions to /root
#/root/mail                     -> $(SEC_CONFIG) ;
#/root/Mail                     -> $(SEC_CONFIG) ;
#/root/.xsession-errors         -> $(SEC_CONFIG) ;
#/root/.xauth                   -> $(SEC_CONFIG) ;
#/root/.tcshrc                  -> $(SEC_CONFIG) ;
#/root/.sawfish                 -> $(SEC_CONFIG) ;
#/root/.pinerc                  -> $(SEC_CONFIG) ;
#/root/.mc                      -> $(SEC_CONFIG) ;
#/root/.gnome_private           -> $(SEC_CONFIG) ;
#/root/.gnome-desktop           -> $(SEC_CONFIG) ;
#/root/.gnome                   -> $(SEC_CONFIG) ;
#/root/.esd_auth                        -> $(SEC_CONFIG) ;
#/root/.elm                     -> $(SEC_CONFIG) ;
#/root/.cshrc                   -> $(SEC_CONFIG) ;
/root/.bashrc                   -> $(SEC_CONFIG) ;
#/root/.bash_profile            -> $(SEC_CONFIG) ;
#/root/.bash_logout             -> $(SEC_CONFIG) ;
/root/.bash_history             -> $(SEC_CONFIG) ;
#/root/.amandahosts             -> $(SEC_CONFIG) ;
#/root/.addressbook.lu          -> $(SEC_CONFIG) ;
#/root/.addressbook             -> $(SEC_CONFIG) ;
#/root/.Xresources              -> $(SEC_CONFIG) ;
#/root/.Xauthority              -> $(SEC_CONFIG) -i ; # Changes Inode number on login
#/root/.ICEauthority                -> $(SEC_CONFIG) ;
On the ‘Device and Kernel information’ rule, change the line as below.
(
rulename = "Devices & Kernel information",
severity = $(SIG_HI),
)
{
/dev            -> $(Device) ;
/dev/pts        -> $(Device);
/dev/shm        -> $(Device);
/dev/hugepages  -> $(Device);
/dev/mqueue     -> $(Device);
#/proc          -> $(Device) ;
/proc/devices           -> $(Device) ;
/proc/net               -> $(Device) ;
/proc/tty               -> $(Device) ;
/proc/cpuinfo           -> $(Device) ;
/proc/modules           -> $(Device) ;
/proc/mounts            -> $(Device) ;
/proc/dma               -> $(Device) ;
/proc/filesystems       -> $(Device) ;
/proc/interrupts        -> $(Device) ;
/proc/ioports           -> $(Device) ;
/proc/scsi              -> $(Device) ;
/proc/kcore             -> $(Device) ;
/proc/self              -> $(Device) ;
/proc/kmsg              -> $(Device) ;
/proc/stat              -> $(Device) ;
/proc/loadavg           -> $(Device) ;
/proc/uptime            -> $(Device) ;
/proc/locks             -> $(Device) ;
/proc/meminfo           -> $(Device) ;
/proc/misc              -> $(Device) ;
}
That’s it. Save the changes and exit the editor.
After editing the config file, implement all changes by recreating the encrypted policy file using the twadmin command as shown below.
sudo twadmin -m P /etc/tripwire/twpol.txt
Type the ‘site-key’ passphrase and press Enter.
With this, new Tripwire policy will be created. Now, reinitialize the Tripwire database.
sudo tripwire –init
Type you local-key passphrase and make sure you get no error this time.

Tripwire Policy has been configured for Ubuntu system
Step 3 – Check integrity of system files
Tripwire has been installed, and the tripwire policy has been updated and reinitialized. In this step, we will be manually checking the system using Tripwire.
Verify all system files using the following command.
sudo tripwire –check
And you should get ‘No Violation’ and ‘No Error’ in the result/output.

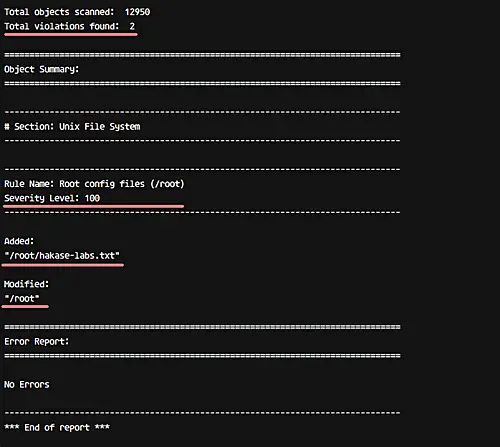
Next, add a new file in the root directory and then check the system using Tripwire again.
cd ~/
touch hakase-labs.txt
sudo tripwire –check
And in the output, the addition of file and modification of the directory in which the file resides should show up as violations.
See result below.
Step 4 – Add new rule to Tripwire
In this step, we want to add a new Tripwire Rule to the configuration. To create new tripwire policy, we need to define the rule name, severity, and the type of files. In this step, we will try to add new rule named ‘Wordpress Data’ with severity ‘High/SIG_HI’ and all files on that directory is critical cannot be changed.
Go to the tripwire configuration directory and edit the configuration file ‘twpol.txt’.
cd /etc/tripwire/
vim twpol.txt
Go to the end of the line and paste the sample of Tripwire rule below.
# Ruleset for Wordpress
(
rulename = “Wordpress Ruleset”,
severity= $(SIG_HI)
)
{
/var/www -> $(SEC_CRIT);
}
Save and exit.
Now regenerate the tripwire config file.
sudo twadmin -m P /etc/tripwire/twpol.txt
Type your site-key passphrase.
And reinitialize the Tripwire database.
sudo tripwire –init
Type you local-key passphrase.

If all of those configurations are complete, we can try to create a new file or modify the file under ‘/var/www/’ directory.
Go to the ‘/var/www/’ directory, create a new file and modify the index file.
cd /var/www/
touch hakase-labs.txt
echo “<h1> Hakase-labs Tutorial</h1>” > html/index.nginx-debian.html
Check the system using tripwire command below.
sudo tripwire –check
And you will get a notification about system violations with security level 100 as below.

A new Tripwire Rule has been added.
Step 5 – Setup Tripwire notification and cron
In this step, we will configure notifications for specific Tripwire ruleset policy, and configure a cron for automatic system checking.
For email notifications, Tripwire provides a function ’emailto’ in the configuration. Tripwire uses Postfix for email notification, and that’s automatically installed during the tool’s installation.
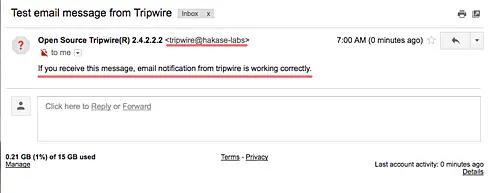
Before configuring email notifications, test Tripwire notification using the command below.
tripwire –test –email [email protected]
And make sure you have an email from your server, as shown below.
Now go to the ‘/etc/tripwire’ directory and edit the ‘twpol.txt’ configuration.
cd /etc/tripwire/
vim twpol.txt
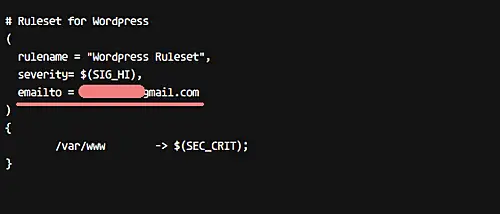
Add new line inside the ‘Wordpress Data’ rule, as shown below.
# Rules for Web-app
(
rulename = "Wordpress Rule",
severity = $(SIG_HI),
emailto = [email protected]
)
That’s it. Save and exit.
Next, regenerate the configuration and reinitialize the Tripwire database.
sudo twadmin -m P /etc/tripwire/twpol.txt
sudo tripwire –init
Type the site-key passphrase to regenerate the configuration, and local-key passphrase to reinitialize.
Now, create a new file again in the ‘/var/www/’ directory, and check the system manually using Tripwire and send the report over email.
sudo tripwire –check –email-report
And you should get an email report in your inbox.

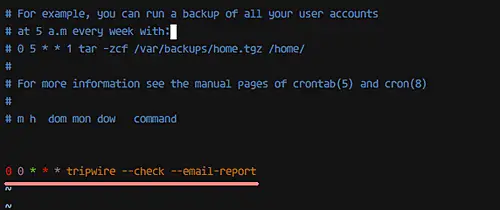
Moving on, for the cron configuration, we just need to define the time at which the tripwire command will run. We will configure Tripwire system checking on a daily basis.
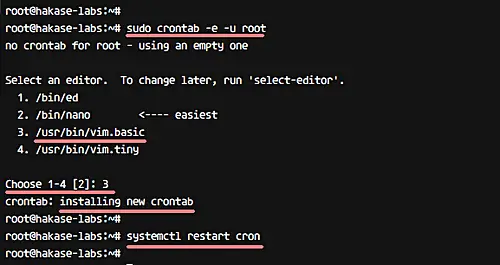
Create new cron using crontab command below.
sudo crontab -e -u root
And paste cron configuration below.
0 0 * * * tripwire –check –email-report
Save and exit, and then reload the cron.
systemctl restart cron
Now the system will perform checking every day and send a notification for a ‘Wordpress’ rule violation to your email.
The Tripwire IDS has been installed and configured on Ubuntu 16.04, and all files and directories on the system have been monitored. You can add your own ruleset by following the instructions in step 4.