
Normally when you plug in an external hard drive to your Mac’s USB port you will see it appear on the desktop (aka mount on the desktop). You can also see it in the Finder in the left column under Locations (or Devices on older versions of macOS). If the drive is not showing up on your Mac chances are it has not been formatted correctly, has been corrupted, or is faulty.
We show you how to work out whether the reason the external drive is not mounting on your Mac up is due to a problem with the drive itself, the cable or the port, and how to resolve the problem and access data on your drive.
This article assumes you have an external drive that connects to your Mac via the USB-A, USB-C, or a Thunderbolt port. If you have a NAS drive that connects over the network then you should read this article about connecting to a NAS drive.
How to fix a drive that won’t show up on a Mac
There are a number of reasons why your hard drive, flash drive, USB drive, or SSD might not be showing up. It may have been formatted incorrectly, it may be corrupted, it may have a faulty (or inadequate) cable, or there could be something else.
If you run though the following steps you should hopefully be able to identify the cause and fix the problem that is stopping your external drive from opening on your Mac.
1: Edit your preferences
Hopefully there is a really easy fix to get the hard drive to mount on your desktop. Try the following to make sure your Mac is set to show mounted drives on the desktop.
- Open the Finder.
- Click on Finder in the menu at the top of your screen.
- Choose Preferences > General and make sure that there is a tick beside External Drives.
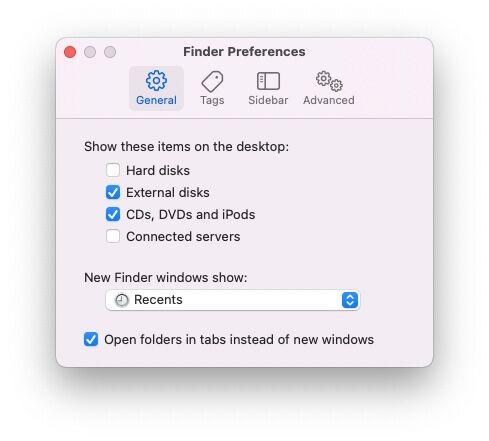
If it was already set up so that the external drive would appear on the desktop then continue to follow the steps below.
2: Check the cable
The first port of call is always to check that it’s plugged in, but we are sure you have done that. The problem might be with the cable though.
One of the main reasons why drives fail to mount is if the drive isn’t receiving enough power. If the drive is powered via a USB-A cable you need to check that adequate power is being delivered to the drive. Very old Macs may require a USB power cable, a cable that splits into two USB connectors that need to both be plugged into your Mac, in order to deliver enough power to the drive. Similarly, make sure that the drive doesn’t have an external power supply it should be using.
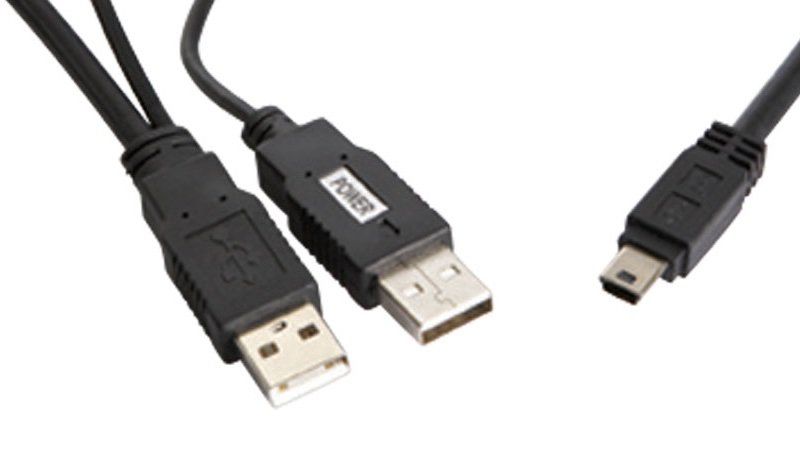
On the subject of cables, make sure that it’s not at fault. Try using a different cable with the drive to see if that fixes the problem. Similarly, if you are using a USB port via a hub check that’s not what’s causing the problem.
Also check that the port on your Mac isn’t the problem. Try plugging into a different port. Or if you only have the one, plug another device in and see if that works ok.
3: Try another Mac and then try a PC
The next step is to try plugging the drive into another Mac. If it also fails to mount there you will know that there is a problem with the drive while if it does mount then the problem is with your Mac.
The next step is to try plugging the drive into a PC. If the drive mounts on the PC it’s likely that you have discovered what the problem is: the drive is formatted for PCs and can’t be read by your Mac.
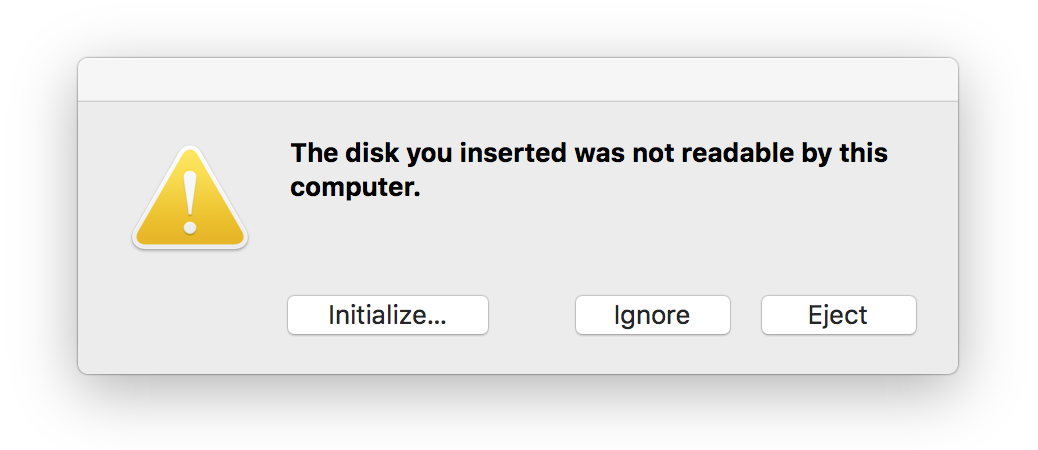
4: Use Disk Utility to access the drive
If the various checks above suggest that the disk is faulty then you can use Apple’s Disk Utility program to access the disk and potentially fix whatever is causing the issue. Here’s what to do:
- Find Disk Utility by opening Spotlight (cmd+Space-bar) and start typing Disk Utility, press enter to open the program.
- Look in the column on the left to see if the hard drive appears there.
- If you can see the hard drive in Disk Utility check underneath it for a volume. If it is there click on it and select Mount. If your Mac has already mounted the drive the option Unmount will be displayed instead. (If there is no volume listed your Mac is not able to access the drive. The Mount option will be greyed out.)

- Your options are First Aid, Erase and Restore. First Aid will check the disk for errors and then repair the disk if necessary and this is the option to choose. (Restore allows you to erase the contents of the drive and replace that with data from somewhere else. Erase deletes all the data stored on the drive. If you need the data on the drive do not choose Erase or Restore!)
- Click the First Aid tab and select Run.
- If after running First Aid the Mac finds errors you could fix you may see the option to Repair Disk. If you do, go ahead and run the repairs.
5: Change the drive format
If your Mac is unable to repair the disk if is likely that the drive is either formatted using a file system that the Mac cannot read, or it is well and truly broken – if it’s the latter we suggest you follow this tutorial about recovering data from a damaged disk.
Hopefully though the drive is fine but the format is wrong. Here’s a bit of background on file formats:
- Windows PCs use NTFS file format.
- Mac computers, prior to Sierra, used the HFS+ file format.
- In High Sierra Apple introduced a new file system called Apple File System (APFS).
- exFAT or the older FAT32 are formats that can be read by Window and Mac computers.
To make sure your drive can be read by Macs and PCs you need to format it using exFAT or the older FAT32. We’ll explain how to do that below.
It is possible that the hard drive has been formatted using a different file system (i.e. on a Windows PC). In that case, if you need to access the data on the drive you’ll need to connect your drive to a Windows PC that does recognise it and copy the data before moving on to the next step.
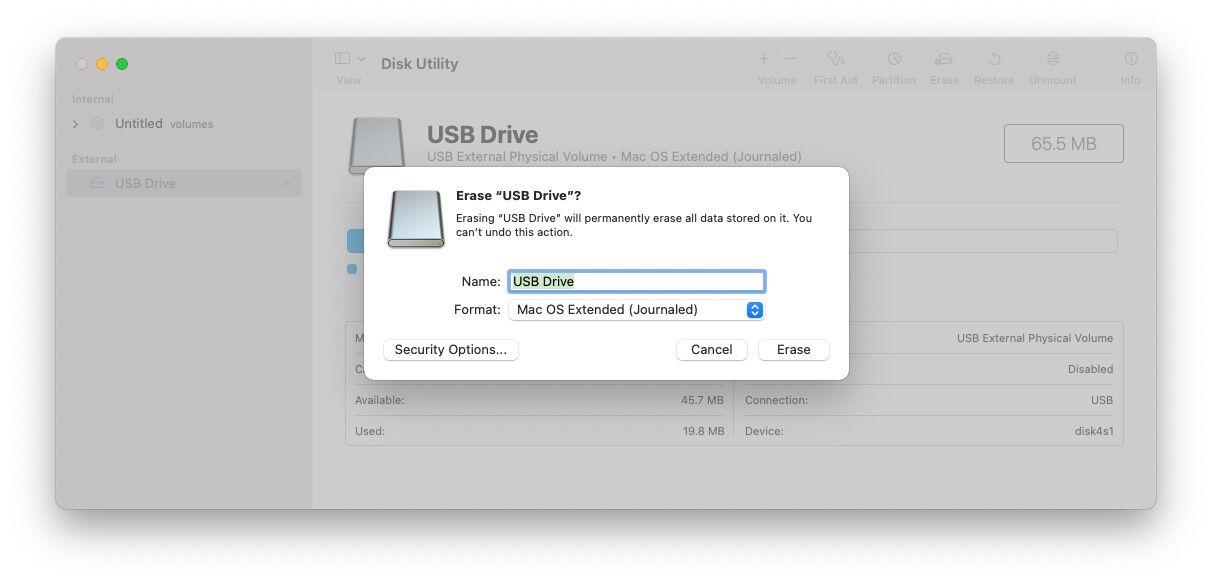
Having got the data of the drive via a PC you can reformat the drive so that you can add the data again. Here’s how to reformat your drive so it can be read by and Mac or a PC.
- Open Disk Utility (as per the steps above).
- If you don’t require the data on the hard drive, select the disk and click Erase.
- Before Disk Utility starts to erase the disk it will pick a format for you. You can change this if you click on the Formatting options. Choose your format, probably exFAT if you want to make sure it’s compatible with PC and Mac, otherwise, Mac OS Extended (Journaled) is probably the best option.
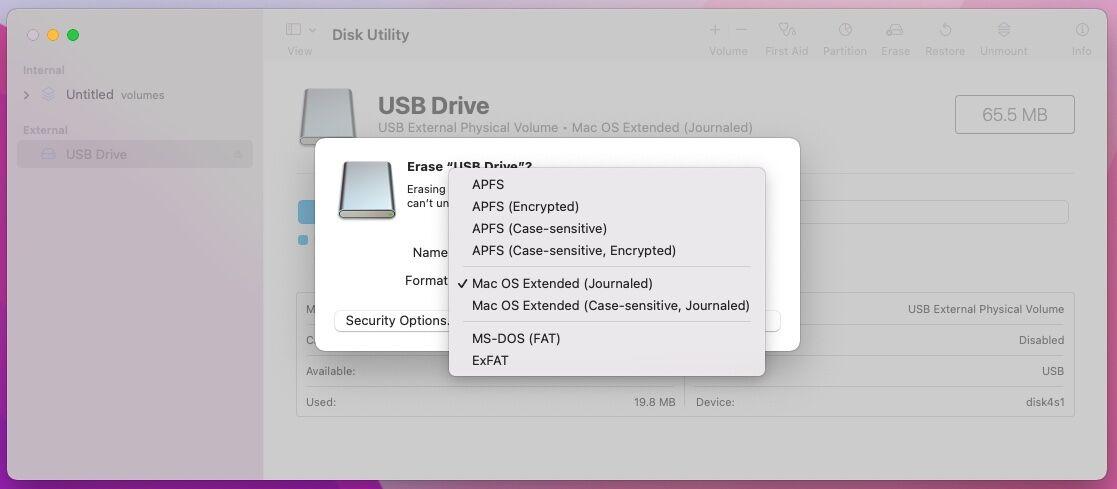
- Give the drive a name.

- Click on Erase and wait for your Mac to erase and then reformat the drive.
6: Try a data recovery app
If you have been unable to access the data on the drive then you might want to try one of the options included in our round up of the Best data recovery apps for Macs.
Our recommendations include EaseUS Data Recovery for Mac, £95.99/$89.95 at Easeus, Stellar Data Recovery for Mac, £43.99/$59.99 at Stellar, or Recoverit £69/$79.99 at Wondershare.
7: Always disconnect your drive properly
We have final suggestion to make that is more of a guard against this error happening again.
Make sure that your external drive doesn’t become damaged in the future by always unmounting the disk properly after using it. Don’t just unplug the USB cable. To unmount your drive you can right-click (control-click) on the icon on the Desktop or in the Finder and choose Eject. Apparently most drive issues are caused when the disk is removed without ejecting it properly.
Decided there is no hope for your faulty hard drive, we have a round up of some of the best we’ve seen here: The best Mac hard drives.