
Overclocking your CPU potentially helps you gain more performance out of your PC without having to spend a lot of money. But before you plan to do that, I’m sure you have a lot of questions. Is it safe to overclock a CPU? Will you end up damaging it? Does it require any special skills?
First, let’s answer the most important one, why do you need to overclock your CPU?
The clock speed of a CPU, in simple terms, means how fast it can run. It’s measured by the number of cycles your CPU executes per second. During each cycle, billions of transistors within the processor open and close. So, for instance, a CPU with a clock speed of 3.5GHz executes 3.5 billion cycles per second. Depending on what processor you have, you can safely squeeze out more power by increasing the clock speed using some simple tweaks. The process of overclocking might sound stressful, but it isn’t all that difficult. Of course, there are some things you need to consider before overclocking your processor.
Overclocking prerequisites
First of all, if you’re planning to overclock a CPU, you need to know if it’s unlocked. All Intel processors ending with a ‘K’ or ‘X’ are unlocked, which means they can be overclocked — for instance, the Core i9-9900K, Core i7-11700K, Core i9-10900X, etc. Next, you need to make sure the motherboard can handle overclocking. This is crucial as the processor draws more power and the VRMs (voltage regulator module) need to be of high enough quality to ensure everything runs in order. If you’re using an Intel processor, get the compatible Z-series board like the Z590 for the latest 11th-gen CPUs, Z490 for 10th-gen, and so on.
In the case of AMD, most processors come unlocked, which means you can overclock them without any limitations. AMD’s entire Ryzen series of processors, including the latest 5000-series, and even some of the FX series processors can be overclocked.
Word of caution
Overclocking puts a lot of strain on the CPU since you’re pushing it beyond its limits. At the same time, it consumes more power and generates a lot of heat. While most CPUs should run absolutely fine, make sure you have an efficient cooling system. A stock cooling fan will not cut it; so it’s best you get a beefy air cooler with multiple heat pipes, or preferably invest in an AiO (all in one) liquid cooler. It’s also advised to thoroughly clean your PC cabinet, remove any dust accumulated over time, and possibly repaste your CPU with fresh thermal paste.
You also need to note you’re potentially reducing the life of your processor, especially if you plan on running an overclocked system in the long run. The warranty of your CPU is also something you need to consider, as Intel and AMD may or may not consider your case if you happen to damage your processor while overclocking.
Overclocking an Intel processor
Most guides will suggest you reboot your system into the BIOS to overclock your Intel CPU. While that’s absolutely correct, it can get complicated as not all BIOS are the same for all motherboards. This means that while the instructions are similar, finding the right setting can be a task.
To make things simple, you can overclock your system using Intel’s Extreme Tuning Utility (XTU) software specifically made for overclocking your Intel CPU. Download Intel XTU and install it on your system. The download link also lists all the compatible CPUs, so check if your product is supported or not.

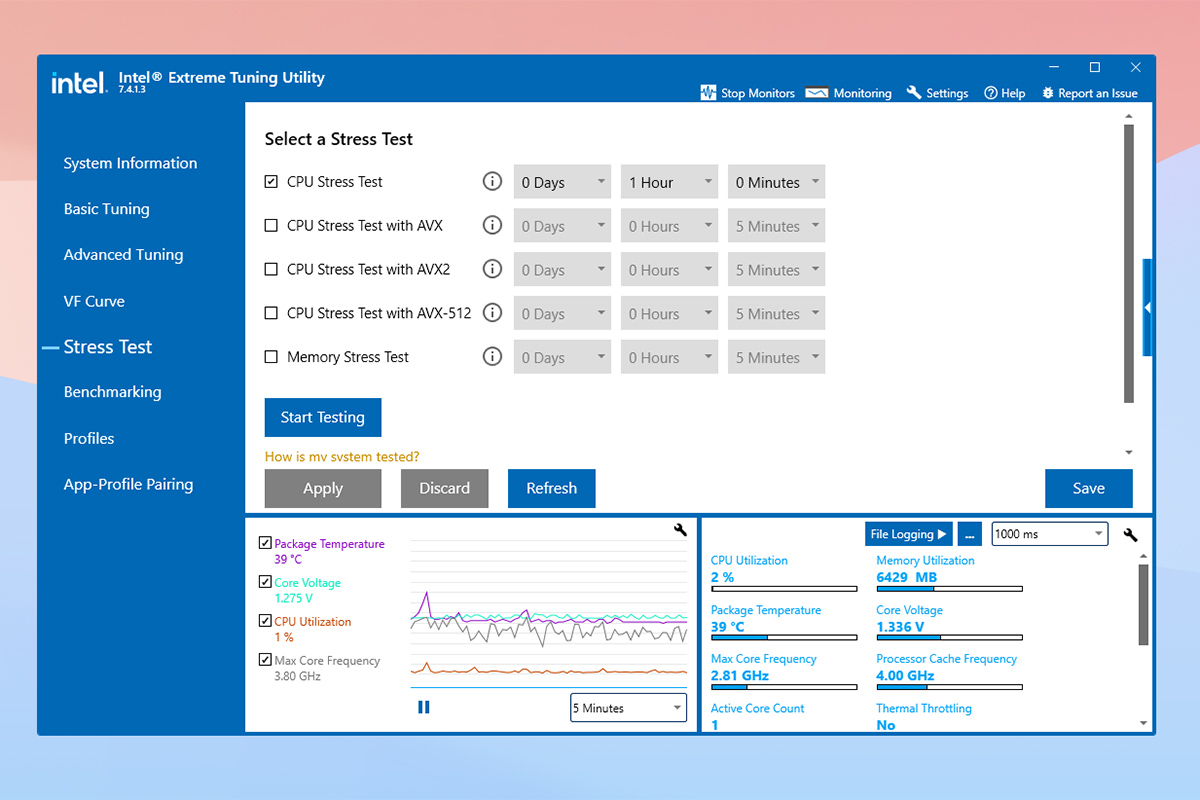
Once you’ve installed and rebooted your PC, fire up Intel Extreme Tuning Utility and prepare your system for a baseline test. This is important as we need to determine the performance and temperatures of the CPU under load at your current base settings. Head to the ‘Stress Test’ option on the left, select the CPU Stress Test, and run for about an hour. The app will log various parameters that you can see at the bottom.
Note down the results at the end of the test. If your CPU was constantly running over 80 degrees Celsius, you should reconsider overclocking or upgrading your CPU cooler. However, if your CPU managed to be well under the above-mentioned temperatures, you can move on to the next step.
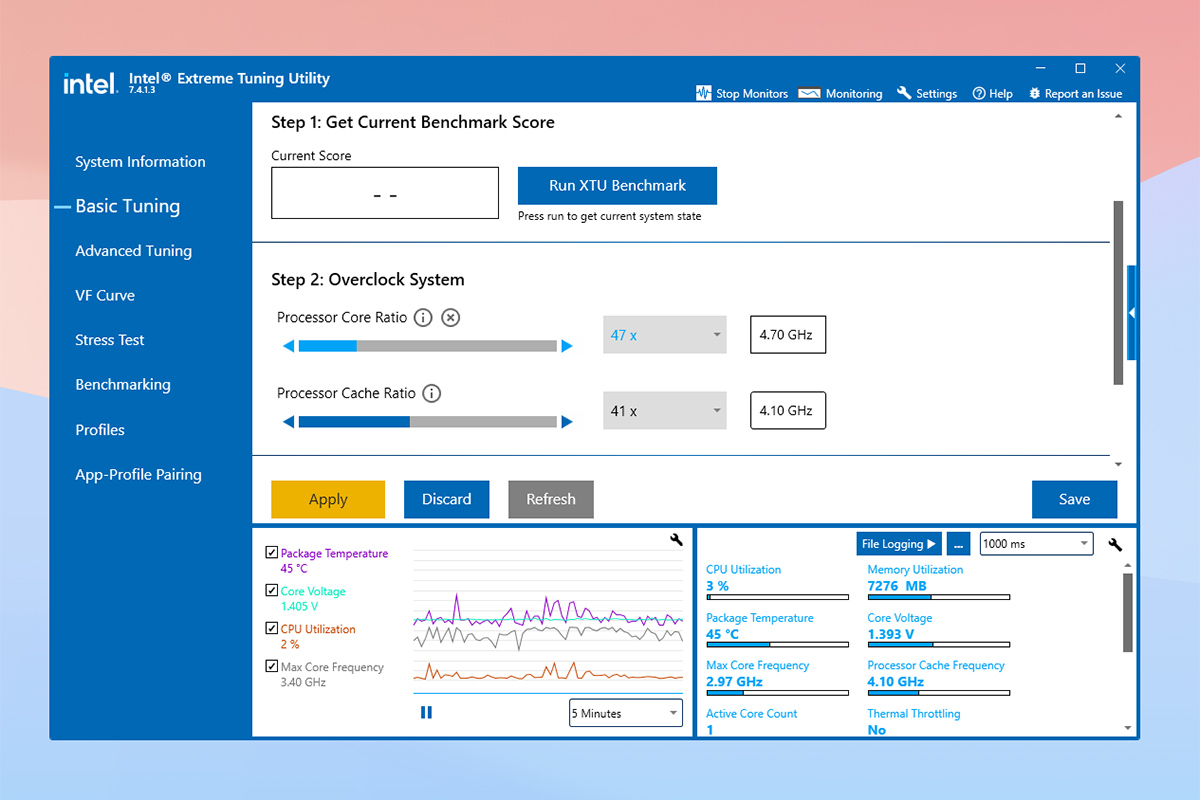
Intel XTU offers a Basic Tuning option, where you can use a slider to amp up the clock speed of your CPU. This is the easiest and safest way to overclock your CPU. The first step is to run a benchmark test to compare the numbers after you have increased the clock speeds of your CPU. You can skip this benchmark test if you want, as we already have baseline results via the Stress Test. Start by moving the Processor Core Ratio or the corresponding multiplier by just one step. Do not move the sliders all the way up, as you could end up damaging your CPU.
As you can see above, my Intel Core i7-11700K is set to 4.60GHz by default, so I moved it up to 4.7GHz. Hit ‘apply’ and repeat the Stress Test from the menu on the left to ensure everything is working in order and compare the results to see the increase in performance.
You can even increase the clock speed of each individual processor core under the Advanced Tuning option. The settings under this tab can be a little overwhelming, but all you need to do is move down to the Ratio/Voltage Tuning Mode, select Per-Core, and increase the multipliers. Make sure you run the stress test once again, and if it completes without any issues, you’re good to go.
Once you’re happy with the increase in clock speeds and performance, further test your overclocked CPU by running some games or maybe some third-party benchmarks. If for some reason, your system is not stable after cranking up the clock speeds, you can fine-tune it by adjusting the voltages.

There are many voltage parameters, but you need to focus on the core voltage or VCore. You can increase or decrease the voltage the same way as the clock speed multipliers in Intel XTU. Having said that, tinkering with the voltage is fairly more dangerous, and one should adjust it with extreme caution as it can potentially damage the CPU permanently. Having a VCore of 1.4V is stable, and while anything beyond that can be dangerous, it all depends on the processor’s capability. So it’s best to check stable VCore options depending on what Intel CPU you are trying to overclock.
You should find the slider for the Core Voltage under the Advanced Tuning. Gradually increase your core voltage with steps of .025. Suppose you are starting at 1.350, move to 1.375, and hit ‘apply’. If your system is stable, run the stress test once again to check if your CPU is within the recommended temperatures.
Keep testing and tinkering with the settings, but make sure you don’t go overboard. Increase clock speeds and voltage in small steps, and apart from stress tests and benchmarks, take the system through its paces with your day-to-day tasks like gaming, video rendering, and so on.
Overclocking an AMD processor
AMD also has its own CPU tuning software called Ryzen Master, a recommended overclocking tool if you have any of the Ryzen CPUs from 2017 onward. The company used to offer AMD Overdrive for older CPUs, but it seems the chipmaker no longer supports the utility and recommends using Ryzen Master instead. The overclocking process for AMD CPUs is more or less identical to Intel with similar instructions.

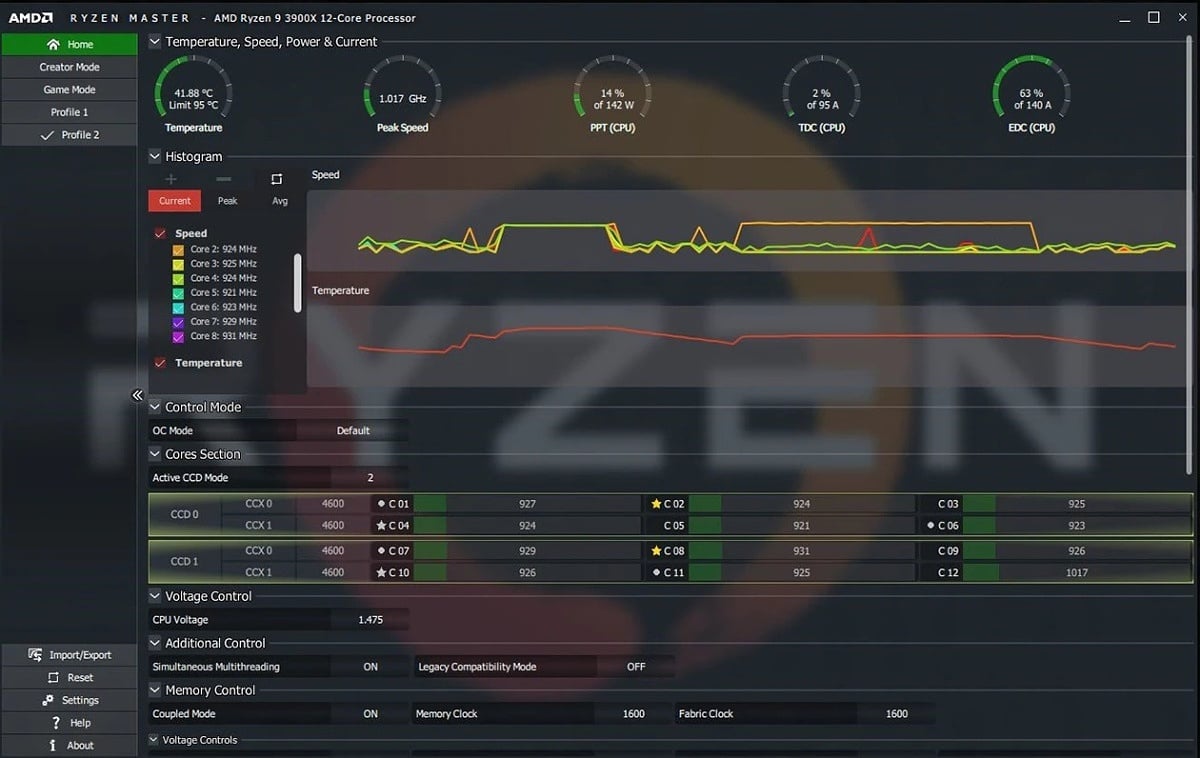
AMD Ryzen Master – Basic View
Once you’ve downloaded Ryzen Master, quickly reboot your system and then open the utility. Run the built-in stress test, or as an alternative, try AIDA64 Extreme, which is a great system monitoring tool that includes its own set of stress tests. Note the results after the stress test to check if your CPU cooler can handle the high temperatures. The bundled Wraith cooler that comes with some AMD Ryzen CPUs is not very efficient, especially if you’re going to overclock the processor. So you need a more powerful cooling solution, in case you don’t already have one.
Once you’ve ensured your CPU cooler can withstand the system temperatures well below 80 degrees Celsius, it’s time to start the overclocking process. Ryzen Master comes with a Basic View layout that provides you with the ability to automatically overclock your CPU, manually control how much overclocking you wish to apply, and give you a view of important parameters like the CPU temperature, speed, and voltages. The Advanced View gives you a wider range of options, including up to four profiles to store custom user-defined configurations. You can also adjust performance parameters for the active cores, integrated graphics frequency, and adjust memory timings.
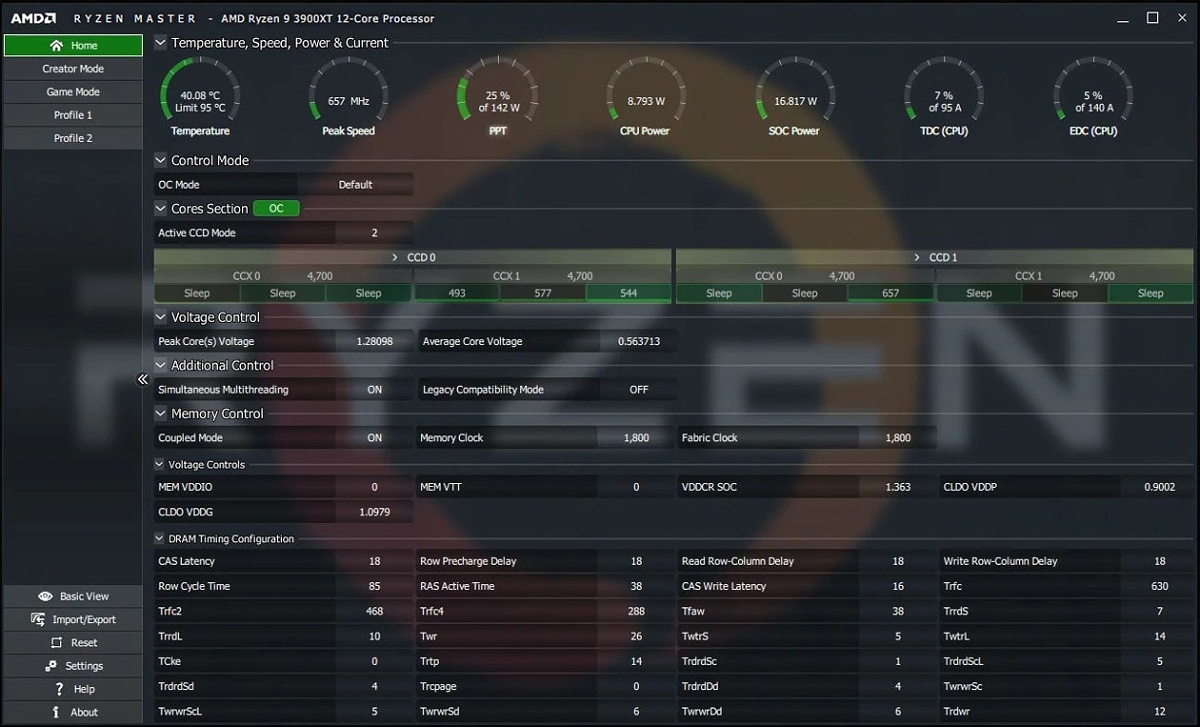
Set it to Basic View as it makes things easier to understand. To begin overclocking, switch the Control Mode from Default to Manual so you can manually adjust the clock speeds and voltages. Overclocking an AMD CPU doesn’t involve multipliers; rather you can increase the clock speed up by 50-100MHz, and then hit Apply & Test. Once the test is successful and the CPU manages to stay under 80 degrees, you can increase the value once again. Make sure you keep testing and take small steps while increasing the clock speed of the CPU.
Once you reach a point where your system is running at higher clock speeds at controlled temperatures without any potential crashes, head over to AIDA64 and run a stress test once again. If your system is crashing or is unstable, take a step back and reduce the clock speeds. Repeat these steps until you reach the best and most optimum base overclock.
Like Intel, you can further fine-tune your settings by tinkering with the voltages, although it’s best to avoid this step. Follow the same steps, as we mentioned, to increase the core CPU voltage on Intel CPUs. Make sure you don’t go beyond the 1.4V limit unless you’re sure the particular CPU you’re overclocking can handle the increased load. Using the CPU Voltage slider, move up your voltage in steps of .025V. Hit Apply & Test to make sure the system is stable. Always keep a close check on the temperatures, and in case the system crashes, dial down the voltage and test again. If your system remains stable and passes the test, you can repeat the process until you’re completely satisfied with the results.
Note that Ryzen Master resets the clock speeds to default after a reboot. However, you can quickly crank up the speeds as the process is pretty straightforward. Additionally, you can always save your settings as a profile and load it when Ryzen Master fires up along with Windows.
As mentioned before, these are fairly basic and simple methods of overclocking your CPU. Make sure you know all the risks involved while overclocking a CPU. It can prove to be a problem in the long run and can even kill your CPU for good.
Do check out our list of the best gaming laptops to buy in 2021. Additionally, we also have a roundup of the best laptops running on AMD’s Ryzen processors and the best gaming laptops from HP.
The post How to overclock your Intel or AMD CPU appeared first on xda-developers.