
To overclock your monitor, increase its refresh rates in increments of 5Hz using your graphics card chipset’s utility or custom software. Remember that not all monitors can accept an overclock, and even two seemingly identical monitors of the same model may perform differently when overclocked.
You’ve probably heard of CPU and GPU overclocking, but did you know you can also overclock your monitor? Here’s why you might want to give it a shot, and how you go about doing so.
What Is Monitor Overclocking?
Overclocking a monitor means going past your monitor’s advertised refresh rate. The refresh rate is the number of times the monitor refreshes in a single second, measured in hertz (Hz). All monitors have an advertised refresh rate, starting at 60Hz for office monitors and going up to 240Hz, 360Hz, and 500Hz or above in the most extreme examples. Many of our top-rated monitors in fact use a standard 60Hz refresh rate.
The advertised refresh rate is the one you should expect to receive from your monitor when making a purchase. You’ll be able to select this refresh rate in the standard Windows display settings without requiring any additional software to do so.
To overclock the monitor you bought, you’ll need to use third-party software to force a signal with an increased refresh rate. You can do this with software provided by your GPU manufacturer (NVIDIA, AMD, or Intel) or an application called CRU (Custom Resolution Utility), which we’ll explain below.
Like other types of overclocking, pushing your monitor beyond its advertised bounds is a game of trial and error. At some point, you’ll reach a ceiling where the monitor won’t accept whatever signal you’re sending. That’s when you’ll have to stop and settle.
Do All Monitors Support Overclocking?
Not all monitors support overclocking. You’re more likely to be able to overclock monitors that are designed for gamers, with some even advertising that the monitor can be overclocked within the marketing material. Many standard 60Hz office monitors may struggle to exceed their native refresh rate.
To further complicate the issue, there can be a degree of variance between different units. You can have two monitors of the same model, from the same manufacturer, and you may achieve higher refresh rates on one than the other. Manufacturing tolerances can make a difference. The only way you’ll know if your monitor can be overclocked is to try it out for yourself.
With that in mind, many monitors can accept a modest overclock. You may be able to push your 60Hz monitor to 75Hz, which can feel like a big improvement in terms of overall smoothness. It’s not simply enough to overclock and call it a day, however. Once you’ve reached a higher refresh rate you’ll want to test your overclock to ensure that your monitor isn’t skipping frames.
When overclocking, your chosen resolution can make a difference to your chances of success. Lower resolutions may be able to take advantage of higher refresh rates, so if you want to increase your refresh rate it may be worth experimenting with dropping the resolution.
Lastly, bandwidth can introduce a bottleneck. A 4K (UHD) 8-bit signal at 60Hz uses 17.82 Gbps. If you’re connecting to a computer over an HDMI 2.0b cable, your maximum available bandwidth is 18 Gbps. There simply won’t be enough spare bandwidth to accommodate a higher refresh rate, even if your monitor supports it.
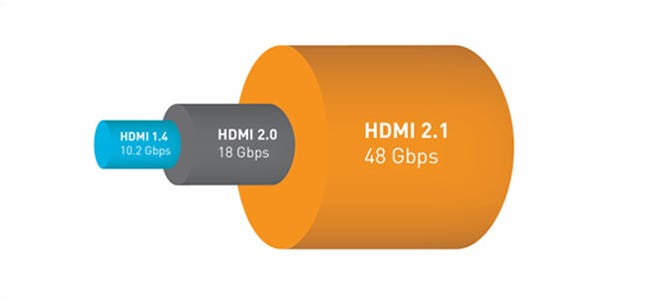
You may be able to get around this using DisplayPort (DP). The DP 1.4 standard has a maximum throughput of 32.4 Gbps, while DP 1.2 can manage 21.6 Gbps.
How to Overclock a Monitor
To access refresh rates that aren’t available to you in Windows display settings, you’ll need to use third-party software. The easiest way to do it is using a graphics card utility.
When overclocking, it’s a good idea to increase by increments of around 5 Hz. It’s also smart to reboot your computer once you’ve settled on an overclock and then run these utilities again to ensure your custom settings are in use. Once you’ve got an overclock to stick, it’s time to move on to verifying the overclock in the next step.
Use NVIDIA Control Panel to Overclock Your Monitor
If you have an NVIDIA graphics card, download the NVIDIA Control Panel app from the Windows store and launch it. With the application open, expand the “Display” menu and select “Change Resolution” and then click the “Create Custom Resolution” button.
In the window that appears enter your resolution of choice in horizontal and vertical pixels, followed by the refresh rate in hertz. You can then hit “Test” to try out your new settings. If your monitor doesn’t go black and displays an image, you can save your custom resolution or continue testing until you hit your panel’s limit.
If the display goes black and won’t save an image, wait a few moments and your previous settings will be reverted.
Use AMD Radeon Settings to Overclock Your Monitor
For AMD graphics cards, make sure you’ve got AMD Radeon Adrenalin installed. From here, right-click on the desktop and select “AMD Radeon settings” and select the “Display” tab when the window opens. Click on the “Create” button next to “Custom Resolutions” and input your desired resolution and refresh rate. Hit “Save” to test and activate your new settings.
Use Intel HD Graphics Control Panel to Overclock Your Monitor
If you have Intel HD Graphics you can also create custom resolutions. The Intel HD Graphics Control Panel should be installed alongside your drivers, so open it and then click on “Display” followed by the “Custom Resolutions” button. From here you can enter a resolution and a desired refresh rate, then click “Add” to test.
Use CRU to Overclock Your Monitor
Another option instead of using your manufacturer’s tools is using a third-party app called CRU (or Custom Resolution Utility) to set a custom resolution and refresh rate for your monitor. With CRU, you can add custom resolutions to your Windows display settings.
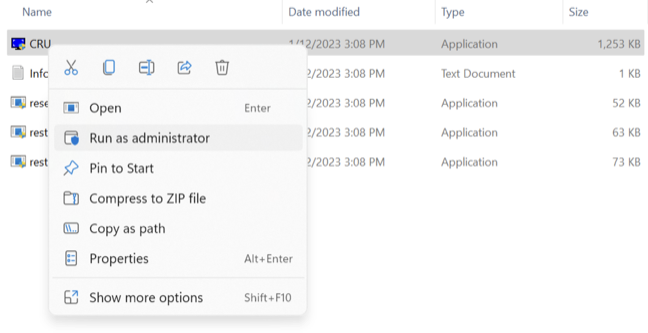
To use the app, download the CRU ZIP file from the link above and extract the contents. Then, right-click on CRU.exe, select “Run as Administrator,” and wait for the app to launch.
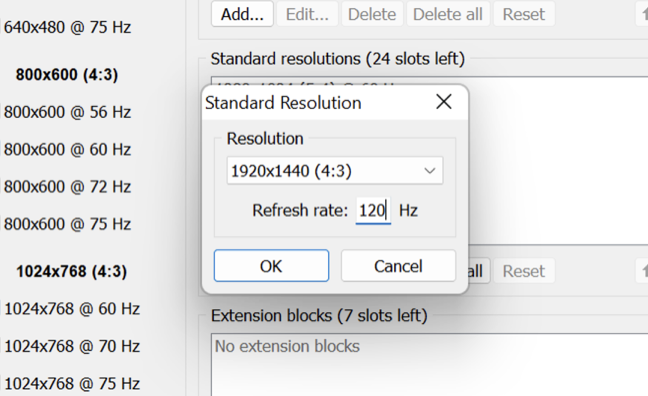
Use the drop-down at the top of the screen to select which display you want to overclock. From here, click “Add” next to the “Standard Resolutions” box. In the window that appears enter your desired resolution and refresh rate. Click “OK” to save, then reboot your computer.
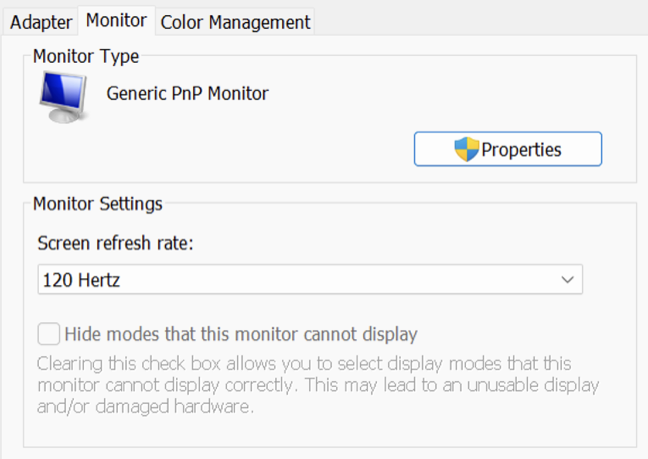
When Windows reboots, right-click on the desktop and select “Display Settings” followed by “Advanced Display” and then under your monitor of choice select “Display Adapter Properties” followed by the “Monitor” tab, under which you can set your new refresh rate followed by “Apply” to test.
Verify Your Overclock
So you’ve managed to overclock your monitor, good job! Now it’s time to make sure that your monitor is displaying all of the frames you are sending it. Some monitors may accept a signal with a higher refresh rate than is officially supported, but the monitor may struggle to display all of the frames. This can result in frame skipping.
When frames skip, you might see uneven motion and noticeable stuttering. Overclocking your monitor is meant to yield better results in motion handling but frame skipping can render the whole pursuit pointless.
Fortunately, you can test for frame skipping using the Blur Busters Frame Skipping Check. The test involves taking a photo of your screen using a slow shutter speed, which you can do with most modern smartphone cameras. You’ll need access to manual camera controls since you’ll need to set the shutter speed to one-tenth (1/10) of a second.
Launch the Frame Skipping Check in your web browser and wait until you see the green “Ready” notification at the bottom of the screen. Now set your camera’s shutter speed to 1/10 of a second (you can increase the aperture or decrease the ISO to balance the exposure) and take a picture.
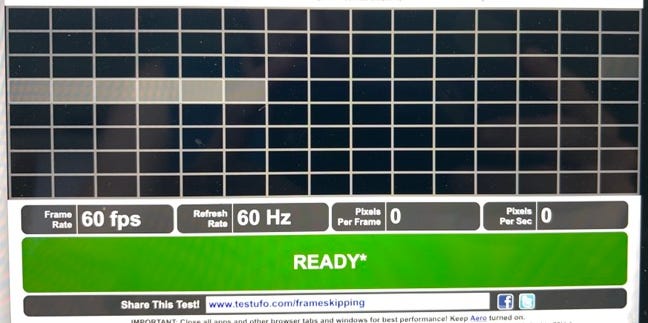
Now take a look at the photo you’ve taken. If you see an unbroken line of light squares as per the image above, you’re not skipping frames. If you see black frames in between light frames (as per the Blur Busters “bad” example image) your monitor is skipping frames.
If you’re encountering skipped frames you should try reducing the refresh rate and running the test again until you get a satisfactory result.
Are There Any Risks to Overclocking?
Overclocking involves pushing a monitor beyond the manufacturer’s standard operating bounds, so there is always some inherent risk involved (just like overclocking a CPU or GPU). Overclocking may place your monitor under additional stress and generate more heat while operating at a higher refresh rate. This could lead to a shorter overall lifespan, but it’s hard to say for sure.
The practice is widely seen as safe among PC enthusiasts, but it’s up to you to weigh up if the gains are worth it. If you like to tinker and push things to the limit, you might want to give it a shot. If you notice a big difference between 60Hz and 75Hz that makes the time you spend in front of your monitor more pleasant, the risk of a small reduction in lifespan may be worth it.
You could also consider only running your monitor at overclocked refresh rates when the gains feel justified, like when playing games. Then when you’re just browsing and doing office work, you go back to regular refresh rates.
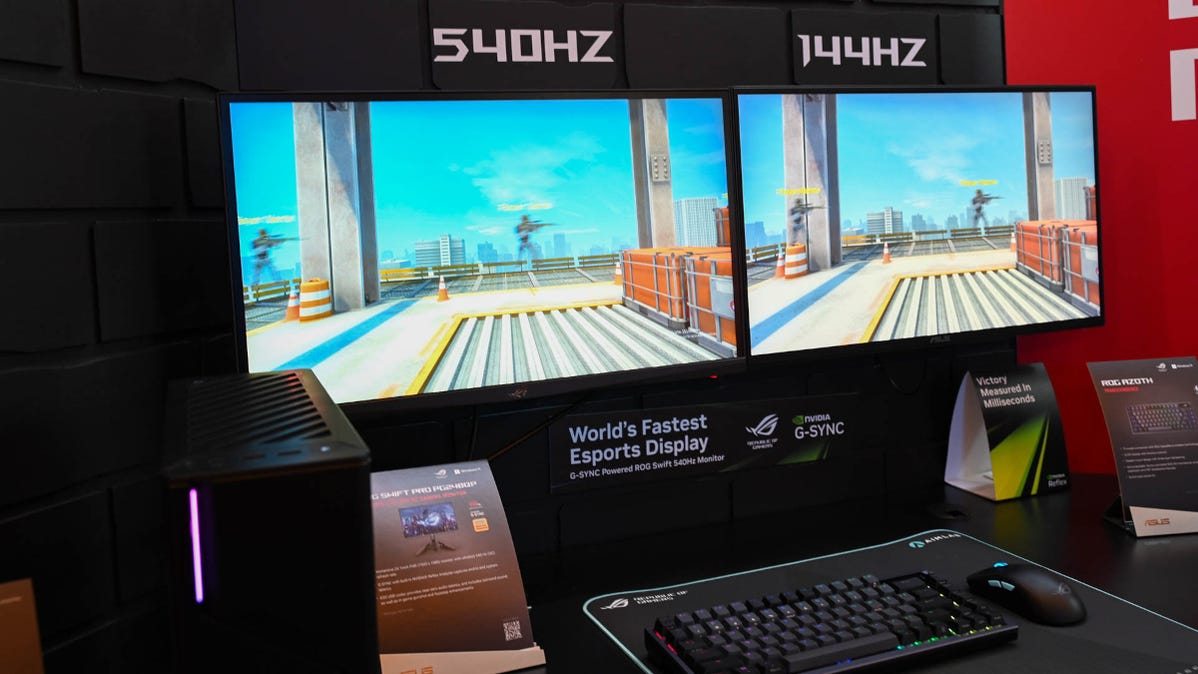
Want Even Higher Refresh Rates? Buy a New Monitor
The gains you’ll encounter from overclocking your monitor may only be small. If you’re serious about improving your refresh rate you should consider investing in a high refresh rate monitor, like one of our top recommended gaming monitors.
Before you buy, make sure you pick a monitor whose refresh rate suits your usage and computer’s performance. You may also notice some benefits in using a high refresh rate on the desktop.