

Install USBGuard to control and manage which thumb drives can be used on your Linux computer. Acting as a sort of firewall for USB devices, it lets you create a set of rules that allow, block, or reject specific drives.
USB memory sticks can be used to steal data from your Linux computer. USBGuard lets you set rules governing the use of USB memory sticks, like a firewall for USB storage devices. Here’s how it works and how you can set it up.
The USB Memory Stick and Its Dangers
We’ve probably all got at least one USB memory stick or USB storage device like a USB external drive. They’re cheap, effective, portable, and easy to use.
Nowadays you can just plug one into your Linux computer to have it identified as a storage device and mounted automatically. Gone are the days of having to mount them by hand on the command line. This convenience means anyone can put one into a Linux computer and copy data off the USB drive onto the computer, or from the computer onto the memory stick.
If other people use your computer you might want to limit what they can do with USB memory sticks. If your computer is in your home, it’s unlikely that an opportunist with malicious intent will walk by when your computer is on and unattended, but that can happen in a workplace.
But even with a computer in your family home, you might want to limit USB access. Perhaps your kids regularly have friends over to play. Locking down USB access is a sensible precaution to stop them from inadvertently causing issues.
When someone finds a USB drive there’s an immediate desire to plug it into something to see what’s on it. Cyber threats that target Linux computers are much rarer than those designed for Windows computers, but they still exist.
What Is USBGuard?
USBGuard can protect you against software-based threats that are distributed on compromised USB memory sticks, such as BadUSB, where the attack commences when you’re manipulated into opening what looks like a document but is a disguised executable. USBGuard cannot protect you against hardware-based threats such as USB Killer devices that cause physical harm to your computer by releasing a high-voltage discharge into your machine.
Actually, USBGuard allows you to set up rules for all manner of different USB devices, including mice, webcams, and keyboards. It’s not just for USB memory sticks. Your computer knows the ID of each USB device, so you can choose which USB devices work in your computer, and which cannot. It’s something like a firewall for USB connectivity.
Warning: The USBGuard daemon runs as soon as it is installed. Make sure you configure USBGuard straight after installing it. If you don’t, all your USB devices will be blocked when you reboot your computer.
Normal Behavior With USB Sticks on Linux
Before we do anything, we’ll check the default behavior on our Ubuntu 22.10 computer. It’s a simple process. We insert a USB memory stick and see what happens.
We hear an audible alert sound, and a memory stick icon appears in the dock.
Opening the file browser shows an entry has been added to the list of locations in the sidebar. The name displayed is the one given to the device when it was formatted.

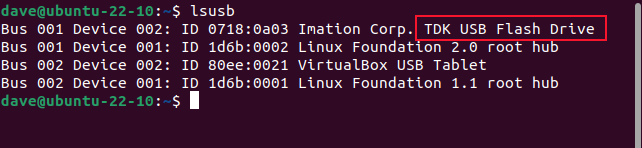
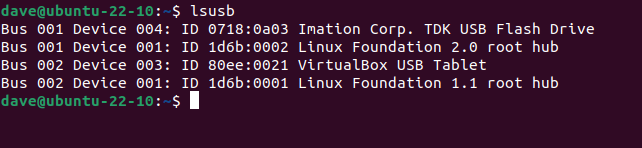
Opening a terminal and using the lsusb command lists the connected USB devices. The top entry is the memory stick in question, which happens to be a TDK-branded device.
lsusb
Installing USBGuard
USBGuard has dependencies on usbutils and udisks2 . On the latest Manjaro, Fedora, and Ubuntu builds that we tested, these were already installed.
To install USBGuard on Ubuntu, use this command:
sudo apt install usbguard

On Fedora you need to type:
sudo dnf install usbguard

On Manjaro, the command is:
sudo pacman -S usbguard

Configuring a Base Policy
USBGuard has a neat trick. It has a command that creates a rule allowing all currently connected USB devices to continue work unhindered. That means you can create a baseline configuration for all of your always-required devices. This set of rules is called a base policy.
USBGuard uses three types of rules.
- Allow: Allow rules permit a specified device to operate unhindered, as normal. This is used for devices that are always connected, such as wired keyboards, mice, trackballs, webcams, and so on. It is also used for devices that are connected intermittently, and which are known and trusted.
- Block: Block rules prevent USB devices from operating. The USB device is not visible to the user at all.
- Reject: Reject rules also prevent USB devices from operating, but the USB device is visible to the user using
lsusb.
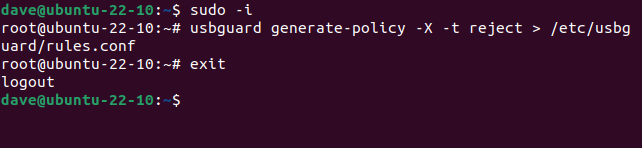
USBGuard has a neat trick. It has a command that will create a base policy with an allow rule for each of the currently connected USB devices. This is a great way to quickly configure devices that are always connected to your computer, like keyboards and webcams. It is also a convenient way to capture trusted, intermittent devices. Just make sure all of your trusted devices are connected to your computer when you issue the command.
An odd quirk requires you to do this as root. Using sudo with the command doesn’t work. We need to use sudo -i (login) command to open a shell as root, then issue the command. Make sure you use the exit command to leave the root login session once you’ve finished.
sudo -i
usbguard generate-policy -X -t reject > /etc/usbguard/rules.conf
exit
The -X (–no-hashes) option prevents USBGuard from generating hash attributes for each device. The -t (target) option sets a default target for all unrecognized USB devices. In our case we’ve chosen “reject.” We could also have chosen “block.”
To see our new rules, we can use cat.
sudo cat /etc/usbguard/rules.conf
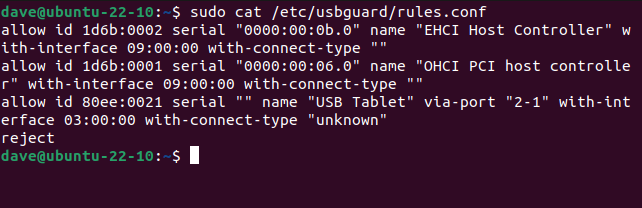
On our test computer, this detected three USB devices and created “allow” rules for them. It added “reject” as the target for all other USB devices.
Adding Another USB Device
Now, if we plug in the same USB memory stick we used earlier, it isn’t permitted to operate. It isn’t added to the dock, it isn’t added to the file browser, and we don’t get an audible alert.
But because we used a “reject” target for unrecognized devices, lsusb can list its details.
lsusb
If we’d used a “block” target in our base policy, we would need to use the list-devices command with the -b (blocked devices) option.
sudo usbguard list-devices -b
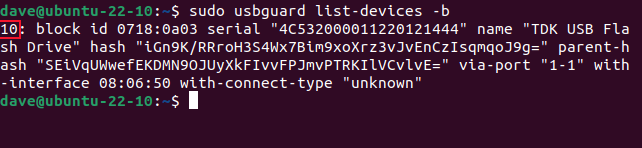
This shows the currently connected, but blocked, USB devices.
We’ll use some of the information from this command to allow our rejected USB device to have temporary access or permanent access. To give our device temporary access, we’ll use the device ID number. In our example this is “10.”
sudo usbguard allow-device 10

Our device is connected and appears in the dock and the file browser. If we ask USBGuard to list the blocked devices, none are listed.
sudo usbguard list-devices -b

We can make the permission permanent by using the -p (permanent) option. This creates a rule for us and adds it to our policy.
sudo usbguard allow-device 10 -p

We can now use this USB device as normal.
Removing a USB Device’s Access
If you change your mind about a USB device—perhaps you’ve lost a USB memory stick and want to remove its access—you can do so with the block-device command.
We need to know the device ID. We can find this by listing the allowed devices. Note that this number might not be the same as the one you used to add the rule to the list, so check before you issue the block-device command.
sudo usbguard list-devices -a

In our case the ID is “13.” We’ll use this with the block-device command, and the -p (permanent) option, to remove its access forever.
sudo usbguard block-device 13 -p

Note that this immediately disconnects the device. Only use this command when you’ve finished using any data on the device.
USBGuard gives you an efficient and robust way to take control of, and manage, which USB devices can be used on your computer.
It’s your computer, so it’s only fair you get to choose.