
You don’t have to hold up a microphone to your computer’s speakers to record its audio. Even if you don’t have a Stereo Mix option on your PC, you can easily record the sound coming from any Windows PC.
You can record the sound coming from your PC in numerous ways, and we’re going to show you some of the best we’ve found. The first three options use only software, and the third relies on an old trick that connects your computer’s audio output to its audio input with an audio cable.
Option 1: Stereo Mix or What U Hear
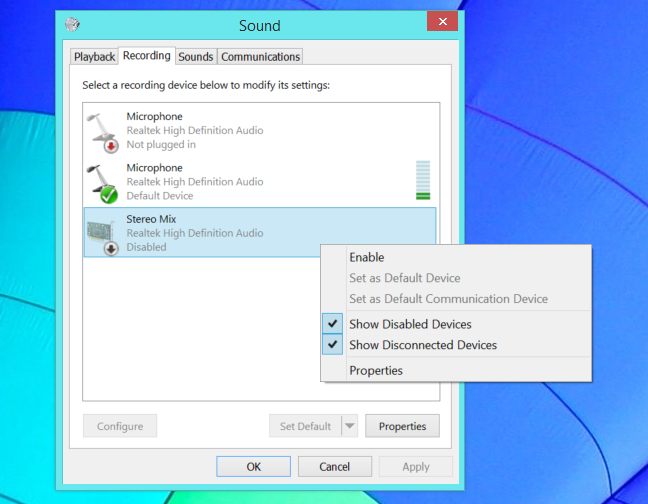
Stereo Mix is sometimes called “What U Hear.” It’s a special recording option that your sound drivers might provide. If it is included with your drivers, you can select Stereo Mix (instead of a microphone or audio line-in input), and then force any application to record the same sound that your computer is outputting from its speakers or headphones.
On modern versions of Windows, Stereo Mix is generally disabled by default — even if your sound drivers support it. Follow our instructions to enable the Stereo Mix audio source on Windows. After enabling Stereo Mix, you can use any audio-recording program, and just select “Stereo Mix” as the input device instead of the usual “line-in” or “microphone” option.
On some devices, you may not have this option at all. There may be a way to enable it with different audio drivers, but not every piece of sound hardware supports Stereo Mix. It’s unfortunately become less and less common.
Option 2: Audacity’s WASAPI Loopback

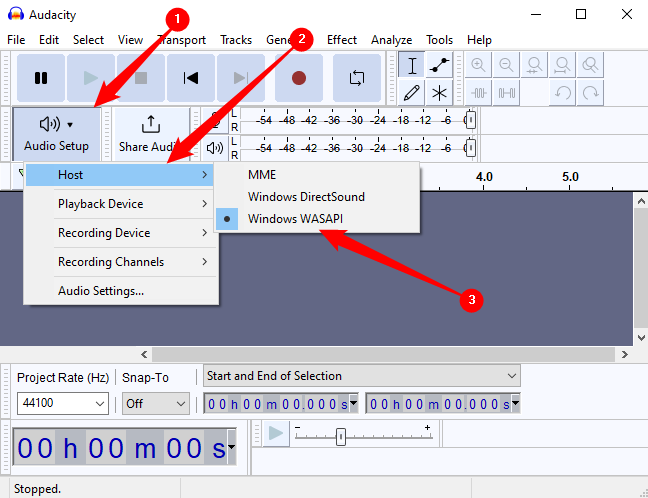
Don’t have a Stereo Mix option? No problem. Audacity has a useful feature that can record the audio coming out of your computer—even without Stereo Mix. In fact, Audacity’s feature may be even better than Stereo Mix, assuming you’re willing to use Audacity to record the audio. This method takes advantage of a feature that Microsoft added in Windows Vista named the Windows Audio Session API (WASAPI). The feature also functions in Windows 7, Windows 8, Windows 10, and Windows 11, and it helps make up for the lack of a Stereo Mix option on modern Windows PCs.
In Audacity, choose the “Windows WASAPI” audio host.
Then choose an appropriate loopback device, such as “Speakers (loopback)” or “Headphones (loopback).”
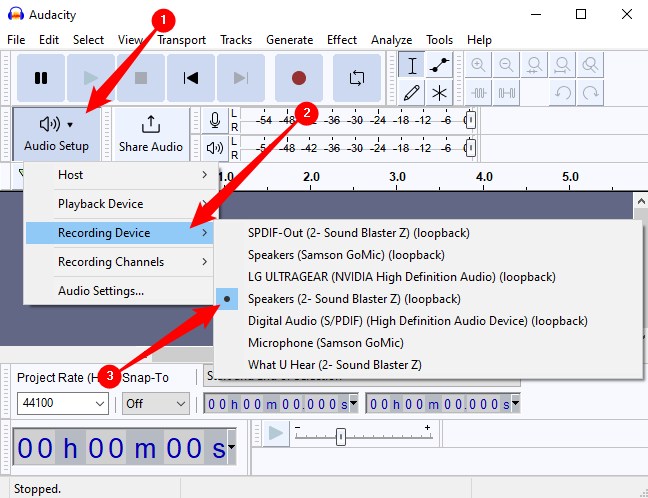
Click the Record button to start recording the audio in Audacity, and then click Stop when you’re done. Because you’re using Audacity, you can easily trim and edit the sound file when you’re done.
Note: If this doesn’t work, you may also need to select the correct number of recording channels to match your device using the dropdown box to the right of the device selection box. For example, If you have a 7.1 channel headset, select “8.”
Audacity’s tutorial website explains why this feature is actually better than Stereo Mix:
“WASAPI loopback has a big advantage over stereo mix or similar inputs provided by the audio interface. The capture is entirely digital (rather than converting to analog for playback, then back to digital when Audacity receives it).”
In other words, your recorded sound file will be higher-quality when using Audacity’s WASAPI loopback option.
Option 3: Use Open Broadcast Software
Open Broadcast Software (OBS), usually pronounced “Oh-bee-ess,” is most popular with streamers on Twitch or Youtube. It isn’t just good for that, though — it is a very capable screen or audio recorder, too. OBS records video and audio by default, so you’ll have files in MP4 or MKV formats rather than a pure audio file, but it is simple enough to convert a video file to an audio-only file with VLC.
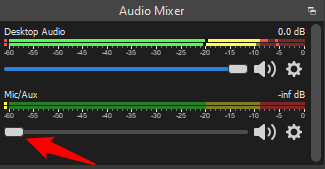
This is the main OBS window when you first launch the program. Note that the “Audio Mixer” section at the bottom of the window has a “Desktop Audio” input.
Make sure the microphone audio volume is turned down all the way if you have one connected to your system, so you don’t have to worry about separating the audio tracks later.
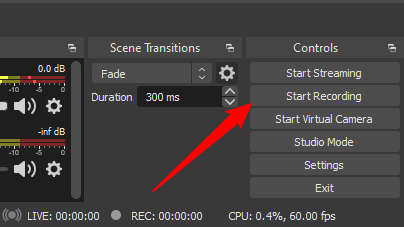
Then click “Start Recording” and capture all of your system’s audio output. When you’re done, click the “Stop Recording” button that replaces the “Start Recording” button. Your file will save to “C:Users(YourUserName)Videos” by default.
If you want to convert the file into an audio-only format, like MP3, you can do it with VLC.
Option 4: An Audio Cable

If neither of the first three options suit your needs, there’s always the low-tech solution — although it’s a bit of a hack. Just get an audio cable with a male 3.5mm connector on both ends. Plug one end into the line-out (or headphone) jack on your PC, and the other end into the line-in (or microphone) jack. You’ll stop hearing the sound your computer produces, but you can use any audio-recording program to record the “line in” or “microphone” input. To actually hear the sound, you could get a splitter, and then output the audio to headphones or speakers at the same time you direct it back into your computer.
Sure, this is inconvenient and silly compared to the software-only options we talked about. But, if you desperately need to capture the audio coming out of your computer in an application that isn’t Audacity or OBS, and you don’t have Stereo Mix, the cable trick allows you to do this.
Obviously, copyright laws may prevent you from distributing whatever recordings you make in this way, so don’t use these tricks for piracy! After all, even if you were going to pirate some audio, there’d be easier ways to do it than this.