
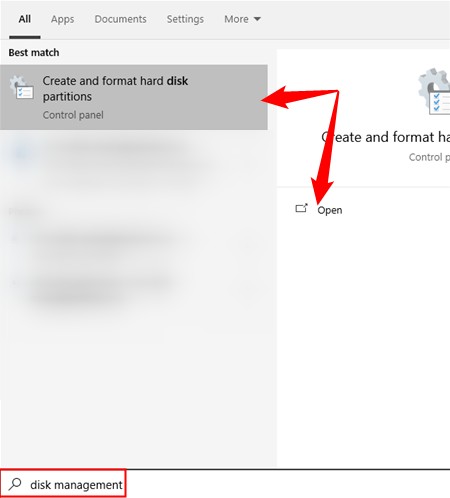
- Open the Start Menu and search “Disk Management”
- Select “Create and Format Hard Disk Partitions.”
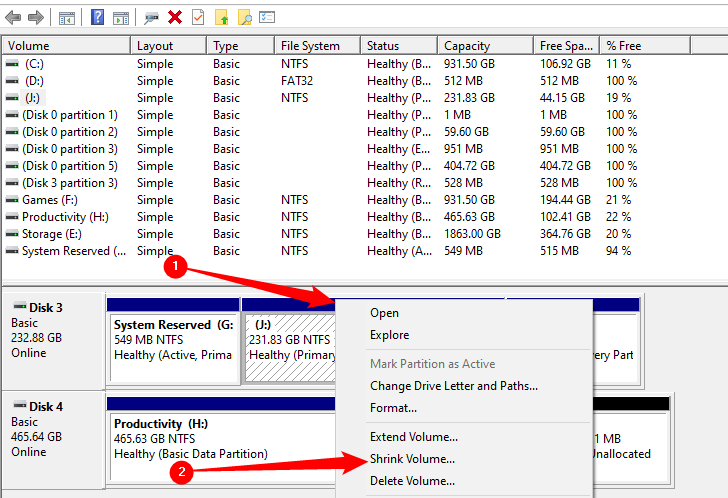
- Right-click the partition you want to resize, then click “Shrink” or “Extend.”
Windows 10 includes Disk Management to shrink and expand partitions. You don’t need a third-party partition manager for basic tasks, although they will often by more feature-rich. This works on other versions of Windows, like Windows 11 and Windows 7, too.
How to Launch the Disk Management Utility
The easiest way to launch the Disk Management Utility is through the Start Menu. Open the Start Menu, search for “Disk Management,” then click “Create and Format Hard Disk Partitions” or click “Open.”
You can also access the Disk Management Utility through the Power User Menu — press Windows+X, then tap the K key to open it. Alternatively, the Disk Management Utility also can be found at Control Panel > Administrative Tools > Computer Management > Storage > Disk Management.
How to Shrink a Partition using Disk Management
In the Disk Management screen, just right-click on the partition that you want to shrink and select “Shrink Volume” from the menu.
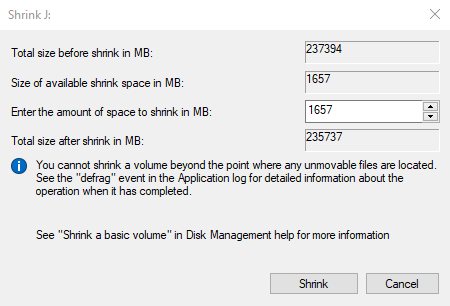
In the Shrink dialog, you will want to enter the amount you want to shrink by, not the new size. For example, if you want to shrink your 50 gigabyte (GB) partition by roughly 10GB so that it will now be roughly 40GB, enter 10000 (10 gigabytes written in megabytes) into the box.
Note: In this example, our drive is almost full and only has 1.6 gigabytes free. You can’t shrink a partition by more than the available free space — doing so would result in file loss.
How to Extend a Partition
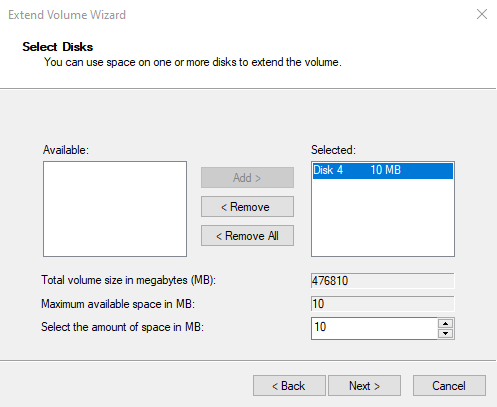
In the Disk Management screen, just right-click on the partition that you want to shrink, and select “Extend Volume” from the menu.
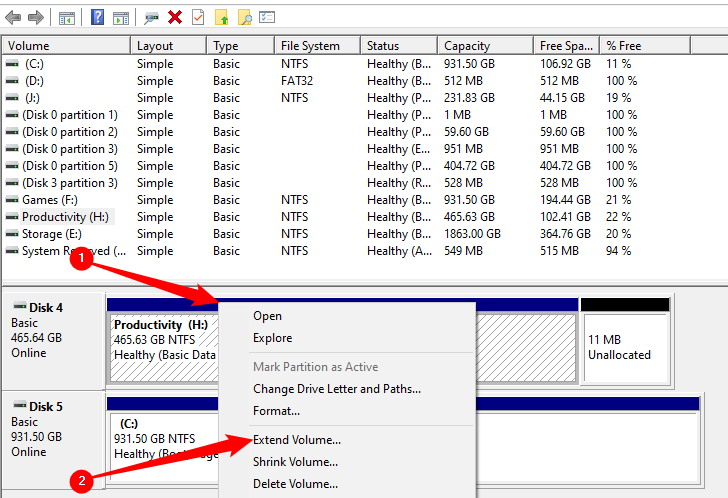
On this screen, you can specify the amount that you want to increase the partition by. In this case, we’re talking about a drive that had a small amount of unallocated space on it — only 10 megabytes. If your drive has more, you can just enter the correct amount.
Note that the extend partition feature only works with contiguous space on drives if you’re using a basic disk. An example will make that clearer.
On Disk 1, we have two existing partitions: “Storage” and “Example Volume.” We also have an additional 9.77 GB of unallocated space.

The “Storage(E:)” partition cannot be extended into the 9.77 GB of unallocated space because they’re not directly adjacent — or contiguous — to each other. If you try, you’ll get a warning about creating a dynamic disk.

Dynamic disks are okay if you’re just using them for storage, but they’re not suitable for operating system installation. They also make moving the drive between computers difficult. Avoid dynamic disks — they’re deprecated and shouldn’t be used.
How to Resize a Partition During Windows Installation
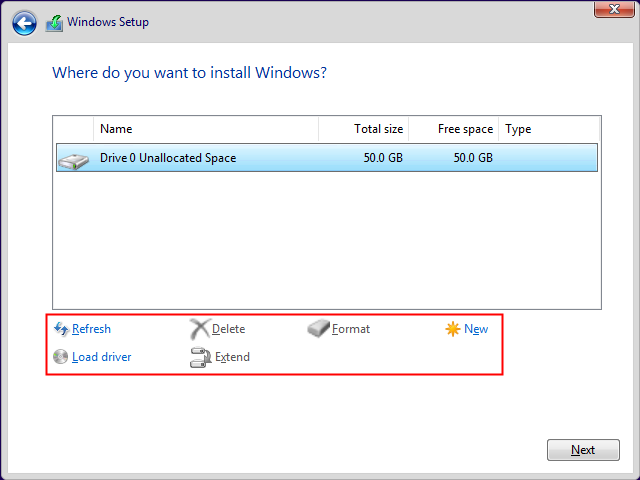
You can modify partitions while Windows installs, too. This can be handy if you know in advance you’re going to want a particular configuration.
You can perform any of the usual partition operations (like format, new, shrink, and extend) while Windows installs. Just be careful that you don’t accidentally format a drive with files on it — you’ll lose everything.
Why Resize a Partition?
There are many reasons you might want to resize a partition. For example, you may want to set up a dual-boot system.
Let’s say you only have one NVMe drive installed in your PC, and you want to dual boot your computer with Windows 10 and Ubuntu. NVMe drives are absurdly fast, so ideally, you’d like to have both Windows 10 and Ubuntu installed on the main NVMe drive. But there is a problem — you installed Windows 10 first and weren’t thinking, and so accidentally partitioned the entire drive as one big NTFS filesystem. You can shrink the existing partition so that unused space becomes unallocated, and then install Ubuntu there.
Alternatively, maybe you have the opposite scenario. Maybe you’ve previously been dual booting off of the same drive and recently decided to install a completely separate drive for your Linux distro. Now you’ve got a ton of extra unused space on your Windows boot drive that you’d like to reclaim. Format the former Linux partition, then extend your Windows partition into that space.
Managing partitions can be a bit messy, and if you make a mistake, it is possible you can lose files. Things only get more complicated when you start mixing operating systems with different file systems. If you can, just use separate drives — it’ll make your life much simpler.
