

You can install Stable Diffusion locally on your PC, but the typical process involves a lot of work with the command line to install and use. Fortunately for us, the Stable Diffusion community has solved that problem. Here’s how to install a version of Stable Diffusion that runs locally with a graphical user interface!
What Is Stable Diffusion?
Stable Diffusion is an AI model that can generate images from text prompts, or modify existing images with a text prompt, much like MidJourney or DALL-E 2. It was first released in August 2022 by Stability.ai. It understands thousands of different words and can be used to create almost any image your imagination can conjure up in almost any style.
There are two critical differences that set Stable Diffusion apart from most of the other popular AI art generators, though:
- It can be run locally on your PC
- It is an open-source project
The last point is really the important issue here. Traditionally, Stable Diffusion is installed and run via a command-line interface. It works, but it can be clunky, unintuitive, and it is a significant barrier to entry for people that would otherwise be interested. But, since it is an open source project, the community quickly created a user interface for it and began adding their own augmentations, including optimizations to minimize video ram (VRAM) usage and build in upscaling and masking.
What Do You Need to Run This Version of Stable Diffusion?
This version of Stable Diffusion is a fork — an offshoot — of the main repository (repo) created and maintained by Stability.ai. It has a graphical user interface (GUI) — making it easier to use than the regular Stable Diffusion, which only has a command-line interface — and an installer that’ll handle most of the setup automatically.
Warning: As always, be careful with third-party forks of software that you find on GitHub. We’ve been using this for a while now with no issues, and so have thousands of others, so we’re inclined to say it is safe. Fortunately, the code and changes here are small compared to some forks of open-source projects.
This fork also contains various optimizations that should allow it to run on PCs with less RAM, built-in upscaling and facial capabilities using GFPGAN, ESRGAN, RealESRGAN, and CodeFormer, and masking. Masking is a huge deal — it allows you to selectively apply the AI image generation to certain parts of the image without distorting other parts, a process typically called inpainting.
- A minimum of 10 gigabytes free on your hard drive
- An NVIDIA GPU with 6 GB of RAM (though you might be able to make 4 GB work)
- A PC running Windows 11, Windows 10, Windows 8.1, or Windows 8
- The WebUI GitHub Repo, by AUTOMATIC1111
- Python 3.10.6 (Newer versions and most older versions should be fine too)
- The Stable Diffusion Official Checkpoints (Watch for the v1.5 checkpoints in late September!)
- The GFPGAN v1.3 Checkpoints (v1.4 might work too)
- Any additional ESRGAN models you might want. You can use as many or few as you want.
How to Install Stable Diffusion with a GUI
The installation process has been streamlined significantly, but there are still a few steps you need to do manually before the installer can be used.
Install Python First
The first thing you should do is install the version of Python, 3.10.6, recommended by the author of the repo. Head to that link, scroll towards the bottom of the page, and click “Windows Installer (64-Bit).”
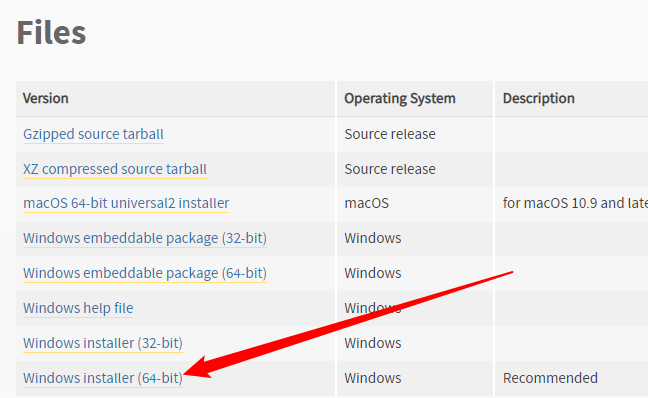
Click the executable you downloaded and go through the prompts. If you already have Python installed (and you most certainly do), just click “Upgrade.” Otherwise follow along with the recommended prompts.
Note: Make certain that you add Python 3.10.6 to the PATH if you get an option for that.
Install Git and Download the GitHub Repo
You need to download and install Git on Windows before the Stable Diffusion installer can be run. Just download the 64-bit Git executable, run it, and use the recommended settings unless you have something specific in mind.
RELATED: How to Install Git on Windows
Next, you need to download the files from the GitHub repo. Click the green “Code” button, then click “Download ZIP” at the bottom of the menu.
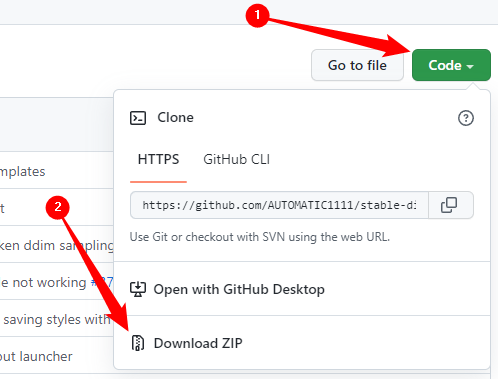
Open up the ZIP file in File Explorer or your preferred file archiving program, and then extract the contents anywhere you want. Just keep in mind that folder is where you’ll need to go to run Stable Diffusion. This example extracted them to the C: directory, but that isn’t essential.

Note: Make sure you don’t accidentally drag “stable-diffusion-webui-master” onto another folder rather than empty space — if you do, it’ll drop into that folder, not the parent folder you intended.
Download All The Checkpoints
There are a few checkpoints you require for this to work. The first and most important are the Stable Diffusion Checkpoints. You need to create an account to download the checkpoints, but there isn’t much required for the account — all they need is a name and email address, and you’re good to go.
Note: The checkpoints download is several gigabytes. Don’t expect it to be done instantly.
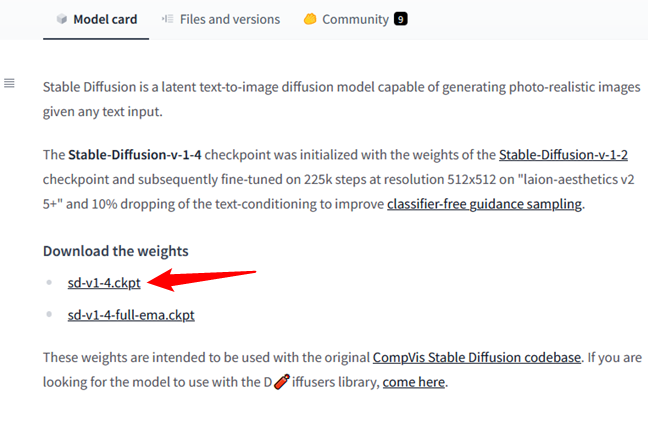
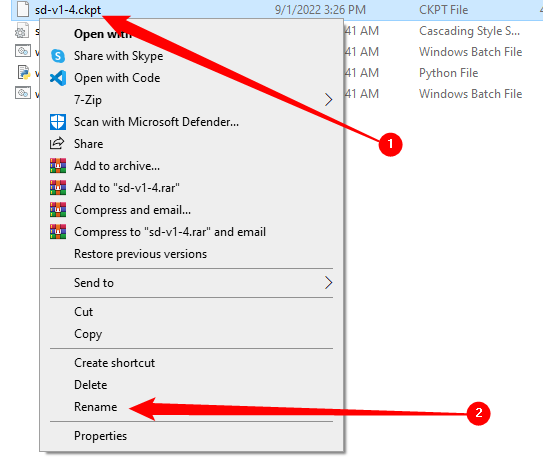
Copy and paste “sd-v1-4.ckpt” into the “stable-diffusion-webui-master” folder from the previous section, then right-click “sd-v1-4.ckpt” and hit rename. Type “model.ckpt” into the text field and hit Enter. Be very sure that it is “model.ckpt” — this will not work otherwise.
Note: The rename function is an icon on Windows 11.
You also need to download the GFPGAN checkpoints. The author of the repo we’re using called for GFPGAN v1.3 checkpoints, but you might be able to use v1.4 if you want to try it out. Scroll down the page, then click “V1.3 model.”

Place that file, “GFPGANv1.3.pth,” into the “stable-diffusion-webui-master” folder just like you did with the “sd-v1-4.ckpt” file, but do not rename it. The “stable-diffusion-webui-master” folder should now contain these files:

You can also download as many ESRGAN checkpoints as you want. They typically come packaged as ZIP files. After downloading one, open the ZIP file, and then extract the “.pth” file into the “ESRGAN” folder. Here is an example:

ESRGAN models tend to provide more specific functionality, so pick out a couple that appeal to you.
Now, you just have to double-click “webui-user.bat” file, which is located in the primary “stable-diffusion-webui-master” folder. A console Window will appear and begin fetching all of the other important files, building a Python environment, and setting up a web user interface. It will look like this:
Note: Expect the first time you run this to take at least a few minutes. It needs to download a bunch of stuff off the Internet. If it appears to hang for an unreasonably long time at one step, just try selecting the console window and hitting the Enter key.

When it is done, the console will display:
Running on local URL: http://127.0.0.1:7860
To create a public link, set `share=True` in `launch()`
RELATED: What Is the 127.0.0.1 IP Address, and How Do You Use It?
How to Generate Images Using Stable Diffusion with a GUI
Alright, you’ve installed the WebUI variant of Stable Diffusion, and your console let you know that it is “running on local URL: http://127.0.0.1:7860.”
Note: What exactly does that mean, what is happening? 127.0.0.1 is the localhost address — the IP address your computer gives itself. This version of Stable Diffusion creates a server on your local PC that is accessible via its own IP address, but only if you connect through the correct port: 7860.
Open up your browser, enter “127.0.0.1:7860” or “localhost:7860” into the address bar, and hit Enter. You’ll see this on the txt2img tab:

If you’ve used Stable Diffusion before, these settings will be familiar to you, but here is a brief overview of what the most important options mean:
- Prompt: The description of what you’d like to create.
- Roll Button: Applies a random artistic style to your prompt.
- Sampling Steps: The number of times the image will be refined before you receive an output. More is generally better, but there are diminishing returns.
- Sampling Method: The underlying math that governs how sampling is handled. You can use any of these, but euler_a and PLMS seem to be the most popular options. You can read more about PLMS in this paper.
- Restore Faces: Uses GFPGAN to try to fix uncanny or distorted faces.
- Batch Count: The number of images to be generated.
- Batch Size: The number of “batches”. Keep this at 1 unless you have an enormous amount of VRAM.
- CFG Scale: How carefully Stable Diffusion will follow the prompt you give it. Larger numbers mean it follows it very carefully, whereas lower numbers give it more creative freedom.
- Width: The width of the image you want to generate.
- Height: The width of the image you want to generate.
- Seed: The number that provides an initial input for a random-number generator. Leave it at -1 to randomly generate a new seed.
Let’s generate five images based on the prompt: “a highland cow in a magical forest, 35mm film photography, sharp” and see what we get using the PLMS sampler, 50 sampling steps, and a CFG scale of 5.
Tip: You can always hit the “Interrupt” button to stop generation if your job is taking too long.
The output window will look like this:

Note: Your images will be different.
The top-middle image is the one we’ll use to try out for masking a bit later. There isn’t really a reason for this specific choice other than personal preference. Grab any image that you like.

Select it, and then click “Send to Inpaint.”
How to Mask Images You Create to Inpaint
Inpainting is a fantastic feature. Normally Stable Diffusion is used to create entire images from a prompt, but inpainting allows you selectively generate (or regenerate) parts of the image. There are two critical options here: inpaint masked, inpaint not masked.
Inpaint masked will use the prompt to generate imagery within the area you highlight, whereas inpaint not masked will do the exact opposite — only the area you mask will be preserved.
We’ll cover a bit about Inpaint masked first. Drag your mouse around on the image holding left click and you’ll notice a white layer appearing over top of your image. Draw out the shape of the area you want to be replaced, and be sure to fill it in entirely. You aren’t circling a region, you’re masking in the entire region.
Tip: If you’re just adding something to an existing picture, it can be helpful to try to make the masked region line up with the approximate shape you’re trying to create. Masking a triangular shape when you want a circle, for example, is counter-productive.
Let’s take our highland cow example and give him a chef’s hat. Mask out a region in approximately the shape of a Chef’s hat, and make sure to set “Batch Size” to more than 1. You’ll probably need multiple to get an ideal(ish) result.
Additionally, you should select “Latent Noise” rather than “Fill,” “Original,” or “Latent Nothing.” It tends to produce the best results when you want to generate a completely new object in a scene.
Note: You’ll note the left edge of the hat has deleted part of his horn. That happened because the “Mask Blur” setting was a bit too high. If you see things like that in your images, try decreasing the “Mask Blur” value.

Alright — maybe a chef’s hat isn’t the right pick for your highland cow. Your highland cow is more into the early-20th century vibes, so let’s give him a bowler hat.
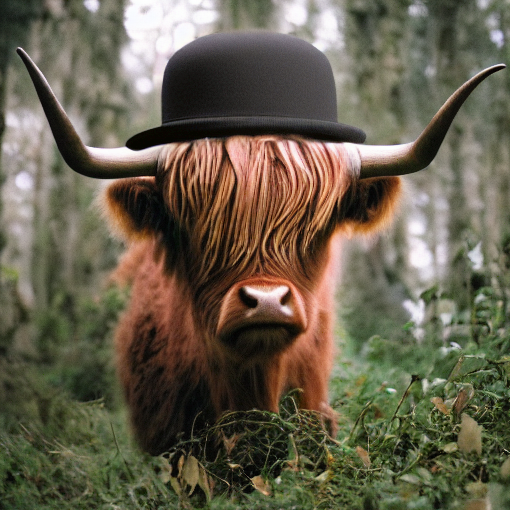
How positively dapper.
Of course, you can also do the exact opposite with Inpaint Not Masked. It is conceptually similar, except the regions you define are reversed. Instead of marking out the region you want to change, you mark out the regions you want to be preserved. It is often useful when you want to move a small object onto a different background.
How to Fix the “CUDA Out Of Memory” Error
The bigger the image you make, the more video memory is required. The first thing you should try is generating smaller images. Stable Diffusion produces good — albeit very different — images at 256×256.
If you’re itching to make larger images on a computer that doesn’t have issues with 512×512 images, or you’re running into various “Out of Memory” errors, there are some changes to the configuration that should help.
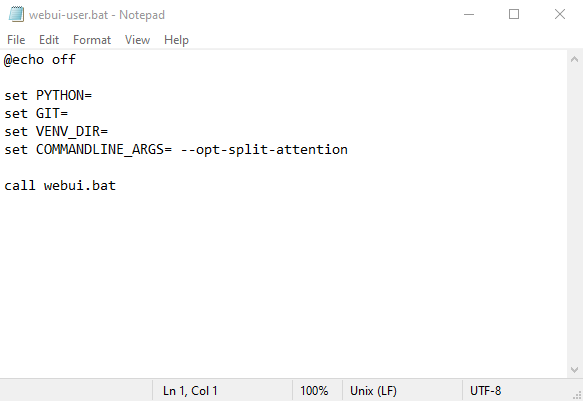
Open up “webui-user.bat” in Notepad, or any other plain text editor you want. Just right-click “webui-user.bat,” click “Edit,” and then select Notepad. Identify the line that reads set COMMANDLINE_ARGS=. That is where you’re going to place the commands to optimize how Stable Diffusion runs.
RELATED: How to Write a Batch Script on Windows
If you just want to make huge pictures, or you’re running out of RAM on a GTX 10XX series GPU, try out --opt-split-attention first. It’ll look like this:
Then click File > Save. Alternatively, you can hit Ctrl+S on your keyboard.
If you’re still getting memory errors, try adding --medvram to the list of command line arguments (COMMANDLINE_ARGS).

You can add --always-batch-cond-uncond to try and fix additional memory issues if the previous commands didn’t help. There is also an alternative to --medvram that might reduce VRAM usage even more, --lowvram, but we can’t attest to whether or not it’ll actually work.
The addition of a user interface is a critical step forward in making these sorts of AI-driven tools accessible to everyone. The possibilities are nearly endless, and even a quick glance at the online communities dedicated to AI art will show you just how powerful the technology is, even while in its infancy. Of course, if you don’t have a gaming computer, or you don’t want to worry about the setup, you can always use one of the online AI art generators. Just keep in mind that you cannot assume your entries are private.