
Google integrated a screen recording tool into Chrome OS 89 primarily to foster virtual learning. If you take a lot of online classes on your Chromebook, or you teach students online, the tool lets you record lessons, reports, and presentations for reference purposes.
However, screen recording isn’t limited to academics only; there are other interesting use cases. You can also record YouTube videos, sports broadcasts, games, and other entertainment content or activities. Proceed to the next section to learn how to screen record on a Chromebook.
How to Record Your Chromebook’s Screen
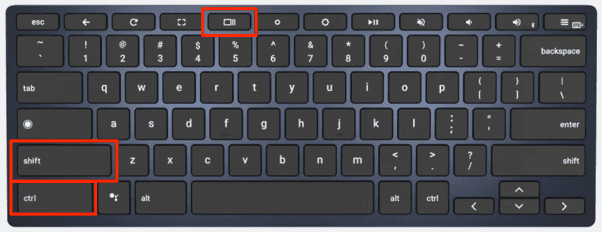
Press and hold Control + Shift + Overview mode (or Show windows key) to launch the Chrome OS snipping tool.
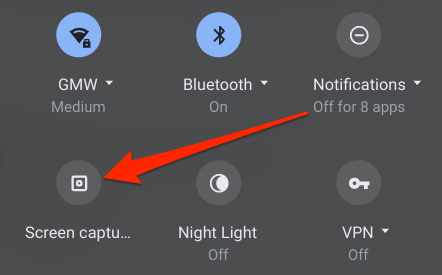
If your Chromebook is in tablet mode, open the Status area and select Screen capture.
The snipping tool will pop up at the bottom of your screen, just right above the Shelf. Tap the camcorder icon to navigate to the Screen Record menu.
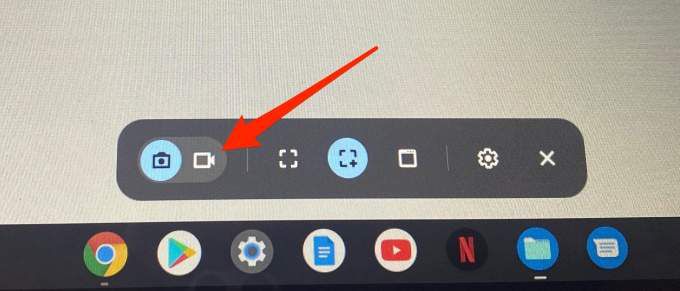
The snipping tool will preselect the “Record Partial Screen” mode by default. In this mode, use the plus-shaped crosshair icon to select an area of the screen you want to record.
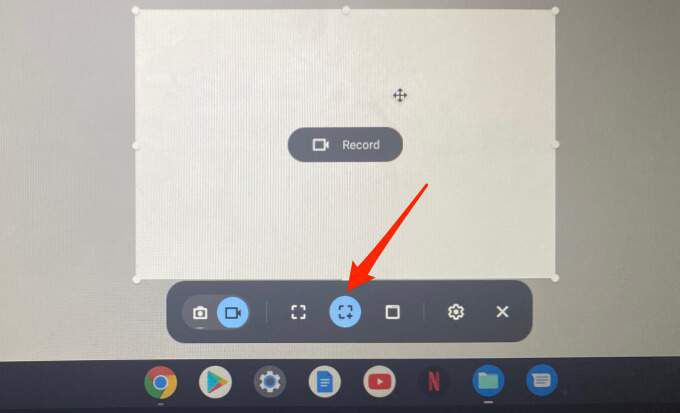
This is perfect for recording a video playing on a website (like YouTube) without having to record the entire web page.
Note: You cannot move the selected area during recording. To record another portion of the screen, cancel the ongoing recording and map out a new recording area.
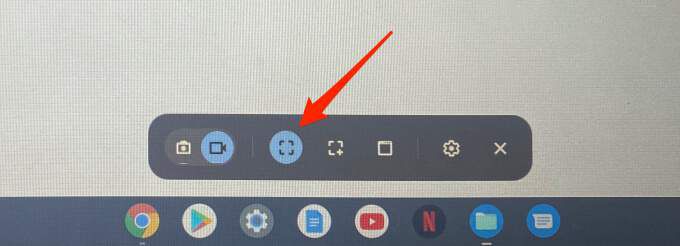
The “Record window” option lets you record the content of a particular app or window. If you’re using two apps in split-screen mode on your Chromebook, this option lets you record the content of one app without closing the other.

When you select the “Record window” option, your cursor changes to a camcorder icon. Use the touchpad to move the icon and click anywhere on the window you want to record.
Lastly, there’s the option to “Record full screen.” Click the dashed-square icon and click anywhere on the screen to take a recording of the entire display.
When you choose your preferred recording option, the snipping tool will display a 3-second countdown on the screen, selected area, or window before it records. The screen recorder will capture all the visual elements on the screen, including the cursor. However, you should note that the screen recorder doesn’t capture audio by default.
You’ll need to manually enable your Chromebook’s microphone to record your screen with audio. Follow the steps in the next section to learn how it’s done.
How to Record Chromebook Screen Without Audio
Before you hit the record button, click the gear icon on the snipping tool and toggle on the Record microphone.
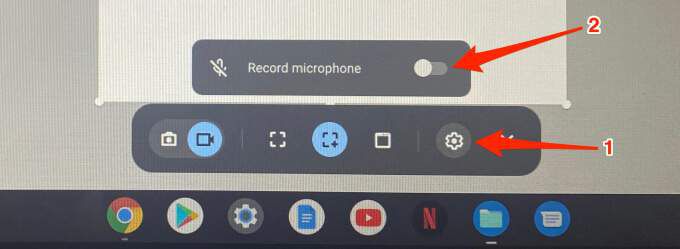
The snipping tool will save the settings, so you don’t have to manually enable the microphone on subsequent recordings. To record without audio, repeat the steps above and toggle off the Record microphone option.
Recording your screen with the microphone enabled will capture audio from the media playing on your Chromebook. The microphone will also pick up background sound from the environment. Therefore, if you’re screen recording with audio on your Chromebook, make sure to do so in a quiet room with minimal ambient noise.
Better yet, use an external noise-canceling microphone, if you have one. That may help filter out background noise and ultimately enhance the sound quality of the recording.
How to Stop Screen Recording on Chromebook
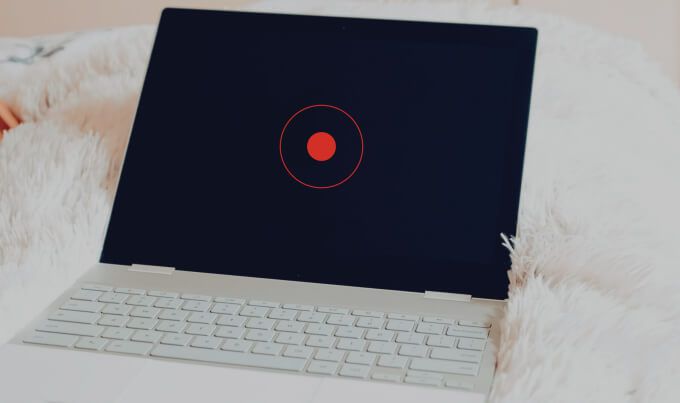
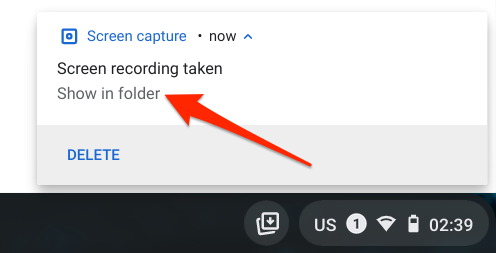
When the screen recording commences, you should see a red-colored stop icon close to the Status area—the bottom-right corner of the screen. Clicking the icon will immediately stop the recording and save the file.
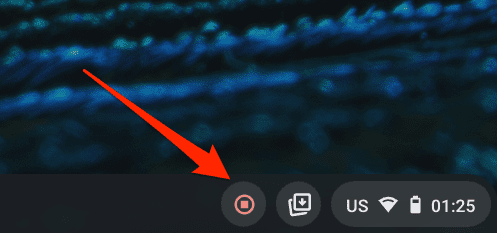
You’ll also get a notification in the Status Area. Click Show in folder to view the recording in the Files app. Chrome OS saves screenshots and screen recordings in the Downloads folder.
Troubleshoot Screen Recording Problems on Chromebook
It’s possible to run into certain problems or difficulties while screen recording on Chromebook. In this section, we cover potential solutions to some of these issues.
Chromebook Not Saving Screenshots or Screen Recordings?
As mentioned earlier, Chrome OS saves screenshots and screen recordings to the Downloads folder by default. If you don’t find your recordings in the Downloads folder, your Chromebook could be low on storage space.
Go to Settings > Device > Storage management to check your device’s storage status.
Free up some space, try recording the screen again, and check if the video is saved to your device.
Chromebook Not Recording Audio?
You enabled the “Record microphone” option but your recordings don’t have audio. What could be the problem?
Well, the snipping tool may fail to capture audio if your Chromebook’s microphone is muted. Before you record, make sure you check the Chrome OS audio settings and confirm that audio input is allowed.
Open the Status Area and click the arrow icon next to the volume slider.
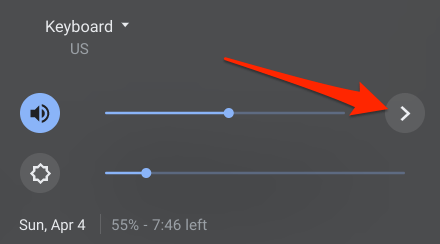
In the Input section, move the Microphone (Internal) slider to the right to increase the volume of your Chromebook’s built-in microphone.
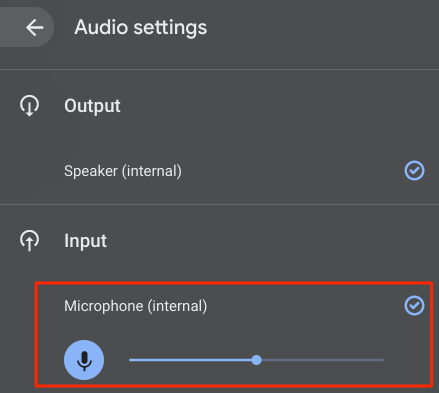
If there’s an external audio device connected to your Chromebook, you’ll find the device’s microphone slider in this section, too. Should the problem persist after increasing audio input volume, restart your Chromebook and try again.
Can’t Find the Screen Recording Tool?
We mentioned in the intro of this article that Google integrated the screen recording tool into Chrome OS 89. If you access the screen recording tool from the Status Area or via the keyboard shortcut, make sure your Chromebook is running the latest Chrome OS version.
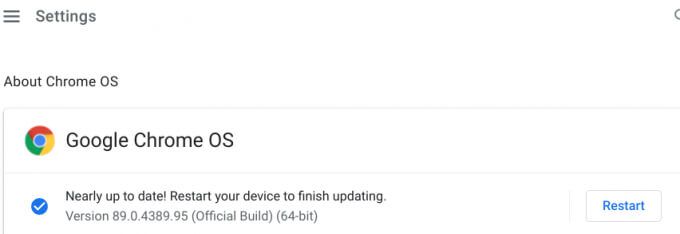
Go to Settings > About Chrome OS and click Check for updates. Restart your device if there’s a pending update on the page.
Updating your Chromebook could also fix other issues causing the screen recording tool to malfunction.
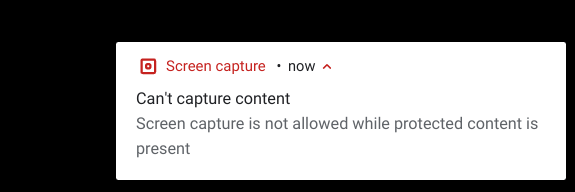
Not All Chromebook Apps Support Screen Recording
You can’t record your screen when using apps with protected content. For example, try recording a movie on the Netflix or Amazon Prime Video app. You’ll get a “Can’t capture content” error message in the notification panel.
Interestingly, we were able to record Netflix through a web browser. Note that we do not recommend doing this because it’s outright illegal to record or reproduce copyrighted content—either on Netflix or elsewhere—without permission. Before you record content on your device, confirm that you’re allowed to do so.