
To record your screen on Windows 11, launch the Snipping Tool and start a screen recording. You can also press Windows+G to open the Xbox Game Bar, then open the capture window and hit the record button. You can also record your screen using a third-party app, like OBS, ScreenPresso, or GeForce Experience.
Recording your screen is a good way to capture a process, or even just something fun or interesting. Windows 11 comes with a built-in solution for screen recording, but you can also use other applications.
Screen Record Windows With the Snipping Tool
The easiest method for screen recording on Windows 11 is the built-in Snipping Tool. It works great for taking and editing screenshots, and it can record videos of your screen.
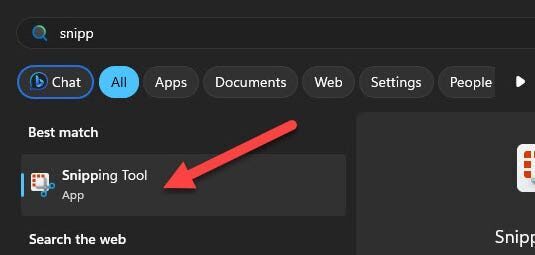
First, open the Start Menu and search for “Snipping Tool” to open the app.
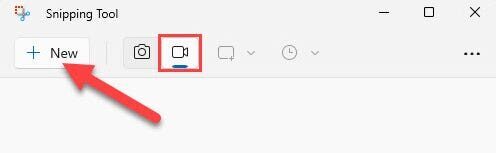
Next, switch the snip mode to the camcorder icon, and click “New” to start a screen recording.
The mouse cursor will turn into a crosshair and you can click and drag to select an area of the screen to record.

Click “Start” from the floating toolbar to begin the screen recording.

When you’re done, tap the red stop icon in the toolbar. You also have the option to pause and delete during the recording.

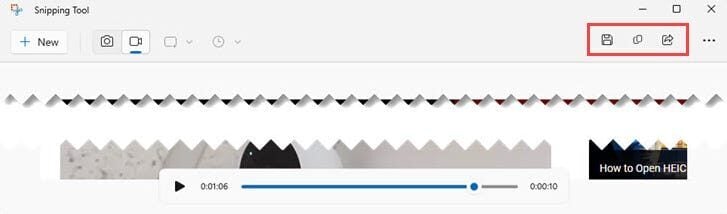
After you stop the recording, it will open in a player window. From here you can watch it back, save it, copy it, or share it.
That’s it! This is a really nice and simple tool for screen recording. If you want more options, like the ability to record audio, you’ll want to use one of the other methods in this guide.
Record Your Screen Using the Xbox Game Bar
The other built-in solution for recording your screen in Windows 11 is the the Xbox Game Bar, which comes with Windows 11 by default. To open the Xbox Game Bar, press the Windows+G keyboard shortcut, or search for it in the start menu.
The Xbox Game Bar will appear at the top of your screen. Click the “Camera” icon to open the Capture window.
![]()
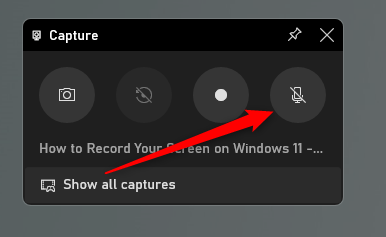
The Capture window is where you can select the option to record your screen. However, you’ll want to enable (or disable) your mic before you do. If you want to speak while you record your screen, make sure the Microphone icon isn’t crossed out with a line, or vice versa.
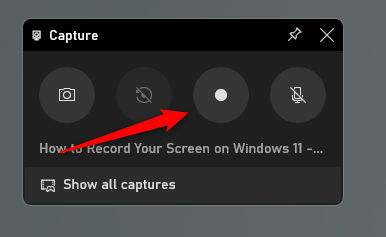
When you’re ready to record, click the “Record” button, which is the button with a solid white circle.
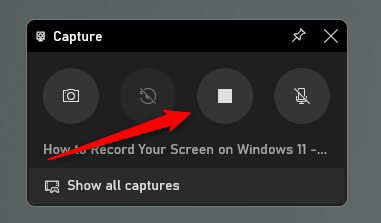
Your screen will begin recording. When you’re finished, click the “Stop” button, which is a solid white square. It’s located in the same place the Record button previously was.
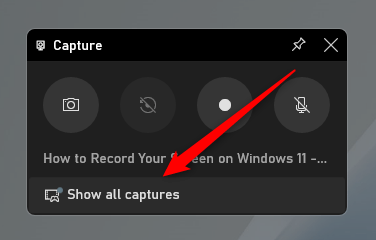
To find your recording, click “Show All Captures” at the bottom of the Capture window.
That’s all there is to it!
Screenrecord Using Microsoft PowerPoint
While not a built-in method, PowerPoint was developed by the same company as Windows, so you can safely use this app to record your screen without worrying about crapware that often comes with third-party downloads.
To record your screen with PowerPoint, open PowerPoint, click the “Insert” tab, and then select “Screen Recording” from the Media group.
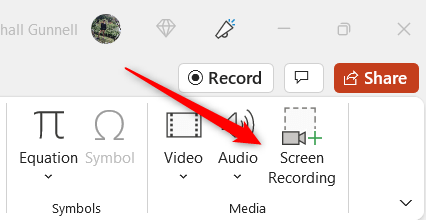
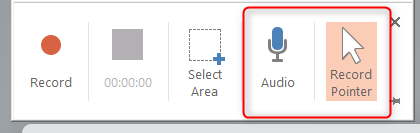
PowerPoint will disappear and a small bar will appear at the top of your screen. To the right of the menu bar, you can choose if you want to record audio and/or your cursor. If the option is highlighted in a peach color, then it’s enabled, and vice versa.
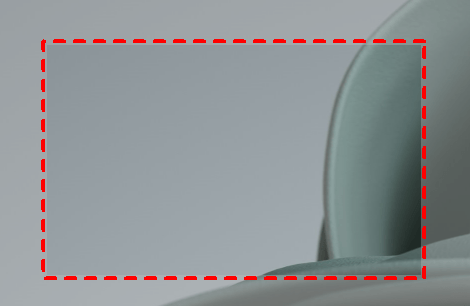
Next, you’ll need to select the area of the screen that you want to record. Your cursor is a plus sign by default once the menu bar appears, so click and drag your mouse across the screen to select the area you’d like to record. The area is boxed in by a perforated red line.
When you’re ready to record, click the “Record” option in the menu bar.

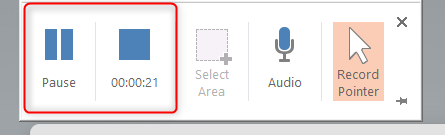
Your screen will begin recording. You can pause your recording by clicking the “Pause” option in the menu bar, and resume by clicking “Play,” which will only appear if you pause your screen. Or, if you’re finished recording, click “Stop,” which is the solid blue square.
Note that the menu bar will disappear when recording. To make it reappear, bring your mouse to the top of your screen.
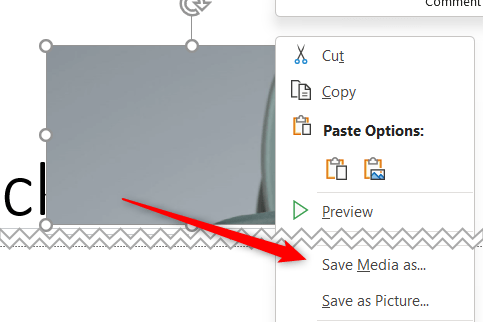
After you’re finished recording, the recording will appear in your PowerPoint slide. To download it, right-click the recording and then select “Save Media As” from the context menu.
From there, just select a location you’d like to save your recording on your PC.
Capture Your Screen Using a Third-Party Application
You can also use a third-party application to record your screen on Windows 11, and there’s certainly no shortage of them. When looking for a third-party app, be sure to only download from an authentic source. In other words, if you want to download Screenpresso (which works quite well), be sure to download it from their official website.
If you’ve decided to go the third-party app route, be sure you’re using antivirus software. Be diligent when downloading things online, and always be sure to follow basic cybersecurity practices.
You aren’t limited to recording only a Windows 11 screen. It’s easy to screen record on Windows 10, Android, Chromebook, iPhone, and Mac too.