
All of us take screenshots on a regular basis. Be it on our smartphones or computers, screenshots have become really easy to take. More often than not, you just have to press a button or two to capture a screenshot on whatever device you’re using. Depending on what you’re taking a screenshot of, you may want to save it for yourself or share it with someone else. You may even want to highlight something in the screenshot.
For this exact reason, brands have added the extra ability to annotate screenshots before saving or sharing them. Another such functionality that’s quite popular is scrolling screenshots.
If you’re trying to capture a webpage or an app feed where you need to scroll vertically, a scrolling screenshot can be helpful to capture the entire content on the page while maintaining continuity. It eliminates the need to capture multiple different screenshots. As a result, most Android OEMs have added the ability to take scrolling screenshots on their custom UIs, from cheap and affordable phones to the best Android flagships.
We’ll tell you how you can make use of this handy tool to take scrolling screenshots and capture more content in a single frame. If you’re on iOS, we also have a guide showing you how to take scrolling screenshots on iPhone.
How to take Scrolling Screenshots on Android 12
Google is quite stingy with regard to adding new features into Android. Even built-in screen recording was only added to stock Android with Android 11 and until then, users had to use a third-party solution. With screenshots, the options you currently get with Android 11 are barebones. While you can annotate and share screenshots, there’s no built-in option to take scrolling screenshots. Well, Android 12 fixes that.
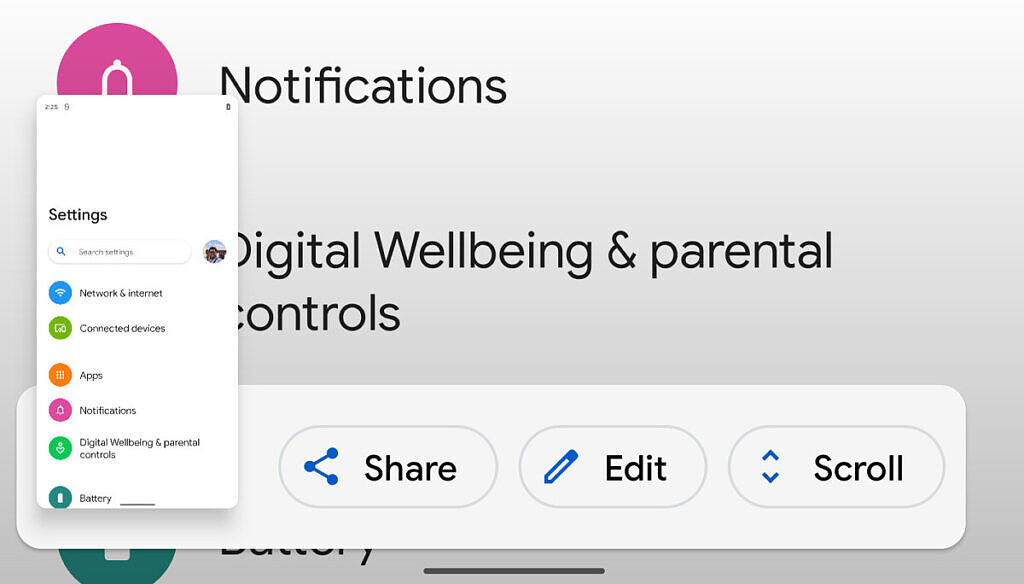
With Android 12, Google has introduced the ability to take scrolling screenshots by default and it’s an option that shows alongside the Share and Edit options in the screenshot menu after you’ve captured a screenshot. The new Capture More button allows you to natively take scrolling screenshots on phones running on stock Android or your Google Pixel smartphones. If you’re using the Android 12 Beta 3 on your phone or if the public release is already out for everyone by the time you’re reading this, here’s how to take scrolling screenshots on Android 12.
- Use the usual button combination (Power + Volume down) to capture a screenshot.
- You’ll now see an option called Capture More next to the thumbnail of the screenshot you captured.

- Select it and the content on your screen will start scrolling down. Once you’ve reached the desired point, touch the screen to stop capturing.
- You can now annotate, save, or share the screenshot.
As for phones that are currently running Android 11 or lower, you can skip to the end of this article and use the third-party app to take scrolling screenshots.
How to take Scrolling Screenshots on Samsung Phones
If you have a Samsung Galaxy phone, OneUI comes with a built-in tool to help you take scrolling screenshots. Here’s how you can use it.
- Use the usual button combination (Power + Volume down) to capture a screenshot.
- You’ll now see a bar at the bottom of your screen with multiple options. Among the options is a button with two downward arrows. Tap on it.
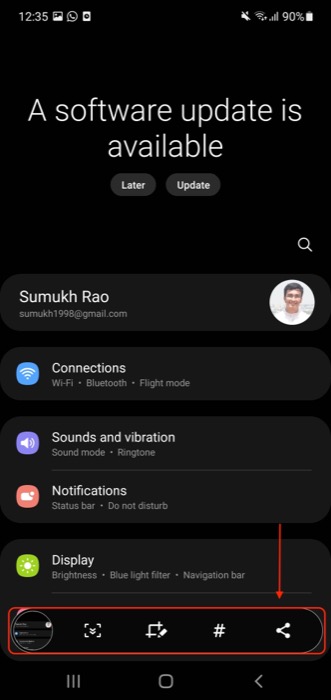
- The content on your screen will start scrolling down. Once you’ve reached the desired point, touch the screen to stop capturing.
- That’s it, your scrolling screenshot is now captured.
How to take Scrolling Screenshots on OnePlus Phones
Just like OneUI, OnePlus also has provided an option to take scrolling screenshots right inside OxygenOS to make things easier. Here’s how you can take scrolling screenshots on your OnePlus smartphone.
- Use the usual button combination (Power + Volume down) to capture a screenshot.
- On the bottom right corner, you’ll see a thumbnail of your screenshot with a button below it called Expanded Screenshot. Tap on it.
- The content on your screen will start scrolling down. Once you’ve reached the desired point, touch the screen to stop capturing.
- That’s it, your scrolling screenshot is now captured.
How to take Scrolling Screenshots on Oppo/Realme Phones
If you have an Oppo or Realme smartphone, your phone is essentially running the same custom UI but in different forms. You get ColorOS on Oppo whereas Realme phones come with RealmeUI which is also based on ColorOS. If you have either of them, here’s how to take a scrolling screenshot.

- Use the usual button combination (Power + Volume down) to capture a screenshot.
- On the left side of your screen, you’ll see a thumbnail of your screenshot with a button below it called Scroll. Tap on it.
- Allow the screen to scroll to the point you want it to and tap on the screen to stop.
- Your scrolling screenshot is now captured and ready to be saved or shared.
How to take Scrolling Screenshots on Vivo/iQOO Phones
Both Vivo and iQOO devices come with Funtouch OS which has the ability to take scrolling screenshots just like most other custom skins out there. Here’s how to take scrolling screenshots on Vivo phones –
- Use the usual button combination (Power + Volume down) to capture a screenshot.
- On the bottom left corner, you’ll see a thumbnail of your screenshot with a button below it called Long Screenshot. Tap on it.
- Scroll down on the page till you reach your desired point and hit Save.
- That’s it, your scrolling screenshot is now captured.
How to take Scrolling Screenshots on Xiaomi/Redmi/Poco Phones
If you’re using a smartphone from Xiaomi, Redmi, or Poco, your phone is running on MIUI. MIUI is one of the most feature-rich custom skins on Android and has the ability to take scrolling screenshots as well. Here’s how you can use the feature.
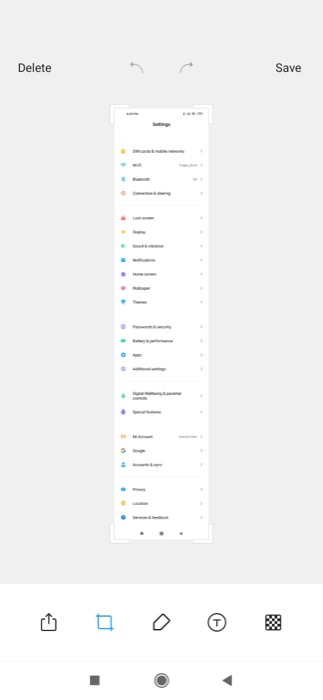
- Use the usual button combination (Power + Volume down) to capture a screenshot.
- On the top right corner, you’ll see a thumbnail of your screenshot with a button below it called Scroll. Tap on it.
- The content on your screen will start scrolling down. Once you’ve reached the desired point, touch the screen to stop capturing.
- That’s it, your scrolling screenshot is now captured.
How to take Scrolling Screenshots using a Third-party App
In case you’re using a phone from a manufacturer that’s not listed above, the chances are your phone may not have a built-in option to take scrolling screenshots. In such cases, you can use a third-party app like LongShot to take scrolling screenshots on any Android smartphone. It works as advertised and is simple to use. Here’s how to use it.
LongShot for long screenshot (Free+, Google Play) →
- Install the LongShot app from the Play Store and open it.
- Grant all the necessary permissions like the ability to display over other apps.
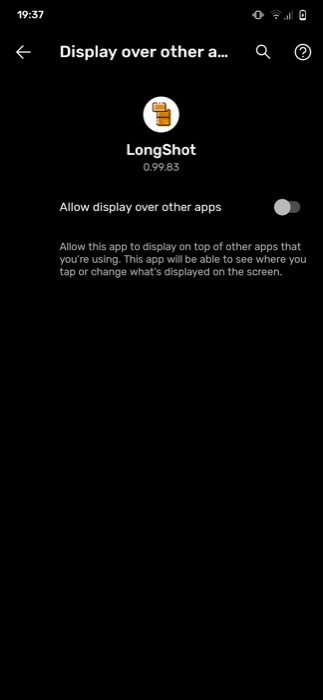
- Next, select the Auto-scroll checkbox under the Capture Screenshot section.

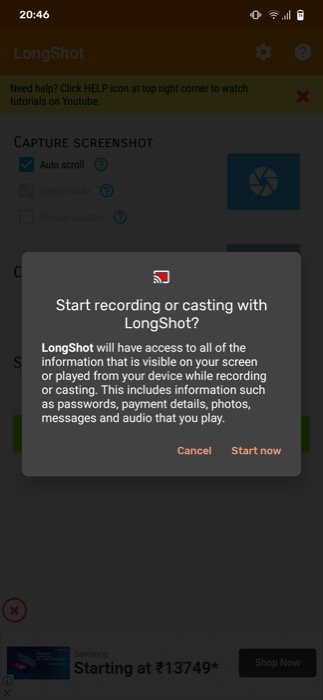
- Now, tap the big blue camera icon and when prompted to allow recording, select Start now.
- You’ll see an overlay on your screen with a Start button.
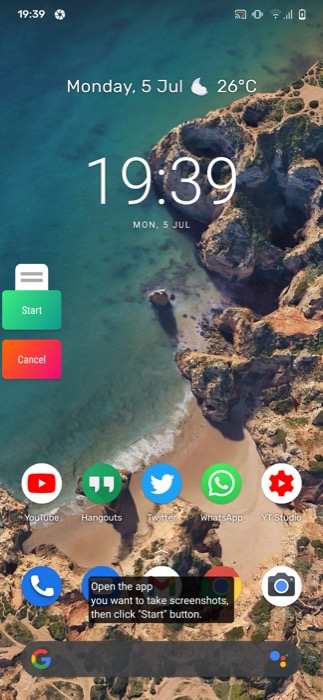
- Open the app in which you want to capture a scrolling screenshot and select Start.
- The app will start capturing the scrolling screenshot. Once you’ve reached the desired point, tap anywhere above the red line to stop capturing further.

- Tap on Save and you’re done.
That’s how easy it is to capture scrolling screenshots on your phone. Most OEMs who use a custom skin provide the feature built-in for ease of use, and thankfully, Google is catching up too, since the feature is included by default on Android 12 and you’ll be able to use it once the update rolls out to the public.
The post XDA Basics: How to take Scrolling Screenshots on your Android smartphone appeared first on xda-developers.