
To transfer contacts from Android to iPhone, you can install Apple’s official Move to iOS app on your Android phone. You can also export your Android contacts to a VCF file and then import them in the iPhone’s Contacts app. With some mobile providers, you can transfer contacts via the SIM card.Switching from Android to iPhone isn’t as difficult as it seems, but you probably have a contact list that has been curated over the years. Thankfully, it’s easy to transfer contacts from your old Android phone to an iPhone.
Transfer Contacts From Android to iPhone With “Move to iOS”
Apple has an official “Move to iOS” app that’s available in the Google Play Store for Android devices. This is a great tool, but there’s a catch—it only works while setting up a new iPhone. You can’t use this if you already went through the initial iPhone setup process.
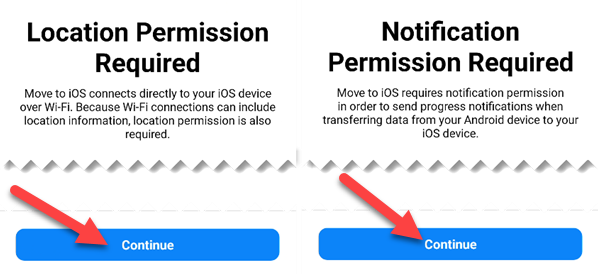
First, download the Move to iOS app on your Android device. You’ll be asked to grant the app permission to access your location and send notifications in order to function properly.
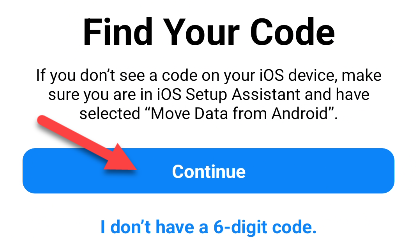
Next, on your iPhone, go through the setup and select “Move Data from Android” when the option appears. You’ll be given a six-digit code to enter in the “Move to iOS” app on your Android device.
After entering the six-digit code, you’ll see a number of things you can transfer to your iPhone. Make sure to select “Contacts” and tap “Continue.”

When it’s all done transferring, you’ll see a “Transfer Complete” screen. Tap “Done” to finish up.
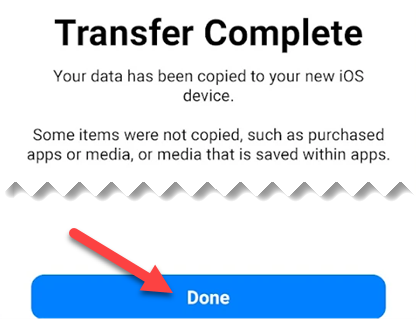
That’s all there is to it! Your contacts and any other content you selected are now on your iPhone!
Sync Contacts From Android to iPhone With Google
If the contacts on your Android phone are backed up to your Google account, you don’t have to “transfer” them to your iPhone. We can simply add your Google account to the iPhone and sync them over.
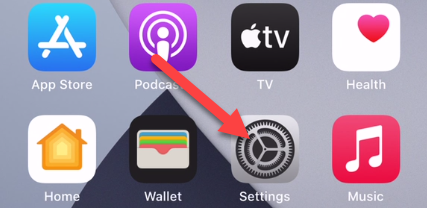
First, open the “Settings” app on your iPhone.
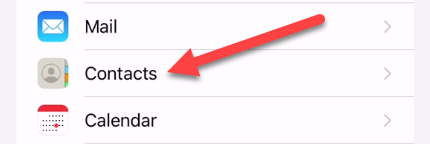
Scroll down to “Contacts.”
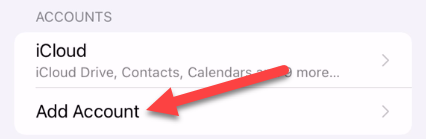
Next, select “Accounts.”

If you didn’t add your Google account here already, tap “Add Account.” (If you have added it, tap the name of your Google account and skip the next step.)
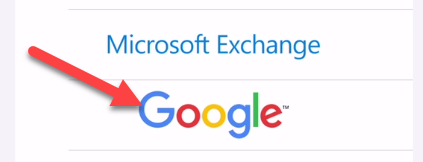
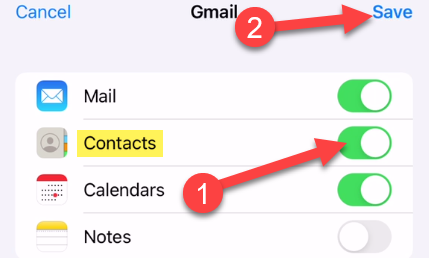
Now, we can select “Google” from the list of services. Follow the steps to sign in to the same Google account that you used on your Android device.
After you’re signed in, you’ll be brought to a screen with a few options for things to sync. Make sure that “Contacts” is toggled on and tap “Save.”
That’s all there is to it for Google contacts. You’ll see all of your contacts appear in the iPhone “Contacts” app right away.
Move Contacts From Android to iPhone With a File
One overlooked method for transferring contacts is exporting them as a file. You can create a VCF file that contains all of your contacts’ information from your Android device and import it into the iPhone’s Contacts app.
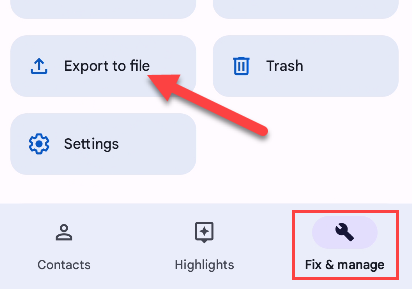
If you don’t already have it, install Google’s “Contacts” app on your Android phone. In the app, go to the “Fix & Manage” tab and select “Export to File.”
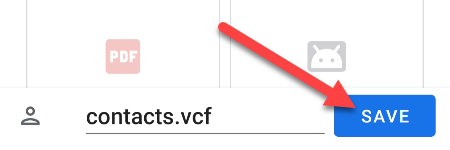
You’ll be brought to a file manager, and you can select where you want to save the .vcf file. Tap “Save” when you’re done.
Now, you need to get that .vcf file onto your iPhone somehow. You can email it to yourself, upload it to a cloud storage service such as Google Drive, or send it over Bluetooth. Do whatever you’re comfortable with.
After you get it onto your iPhone, open the .vcf file once it’s there.
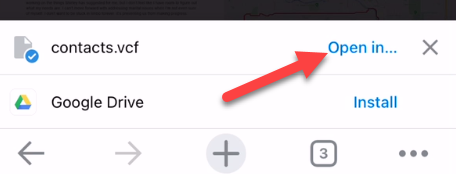
When it asks which app you’d like to open the file in, select the “Contacts” app.

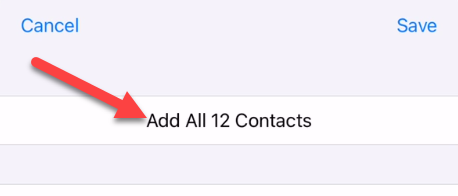
Now, you can select the contacts individually to create new contacts or merge with existing contacts. To transfer them all, tap “Add All X Contacts” at the top.
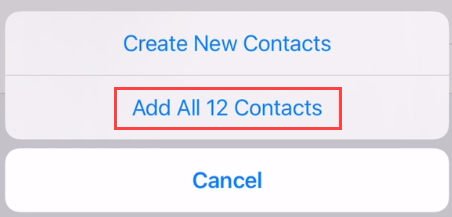
Select “Add All X Contacts” to confirm your decision.
That’s all there is to it. Your contacts have successfully be moved to your iPhone.
Transferring Contacts From Android to iPhone via SIM and eSIM
Contacts can be saved to your SIM—both physical SIM cards and eSIM—if your mobile provider supports it. This way, your contacts are always attached to your phone number, and you don’t need to sync them to a cloud service.
Saving contacts to a SIM is not possible with every app. For example, Samsung’s Contacts app supports the feature, while Google’s does not. We’ll be using the Samsung Contacts app—if your contacts app supports the feature, look for similar options.
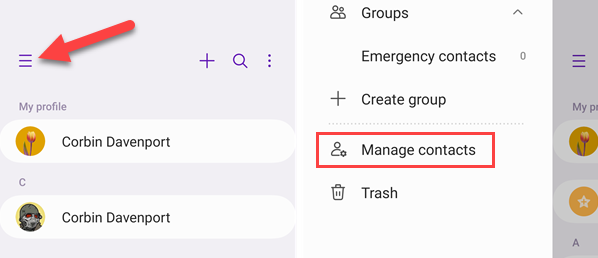
With your SIM card or active eSIM in your device, open the app and tap the hamburger menu icon on the left side, then select “Manage Contacts” from the menu.
Next, select “Export Contacts.”

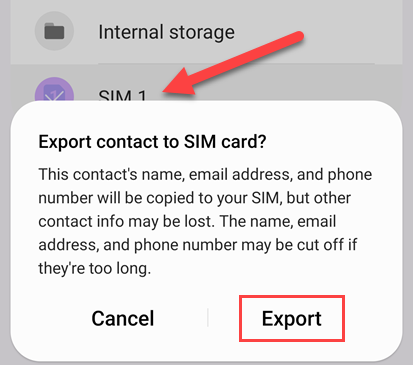
Select your SIM from the “To” section and tap “Export.”
Now move your SIM card or eSIM to your iPhone and open the “Settings” app.
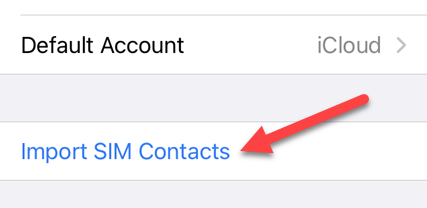
Scroll down and select “Contacts.”
Tap “Import SIM Contacts.”
Now select the account you want to add the contacts to.
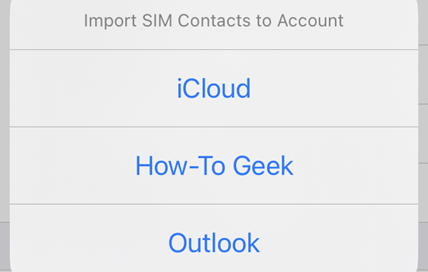
Your contacts will now be moved over to your iPhone!
It’s nice to have several options available for transferring contacts from Android to iPhone. There are plenty of ways to move stuff to an iPhone and to move stuff from an iPhone. Don’t let all your digital content get lost on old devices.