
VLC is among the best media player apps that can open several file formats, including MKV, AVI, MP4, MOV, SRT, Opus, DTS, etc. You can easily add and save files inside the iOS VLC app to enjoy them on the go.
In this tutorial, we show you two ways (wired and wireless) to transfer video, audio, subtitle, and other files from a Mac or PC to the VLC app on your iPhone or iPad.

Why transfer files to VLC mobile app?
VLC can play huge video files: Recently, a videographer gave me the video files of my wedding in a 128 GB pen drive. There are nine huge video clips, and the easiest way to play these massive video files on my iPhone or iPad is to transfer them to VLC, which handles such tasks effortlessly. Plus, it remembers where I left off when watching a video, and gives the option to resume from that point. This is super handy for big clips, movies, and shows.
Use VLC to play MKV files: If you have downloaded movies, TV shows, or other such video files in the MKV format, then your perfect companion is the VLC app on iPhone or iPad. It can play these while giving you all the perks like adding or viewing subtitles, changing audio, and adjusting the playback speed.
Has video filters: Most video playing apps fade in comparison to VLC as it offers several handy settings to enhance your viewing experience. One that I like is Video Filters which lets me adjust the brightness, contrast, hue, saturation, and gamma as per my liking.

How to transfer computer files to VLC on iPhone or iPad
You have the flexibility to use a cable for faster transfer speeds or transfer files wirelessly with slightly lower transfer speeds.
Transfer via a wire
1) Download the free VLC media player on your iPhone or iPad from the App Store.
2) After downloading the app, connect your iPhone or iPad to your computer via an appropriate Lightning or USB-C cable.
3) Open Finder if you’re using a Mac running macOS Catalina or later. Open iTunes if you’re on a Windows PC or a Mac running macOS Mojave or earlier. In case you don’t have iTunes, download it from the Microsoft Store.
4) Click your iPhone’s name or its tiny icon inside Finder or iTunes. After that, click Trust on your computer and do the same on your iPhone if asked.
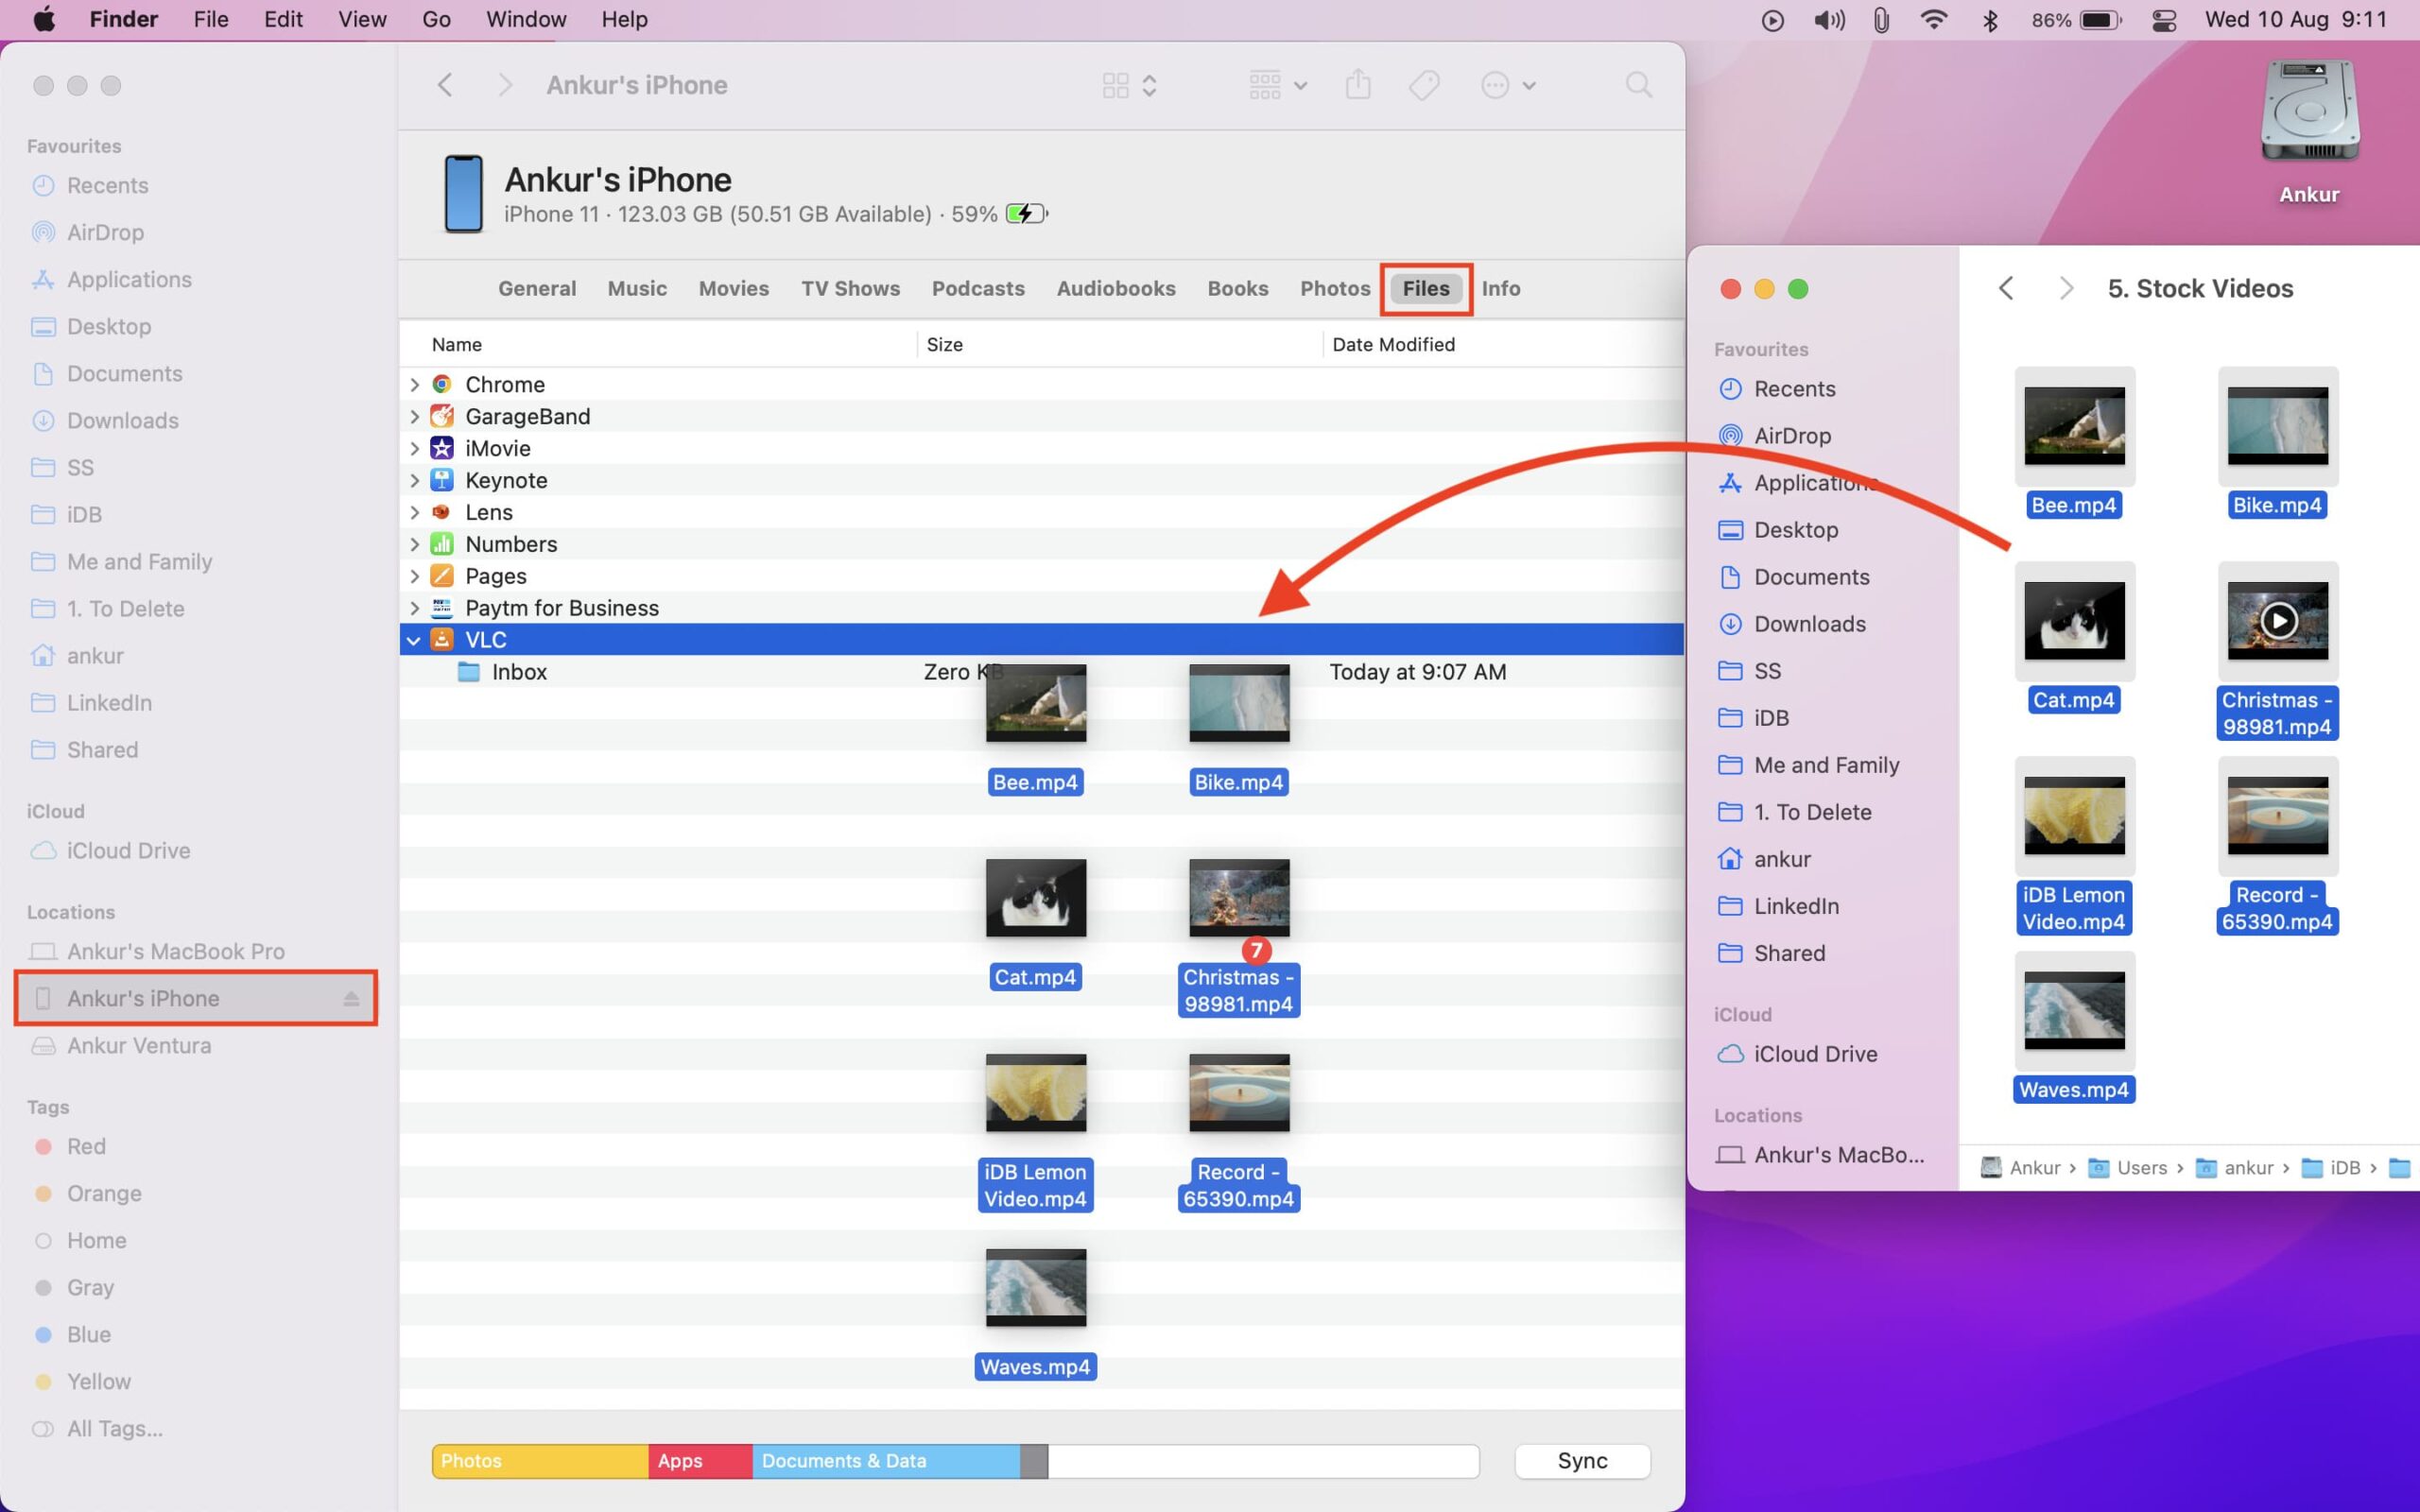
5) Next, go to the Files section inside Finder or iTunes.
6) Click the tiny arrow (>) before VLC to expand it slightly.
7) Now, decrease the Finder or iTunes window size so that you can easily drop files here. After that, open the folder where you have the video files.
7) Finally, drag the video file from the folder and drop it over VLC.
Depending on the file size, it will take a while to complete the transfer. Annoyingly, you will not see any transfer progress bar inside Finder. But when it’s done, the file will appear inside the VLC app on iPhone or iPad from where you can play it.

Tip: Are you transferring subtitles (SRT file) to the VLC app on your iPhone? Make sure to put it inside the folder that has the corresponding video file. I also recommend giving the same name to the video file (My Video.mp4) and the subtitle file (My Video.srt). Once that’s done, follow the above steps to add both files to VLC, and now your subtitles will work perfectly inside the iOS VLC media player.
Transfer wirelessly
You can transfer video, audio, subtitles, and other files wirelessly from a Mac or PC to the VLC iPhone or iPad app. All you need is Wi-Fi. It’s the smoothest way to go if you don’t want to fiddle with wires or don’t have the required Lightning cable, USB-C cable, or dongle.
Follow these steps to wirelessly transfer computer files to the VLC mobile app on iPhone or iPad:
1) Make sure your iPhone/iPad and your Mac/PC are connected to the same Wi-Fi network.
2) Open the VLC app on your iOS device and tap Network. Next, enable Sharing via Wi-Fi, and it will show two URLs (website addresses). One will have a string of numbers, and the other will be your iPhone name, followed by the word local.

3) On your computer, open a browser like Chrome, Safari, or Firefox. Here, enter any one of the URLs you see in step 2 and hit the enter key. Make sure to exactly type http:// and the rest of the URL.
4) You will now see VLC’s Sharing via Wi-Fi screen. Drag the files you want to transfer on this browser screen or click the plus icon from the top right to use the file picker window and upload files from there.

Depending on the file size, the transfer might take a bit to complete. While that happens, make sure you:
- Don’t disconnect either device from Wi-Fi or go out of the range.
- Don’t close the VLC Sharing via Wi-Fi browser window on your computer.
- Don’t lock your iPhone or iPad. If possible keep the VLC app open on the screen.
- Don’t force quit the VLC app on your iPhone or iPad.
If you don’t honor the above points, the transfer will fail and you will have to reinitiate the process.

This is how you can send video, audio, subtitles, and other files from your computer to the VLC app on iPhone or iPad. I have been using this method for several years and love it.
Besides VLC, many other apps also let you add files to them via Finder or iTunes. The steps are the same as above.