• Skip to main content
  • Skip to secondary menu
  • Skip to primary sidebar
  • Skip to footer
WebSetNet

WebSetNet

Technology News

  • Technology News
    • Mobile
    • Games
  • Internet Marketing
  • System Admin
    • Windows
    • Linux
    • Mac & Apple
    • Website Scripts
      • Wordpress

How to Turn Off Auto Brightness on Windows 10 or 11

May 29, 2022 by Martin6

If you’re tired of your Windows 10 or 11 PC’s screen automatically getting brighter or dimmer, it’s easy to turn off. All it takes is a quick trip to Settings. Here’s how to do it.

Understanding Windows Automatic Brightness

Before we get started, it’s important to know that automatic (or adaptive) brightness only applies to Windows devices with built-in screens such as laptops, tablets, and all-in-one desktop PCs. If you use an external monitor, you probably won’t see controls for adaptive brightness in Settings.

Some Windows devices automatically adjust screen brightness based on ambient lighting conditions, and some don’t. If so, these changes are based on readings from a light sensor built into your device.

Also, some PCs allow automatic changes in brightness depending on what you’re viewing on your screen, which helps save battery life. Microsoft calls this feature “content adaptive brightness control,” or CABC. Depending on which of these features your Windows PC supports, you may see one or two check boxes to control these options in Settings, which we’ll cover below.

How to Disable Adaptive Brightness in Windows 10 or 11

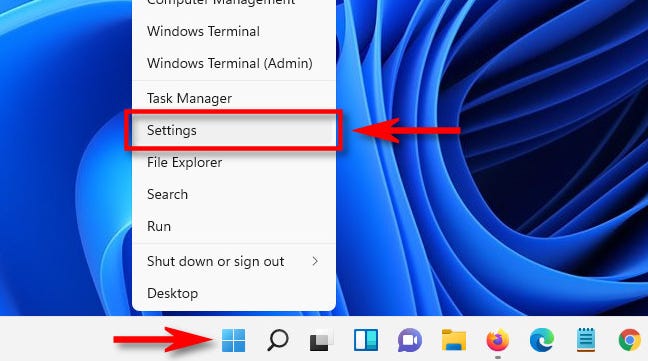
When you’re ready to disable auto brightness, first open Windows Settings by pressing Windows+i. Or you can right-click the Start button and select “Settings” in the list.

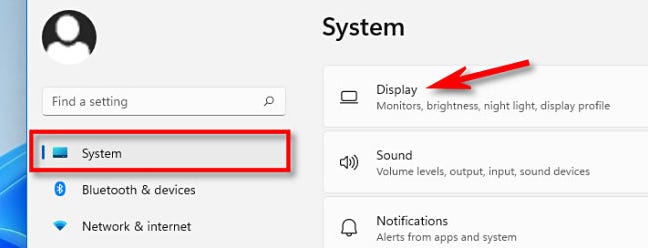
When the Settings app opens, in Windows 10, click “System,” then select “Display” in the sidebar. In Windows 11, click “System” in the sidebar, then select “Display.”

Under the “Brightness and Color” section in Windows 10, look below the Brightness slider and uncheck the box beside “Automatically adjust contrast based on the displayed content to help improve battery” or “Change brightness automatically when lighting changes.” If you see both options, uncheck both.

In Windows 11, click small arrow beside the “Brightness” slider to expand a small menu, then uncheck “Help improve battery by optimizing the content shown and brightness.”

If you see “Change brightness automatically when lighting changes,” uncheck that as well.

Uncheck "Help improve battery by optimizing the content shown and brightness."

After that, close Settings. From now on, your screen brightness will always stay how you set it under manual control. Happy computing!

Original Article

Related posts:

  1. The ultimate guide to fixing problems with the May 2020 Update
  2. Best gaming keyboards 2020: The best quiet, loud, colourful and proud mechanical keyboards around
  3. Running out of storage? Try these tips to free up space on Windows 10
  4. Samsung Galaxy S22 tips and tricks: Master the S22, S22+, S22 Ultra
  5. Samsung Galaxy S22 tips and tricks: Master the S22, S22+, S22 Ultra
  6. Samsung Galaxy S20 tips and tricks: The insider’s guide to the S20FE, S20, S20+ and S20 Ultra
  7. Samsung Galaxy S20 tips and tricks: The insider's guide to the S20, S20+ and S20 Ultra
  8. Samsung Galaxy S21 tips and tricks: Master the S21, S21+ and S21 Ultra
  9. Google Nest Thermostat tips and tricks: Get the most out of your learning thermostat
  10. How To Start A Premium WordPress Blog (Step-by-Step Guide)

Filed Under: Windows

Primary Sidebar

Trending

  • How to fix Windows Update Error 80244019
  • Windows 10 Update keeps failing with error 0x8007001f – 0x20006
  • How To Change Netflix Download Location In Windows 10
  • Troubleshoot Outlook “Not implemented” Unable to Send Email Error
  • How do I enable or disable Alt Gr key on Windows 10 keyboard
  • How To Install Android App APK on Samsung Tizen OS Device
  • 3 Ways To Open PST File Without Office Outlook In Windows 10
  • FIX: Windows Update error 0x800f0986
  • How to Retrieve Deleted Messages on Snapchat
  • Latest Samsung Galaxy Note 20 leak is a spec dump revealing key features
  • Install Android 7.0 Nougat ROM on Galaxy Core 2 SM-G355H
  • 192.168.1.1 Login, Admin Page, Username, Password | Wireless Router Settings
  • Websites to Watch Movies Online – 10+ Best Websites Without SignUp/Downloading
  • How to Backup SMS Messages on Your Android Smartphone
  • How to delete a blank page at the end of a Microsoft Word document
  • Fix: The Disc Image File Is Corrupted Error In Windows 10
  • Android 11 Custom ROM List – Unofficially Update Your Android Phone!
  • Samsung Galaxy Z Fold 3 could be scheduled for June 2021, with S Pen support

Footer

Tags

Amazon amazon prime amazon prime video Apple Application software epic games Galaxy Note 20 Galaxy S22 Plus Galaxy S22 Ultra Google Sheets headphones Huawei icloud Instagram instant gaming ip address iPhone iphone 12 iphone 13 iphone 13 pro max macOS Microsoft Microsoft Edge Mobile app office 365 outlook Pixel 6 Samsung Galaxy Samsung Galaxy Book 2 Pro 360 Samsung Galaxy Tab S8 Smartphone speedtest speed test teams tiktok Twitter vpn WhatsApp whatsapp web Windows 10 Windows 11 Changes Windows 11 Release Windows 11 Update Windows Subsystem For Android Windows 11 Xiaomi

Archives

  • June 2022
  • May 2022
  • April 2022
  • March 2022
  • February 2022
  • January 2022
  • September 2021
  • August 2021
  • July 2021
  • June 2021
  • May 2021
  • April 2021
  • March 2021
  • February 2021
  • January 2021
  • December 2020
  • November 2020
  • October 2020
  • September 2020
  • August 2020
  • July 2020

Meta

  • Log in
  • Entries feed
  • Comments feed
  • WordPress.org