

The Linux cut command lets you extract portions of text from files or data streams. It’s especially useful for working with delimited data, such as CSV files. Here’s what you need to know.
The cut Command
The cut command is a veteran of the Unix world, making its debut in 1982 as part of AT&T System III UNIX. Its purpose in life is to snip out sections of text from files or streams, according to the criteria that you set. Its syntax is as simple as its purpose, but it is this joint simplicity that makes it so useful.
In the time-honored UNIX way, by combining cut with other utilities such as grep you can create elegant and powerful solutions to challenging problems. While there are different versions of cut, we’re going to discuss the standard GNU/Linux version. Be aware that other versions, notably the cut found in BSD variants, don’t include all the options described here.
You can check which version is installed on your computer by issuing this command:
cut --version
If you see “GNU coreutils” in the output you’re on the version we’re going to describe in this article. All versions of cut have some of this functionality, but the Linux version has had enhancements added to it.
First Steps With cut
Whether we’re piping information into cut or using cut to read a file, the commands we use are the same. Anything you can do to a stream of input with cut can be done on a line of text from a file, and vice versa. We can tell cut to work with bytes, characters, or delimited fields.
To select a single byte, we use the -b (byte) option and tell cut which byte or bytes we want. In this case, it is byte five. We’re sending the string “how-to geek” into the cut command with a pipe, “|”, from echo .
echo 'how-to geek' | cut -b 5

The fifth byte in that string is “t”, so cut responds by printing “t” in the terminal window.
To specify a range we use a hyphen. To extract bytes 5 through to—and including—11, we’d issue this command:
echo 'how-to geek' | cut -b 5-11

You can supply multiple single bytes or ranges by separating them with commas. To extract byte 5 and byte 11, use this command:
echo 'how-to geek' | cut -b 5,11

To get the first letter of each word we can use this command:
echo 'how-to geek' | cut -b 1,5,8

If you use the hyphen without a first number, cut returns everything from position 1 up to the number. If you use the hyphen without a second number, cut returns everything from the first number to the end of the stream or line.
echo 'how-to geek' | cut -b -6
echo 'how-to geek' | cut -b 8-

Using cut With Characters
Using cut with characters is pretty much the same as using it with bytes. In both cases, special care must be taken with complex characters. By using the -c (character) option, we tell cut to work in terms of characters, not bytes.
echo 'how-to geek' | cut -c 1,5,8
echo 'how-to geek' | cut -c 8-11

These work exactly as you’d expect. But take a look at this example. It’s a six-letter word, so asking cut to return the characters from one to six should return the entire word. But it doesn’t. It’s one character short. To see the whole word we have to ask for the characters from one to seven.
echo 'piñata' | cut -c 1-6
echo 'piñata' | cut -c 1-7

The issue is the character “ñ” is actually made up out of two bytes. We can see this quite easily. We’ve got a short text file containing this line of text:
cat unicode.txt

We’ll examine that file with the hexdump utility. Using the -C (canonical) option gives us a table of hexadecimal digits with the ASCII equivalent on the right. In the ASCII table, the “ñ” isn’t shown, instead, there are dots representing two non-printable characters. These are the bytes highlighted in the hexadecimal table.
hexdump -C unicode.txt
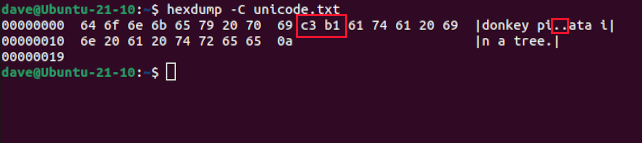
These two bytes are used by the displaying program—in this case, the Bash shell—to identify the “ñ.” Many Unicode characters use three or more bytes to represent a single character.
If we ask for character 3 or character 4 we’re shown the symbol for a non-printing character. If we ask for bytes 3 and 4, the shell interprets them as “ñ.”
echo 'piñata' | cut -c 3
echo 'piñata' | cut -c 4
echo 'piñata' | cut -c 3-4

Using cut With Delimited Data
We can ask cut to split lines of text using a specified delimiter. By default, cut uses a tab character but it is easy to tell it to use whatever we want. The fields in the “/etc/passwd” file are separated by colons “:”, so we’ll use that as our delimiter and extract some text.
The portions of text between the delimiters are called fields, and are referenced just like bytes or characters, but they’re preceded by the -f (fields) option. You can leave a space between the “f” and the digit, or not.
The first command uses the -d (delimiter) option to tell cut to use “:” as the delimiter. It’s going to pull the first field out of each line in the “/etc/passwd” file. That’ll be a long list so we’re using head with the -n (number) option to show the first five responses only. The second command does the same thing but uses tail to show us the last five responses.
cut -d':' -f1 /etc/passwd | head -n 5
cut -d':' -f2 /etc/passwd | tail -n 5

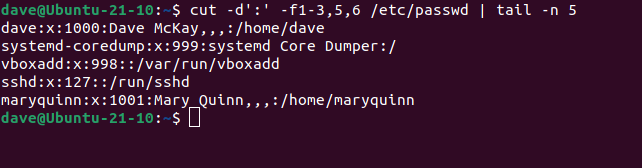
To extract a selection of fields, list them as a comma-separated list. This command will extract fields one to three, five, and six.
cut -d':' -f1-3,5,6 /etc/passwd | tail -n 5
By including grep in the command, we can look for lines that include “/bin/bash.” The means we can list only those entries that have Bash as their default shell. That’ll usually be the “normal” user accounts. We’ll ask for fields from one to six because the seventh field is the default shell field and we already know what that is—we’re searching for it.
grep "/bin/bash" /etc/passwd | cut -d':' -f1-6

Another way to include all fields apart from one is to use the --complement option. This inverts the field selection and shows everything that hasn’t been requested. Let’s repeat the last command but only ask for field seven. Then we’ll run that command again with the --complement option.
grep "/bin/bash" /etc/passwd | cut -d':' -f7
grep "/bin/bash" /etc/passwd | cut -d':' -f7 --complement

The first command finds a list of entries, but field seven gives us nothing to distinguish between them, so we don’t know who the entries refer to. In the second command, by adding the --complement option we get everything except field seven.
Piping cut Into cut
Sticking with the “/etc/passwd” file, let’s extract field five. This is the actual name of the user who owns the user account.
grep "/bin/bash" /etc/passwd | cut -d':' -f5

The fifth field has subfields separated by commas. They’re rarely populated so they show up as a line of commas.
We can remove the commas by piping the output of the previous command into another invocation of cut . The second instance of cut uses the comma “,” as its delimiter. The -s (only delimited) option tells cut to suppress results that don’t have the delimiter in them at all.
grep "/bin/bash" /etc/passwd | cut -d':' -s -f5 | cut -d',' -s -f1

Because the root entry doesn’t have comma subfields in the fifth field it is suppressed, and we get the results we’re after—a list of the names of the “real” users configured on this computer.
The Output Delimiter
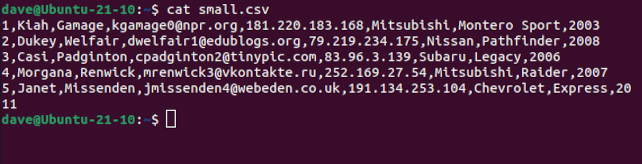
We’ve got a small file with some Comma Separated Values in them. The fields in this dummy data are:
- ID: A database ID number
- First: The first name of the subject.
- Last: The last name of the subject.
- email: Their email address.
- IP Address: Their IP Address.
- Brand: The brand of motor vehicle they drive.
- Model: The model of motor vehicle they drive.
- Year: The year their motor vehicle was built.
cat small.csv
If we tell cut to use the comma as the delimiter we can extract fields just like we did before. Sometimes you’ll have a requirement to extract data from a file, but you don’t want to have the field delimiter included in the results. Using the --output-delimiter we can tell cut what character—or in fact, character sequence—to use instead of the actual delimiter.
cut -d ',' -f 2,3 small.csv
cut -d ',' -f 2,3 small.csv --output-delimiter=' '
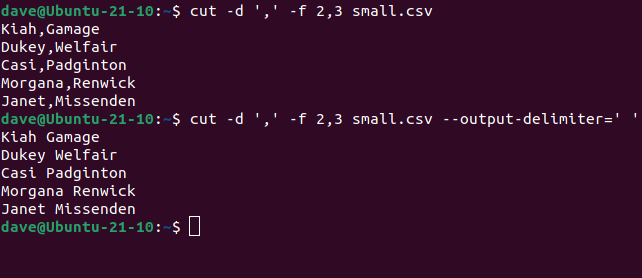
The second command tells cut to replace the commas with spaces.
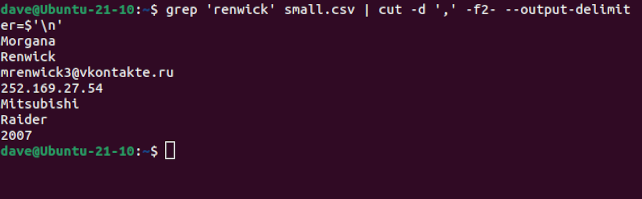
We can take this further and use this feature to convert the output to a vertical list. This command uses a new line character as the output delimiter. Note the “$” that we need to include to have the newline character acted upon, and not interpreted as a literal sequence of two characters.
We’ll use grep to filter out the entry for Morgana Renwick, and ask cut to print all fields from field two to the end of the record, and to use a newline character as the output delimiter.
grep 'renwick' small.csv | cut -d ',' -f2- --output-delimiter=$''
An Oldie but Goldie
At the time of writing, the little cut command is approaching its 40th birthday, and we’re still using it and writing about it today. I suppose cutting up text today is the same as it was 40 years ago. That is, a lot easier when you have the right tool to hand.