
DHCP or Dynamic Host Configuration Protocol is a protocol used in networks through which a system can automatically obtain the network settings, at boot time, required for communicating with other network devices. Using a DHCP server at your premises greatly simplifies the administration of network settings for all network hosts and also allows a centralizing management point for machines network configurations. By using a DHCP you can also ensure that all desktop machines, mobile phones or other network devices that require that the IP settings to be configured at boot time will receive the same set of configurations, as per your network settings.
The DHCP server can provide a huge number parameters and options that are related to configuring the network settings needed for interactively joining the network. Some ordinary settings a DHCP server can provide is the IP address related to your network and also other information, such as the broadcast address of the network you belong to, the netmask of the network, DNS name servers, the IP address of your network exit point, typically the gateway router, the address of a NTP servers from you network, needed for devices to accurately sync time, and other, more exotic settings.
In case you have just a few computers to manage, commonly desktops or laptops, the manual addressing is favored. But currently, with the explosion of small network devices and mobile devices, the static/manual configuration for each of these devices can prove to be very difficult, if not impossible sometimes, in case of embedded devices. This should be the main factor you should consider in favoring of installing and configuring a DHCP server on your premises. A DHCP server can limit the amount of time and effort you should invest in manually configuring each network related device and maintain a table of what IP has been setup for what device.
However, static/manual IP address assignment is always a must in case you deploy servers at your premises. The servers should always be configured with a static IP Address. But, a DHCP can be configured to simplify the static IP addressing for servers, by releasing the same IP address for devices based on the connected interface MAC address.
Now, let’s see how a DHCP server operates in a network. The DHCP negotiation unfolds as explained in the below steps:
- The network device, or the client who need to be assigned with a static address, sends a broadcast in a network with the message “DHCP Discover”. In the message sent, the client device also includes its MAC address. The clients send this message in order to identify if a DHCP server is somewhere in the network, listening for these type of incoming messages.
- The listening DHCP server receives the broadcast frame and replies to the client with a “DHCP Offer” message: The offer contains the network settings needed for the client to be registered in the network and its own IP address, in order for the client to correctly identify the source of the offer. Usually, the offer contains an IP address, subnet mask, default gateway and other parameters for the network. If more than one DHCP server are configured at your premises, a broadcast message is sent so that the offer can be received by the client.
- After receiving the offer, the client, if satisfied with the settings it received, sends a “DHCP Request” message back to DHCP server and informs that it agrees with the formal network settings offered. A record of the offer is included so that only the server that sent the offer will set aside the requested IP address. Again, the request is sent as a broadcast to all other DHCP servers that may have responded because the client hasn’t officially started assigning the offered IP address.
- Finally, the DHCP server replies with the “DHCP ACK” unicast message. In this stage, the IP address and all other network parameters are sent to the client device because they are now approved to be used by the client. The ACK message is sent as a unicast, but may be broadcast instead.
The Internet Software Consortium is the main author and developer of the most used DHCP server in Linux, typically known as ISC DHCP Server. In Debian 9 the matching binary package is called isc-dhcp-server. Further, in this tutorial, we’ll learn how to install and configure DHCP server in Debian 9.
Requirements
- A Fresh installation of Debian 9.
- A static IP address configured for the network interface that the DHCP server will listen to.
- An account with root privileges or direct access to root account.
In order to install an ISC DHCP server in Debian 9. First, we need to make sure the package tree is up –to-date with the latest software versions by issuing the below command.
sudo apt-get update
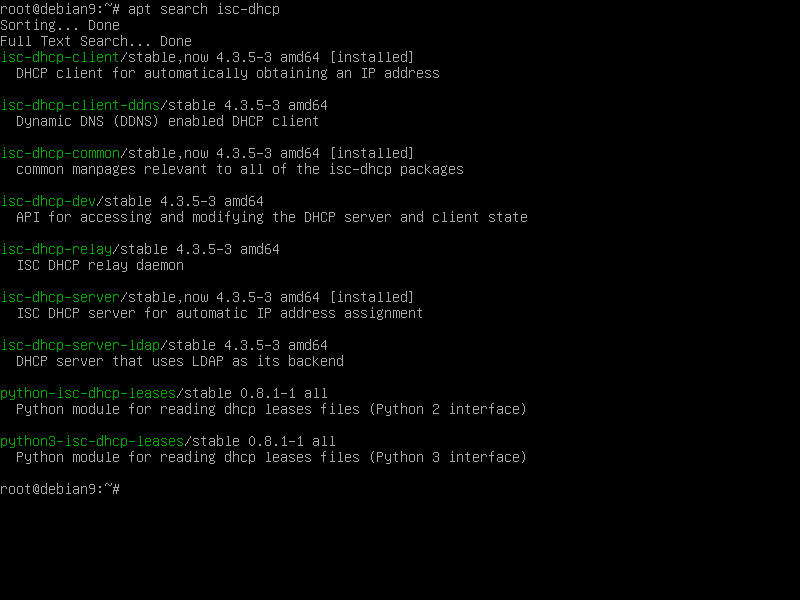
Then, after the local package tree is in sync with the remote sources, issue the below command in order to search all pre-compiled packages available of the ISC DHCP software, as illustrated in the following screenshot.
sudo apt search isc-dhcp
Install ISC DHCP Server
Now, that we’ve got the list of all available packages for ISC DHCP server, issue the below command to install ISC DHCP Server.
sudo apt install isc-dhcp-server
The DHCP server main configuration file is dhcpd.conf, which is located in /etc/dhcp/ directory. The configuration file will contain a lot of comments, denoted by a leading hash mark (#). All other uncommented lines are either parameters of dhcp server (used for general configuration features of the dhcpd daemon) or declarations, which describe the network IP ranges and IP addresses or other network values the server can send to client devices.
Before actually start editing a new blank configuration file, first backup the original file by issuing the below command.
cp /etc/dhcp/dhcpd.conf{,.backup}
cat /dev/null > /etc/dhcp/dhcpd.conf
Configure DHCP
Next, start editing the dhcp configuration file to look like as presented in the below excerpt.
nano /etc/dhcp/dhcpd.conf
dhcpd.conf file excerpt:
ddns-update-style none;
default-lease-time 600;
max-lease-time 7200;
#ping true;
option domain-name-servers 172.27.15.2, 10.72.81.2;
option domain-name "example.com";
authorative;
log-facility local7;
subnet 192.168.1.0 netmask 255.255.255.0 {
range 192.168.1.50 192.168.1.115;
option subnet-mask 255.255.255.0;
option domain-name-servers 192.168.1.254, 10.128.254.254;
option domain-name “example.com”;
option routers 192.168.1.1;
option netbios-name-servers 192.168.1.3;
option netbios-node-type 8;
get-lease-hostnames true;
use-host-decl-names true;
default-lease-time 600;
max-lease-time 7200;
}
Explaining the DHCP configuration parameters:
All parameter lines end with semicolons (;) in dhcp configuration file. Some parameters might have more than just one value, such as domain-name-servers which has two IP addresses separated by a comma. The lines that begins with a hashtag # are comments and are not parsed by the dhcp server.
Some common DHCP server parameters:
default-lease-time = Integer which sets the default lease time in seconds.
max-lease-time = Integer which sets the maximum lease time, in seconds
ping = check boolean If true, the server pings an address before assigning a lease on that address to a client.
option domain-name–servers = The IP address or addresses of DNS servers the clients may use.
option domain-name = The name of the domain that will grant fr the clients to use.
authorative = The server is authoritative, this DHCP server should send DHCPNAK messages to misconfigured clients
log-facility local7 = Send logs to syslog facility local7
subnet 192.168.1.0 netmask 255.255.255.0 { anything enclosed here } the subnet declaration for 192.168.1.10 network
range 192.168.1.50 192.168.1.115 = defines the IP address range that the server will lease IPs.
option routers = defines the IP address of your gateway or the network exit point.
option netbios-name-servers = The IP addresses of NetBIOS Name Service (NBNS) servers or Windows Internet Name Service (WINS) servers which are used by SMB/CIFS protocols to share files on Windows.
option netbios-node-type = A code for how NetBIOS clients should attempt name resolution. Values are 1 to use broadcasts, 2 to use a WINS server, 4 to try broadcasts first followed by a WINS server and 8 to try a WINS server first followed by a broadcast.
You should replace the presented values with the parameters specific for your own network.
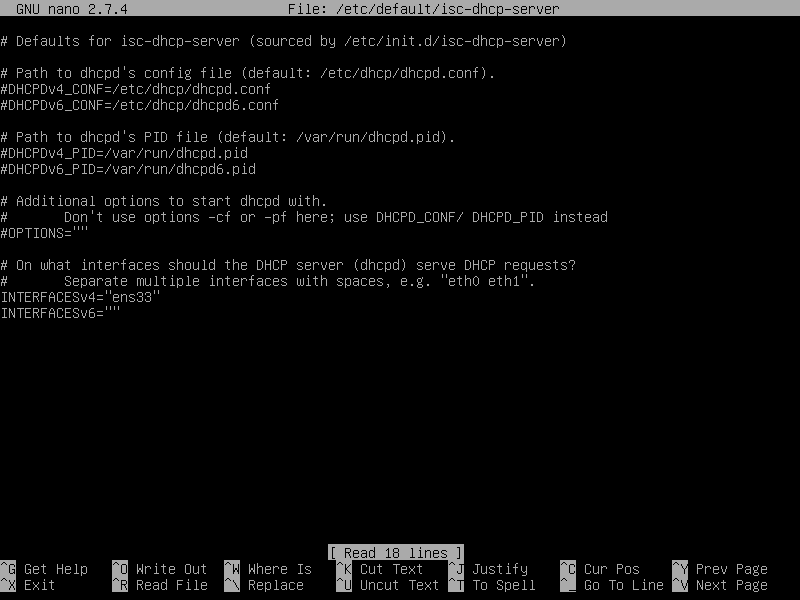
After you’ve edited the main configuration file and declared your own IP ranges, open /etc/default/isc-dhcp-server file and replace the INTERFACESv4 parameter with the name of the network interface that will be configured for your network, as illustrated in the below image. Use ip or ifconfig commands to list all your network interfaces.
INTERFACESv4="ens33"
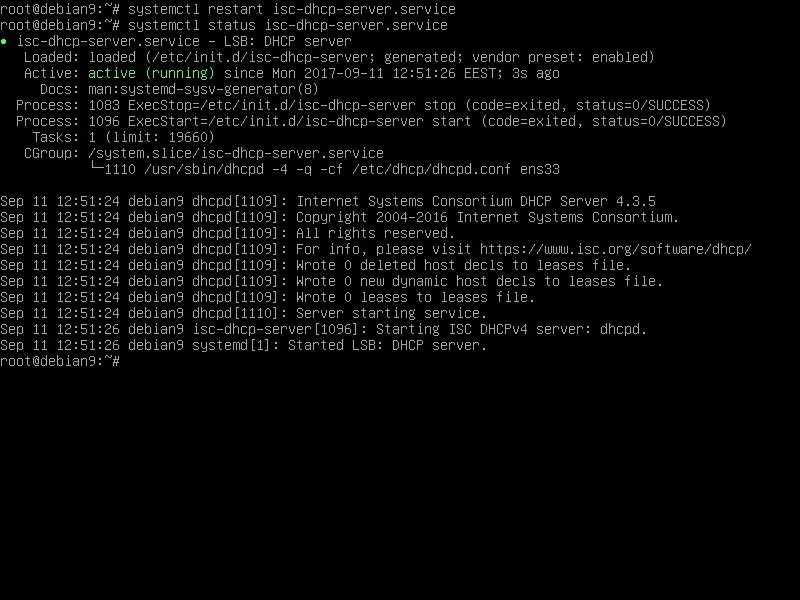
Finally, after you’ve made all the changes, restart the dhcp server to apply new configurations and check service status by issuing the below commands.
systemctl restart isc-dhcp-server
systemctl status isc-dhcp-server
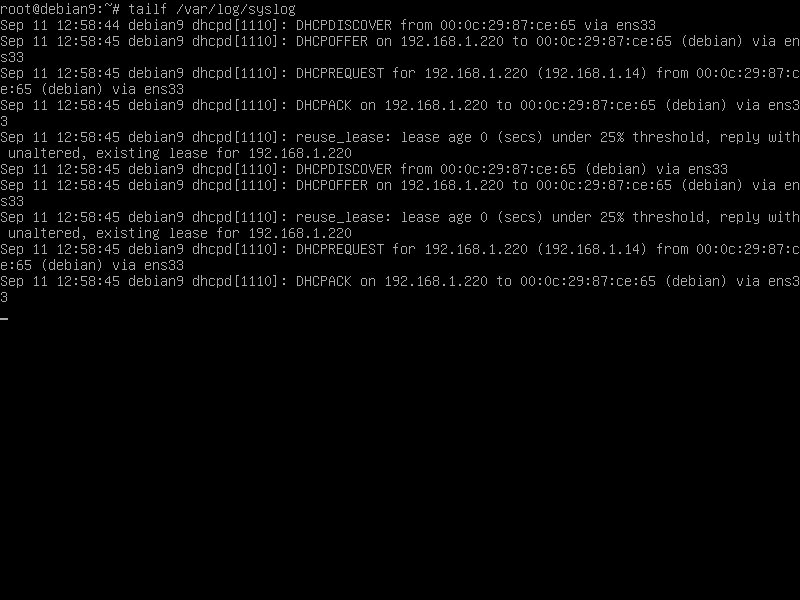
The clients should now start receiving IP leases from your dhcp server. To list the granted addresses to your clients in real time, you should inspect the content of the log file by issuing tail command as illustrated below.
tail -f /var/log/syslog
Configuring DHCP server to deliver reserved IP address
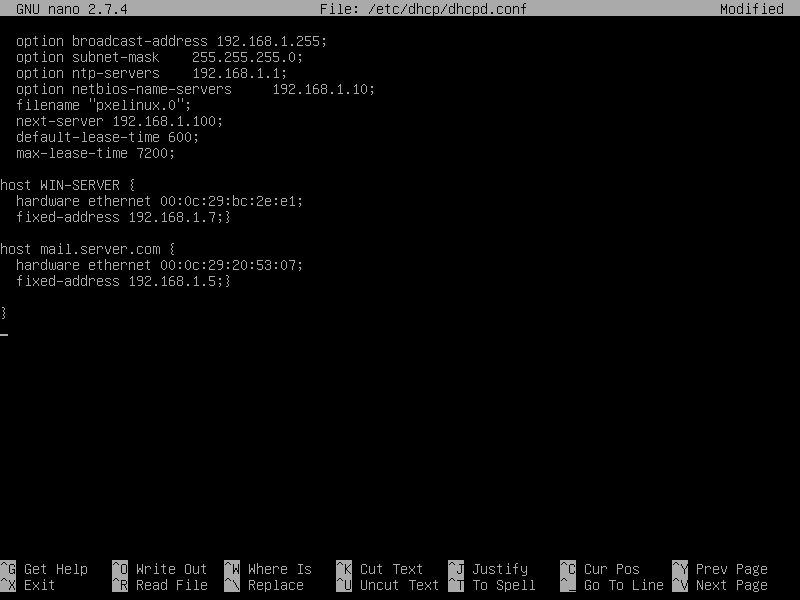
I order to configure your DHCP server to assign a fixed IP address for special network devices from your network, such as servers, use a declaration with the name of the host you want to grant a fixed IP address and the Media Access Control (MAC) address of the network interface plug-in to your network. The reserved IP address will be assigned to the client each time it boots. You should reserve a fixed IP address from the outside any IP range you’ve declared for your network in DHCP server. The declaration of the fixed IP address should be enclosed in the lines you’ve declared for your network range and should have the following content, as illustrated below. However, the reserved IP address entry can be also added after the subnet declaration.
nano /etc/dhcp/dhcpd.conf
Fixed IP declaration sample:
subnet 192.168.1.0 netmask 255.255.255.0 {
range declarations….
host WIN-SERVER {
hardware ethernet 00:0c:19:bc:2e:e1;
fixed-address 192.168.1.7;}
}
After you’ve added the lines for your fixed IP addresses, restart the DHCP server in order to apply changes, by issuing the following command.
systemctl restart isc-dhcp-server
That’s all! You have successfully installed and configured a DHCP server in Debian 9 at your premises.