
Linux offers several command line tools for compressing/decompressing files. One of them is Gzip, which uses Lempel-Ziv coding (LZ77) for its compression operations. In this tutorial, we will discuss the basics of gzip, as well as the features it provides using easy to understand examples.
But before we proceed, it’s worth mentioning that all examples/instructions mentioned in this tutorial have been tested on Ubuntu 16.04LTS.
Linux Gzip command
As you’d have understood by now, the Gzip command line tool is used to compress or expand files. Following is the syntax of this command:
gzip [ -acdfhklLnNrtvV19 ] [–rsyncable] [-S suffix] [ name … ]
And here’s how the man page describes this tool:
Gzip reduces the size of the named files using Lempel-Ziv coding (LZ77). Whenever possible, each
file is replaced by one with the extension .gz, while keeping the same ownership modes, access and
modification times. (The default extension is -gz for VMS,  z  for  MSDOS, OS/2  FAT,
Windows NT FAT and Atari.)
The following Q&A-styled examples should give you a good idea about how Gzip works.
Q1. How to compress file using Gzip?
It’s very easy – all you have to do is to pass the name of the file as an argument to the gzip command in the following way:
gzip [file-name]
Here’s an example:
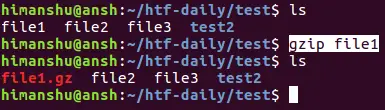
So you can see that the command compressed a file named ‘file1’ and produced a .gz file of the same name. What’s worth noting here is that the tool replaces the original file with the compressed version by default.
Q2. How to force gzip to not delete original file?
As discussed in the previous Q&A, the default behavior of gzip is to delete the original file. However, you can force the tool to not do that by using the -k command line option.
gzip -k [file-name]
Q3. How to recursively compress files using gzip?
To recursively compress files, use the -r command line option. This option, as the name suggests, will compress files in the main directory as well as all subdirectories.
gzip -r *
Here’s an example:
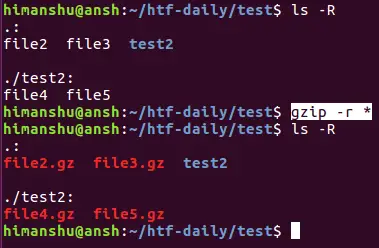
So you can see that all files – whether in main directory or subdirectory – were compressed.
Q4. How to uncompress files using gzip?
To uncompress a file, use the -d command line option.
gzip -d [compressed-file-name]
Following is an example:
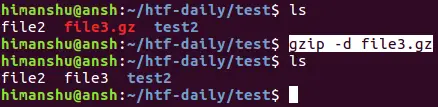
So you can see that the file3.gz was decompressed to produce file3, and then the compressed file was deleted.
Note: To recursively decompress, use the -r option along with the -d option.
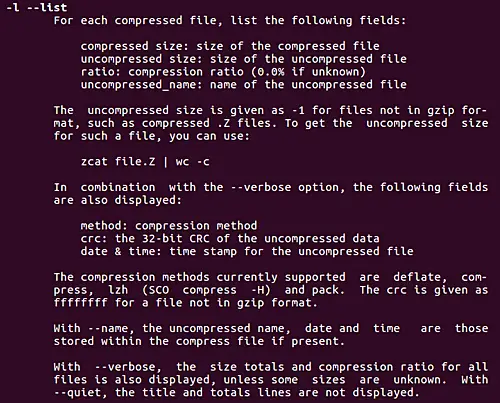
Q5. How to make gzip list details related to compressed file?
This can be achieved using the -l command line option.
gzip -l [compressed-file-name]
Here’s an example:

And here’s what these fields mean:
Q6. How to force gzip to perform compression/decompression operations in some cases?
Suppose you’ve created a .gz file, while making sure the original file doesn’t get removed (using the -k command line option). Now, if you again try creating the same .gz file (for whatever reason), the gzip command won’t let you do so, or it will ask for your permissions at-least.

Now, if you want, you can execute gzip in a way that no such notices are produced. This can be done using the -f command line option.
gzip -f [file-name]
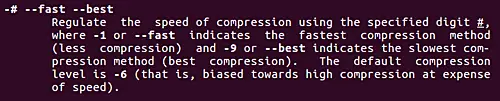
Q7. How to regulate the speed of compression?
The Gzip command also lets you regulate the speed of compression. This you can do by specifying a hyphen (-) followed by a number as command line argument to the tool. For example:
gzip -5 [file-name]
Note that you can use any number between 1 and 9, where -1 indicates fastest compression while -9 indicates slowest (but best). Here’s what the man page says about this:
Conclusion
Clearly, the Gzip command is a useful tool. What makes it even better is the fact that it’s easy to understand and use. We’ve tried to cover many of the important command line options in this tutorial. So once you’re done practicing these, head to the tool’s man page to learn more about it.