
 What Is Indexing?
Indexing is basically a process whereby a database is created. This database holds many pointers to files on your computer, and the contents within them. By doing so any searches you perform are, in theory, much faster. It helps Windows find things faster because it doesn’t have to search each and every file for information you are looking for. The index narrows the search down to reasonable parameters.
A simple example would be if you searched for the word “forest”. With indexing enabled, the index database would already contain pointers to all the files containing that word making Windows’ job much easier. Basically, the search had already been done before you asked for it. With indexing disabled, the search would obviously take much longer since Windows would have to look for all those occurrences of the word “forest”. This might make the difference between searching 100’s of thousands of files instead of a few hundred. You can see how this is a definite advantage. Oddly, it doesn’t always work as expected. Consider this…
Indexing is turned on by default. This makes sense if you are running Windows on slower mechanical Hard Disk Drives (HDD), but becomes much less of an advantage if you are using a modern Solid State Drive (SSD). SSDs are so fast by comparison that indexing them becomes an archaic notion and can actually slow your system down, not to mention that the constant write operations caused by the indexing service can potentially shorten the life of these remarkable bits of hardware.
Indexing is a background Service that continually updates its information. Every time it detects a change in your file system it must update all its pointers. During this process your computer may become less responsive in a considerable way. This week’s Quick Tips article will show you how to rein in this bottleneck or, if you choose, to eliminate it entirely.
How To Tame Indexing
The first time you fire up Windows it will begin indexing your files based on a preset determined by the guys in the white coats at Microsoft. In other words, they will set it up the way they think you will need it to be set up. I can’t blame them, really. They have to start somewhere. The reality is that their decisions are generally not what you ultimately need for your particular usage patterns.
In order to change what the White Coats have determined is best for you, follow the next few easy steps:
- Click the Windows Start Button
- Type Indexing, and Indexing Options should appear at the top of the list. Click that option
- This will open a window showing all the locations that are currently being indexed plus those which are currently being excluded from the indexing process
- Click the Modify button
This will open a window similar to this one:

At this point you may check/uncheck all the folders you would like to have Windows index for you. It might be tempting to simply check everything, but this would probably be a huge mistake. Indexing uses valuable resources and disk space. If you have everything indexed, your computer will spend inordinate amounts of time indexing, which is what you told it to do, but will slow down everything else. That is counter-intuitive– we are trying to speed things up, not slow them down. Choosing too many can bring a weaker computer to its knees.
Make your choices wisely and only check off the folders you know will actually help you in the long run. If you make a poor choice here, you can always come back and make some adjustments. You will learn as you go.
Corruption
Sometimes, the Index will become corrupted. This can happen for any number of reasons, but you will know it when it happens because your searches won’t work quite as they should anymore.
You can “fix” this problem by performing a Rebuild of the Index. Be forewarned that this process can take a long time depending on how many folders/files you have chosen to index in the first place.
In Step 4 above, I mentioned the Modify button. This time, click the Advanced button to bring up this window instead:

You will notice in the indicated box that this is truly a start-from-scratch operation. Windows will delete the current Index and proceed to build it anew.
Another few points that should be mentioned here are some options to modify the way Indexing works in Windows:
- You can choose to Index encrypted files (it won’t by default)
- You can handle words with diacritics differently (it won’t by default)
- Another option which I particularly like is the ability to change the default Index File location; this means you can send it off to a drive other than your system drive. For many reasons this may be a better choice
How To Enable/Disable Indexing
Some of you, like me, would simply like to disable indexing altogether. This choice is yours and yours alone. I don’t need it; others (Office users in particular) may.
To turn it off you will need to open the Services App:
- Click the Start Menu button
- Type Services and click the Services (desktop app) result at the top of the list
That should bring you to a window that looks like this:
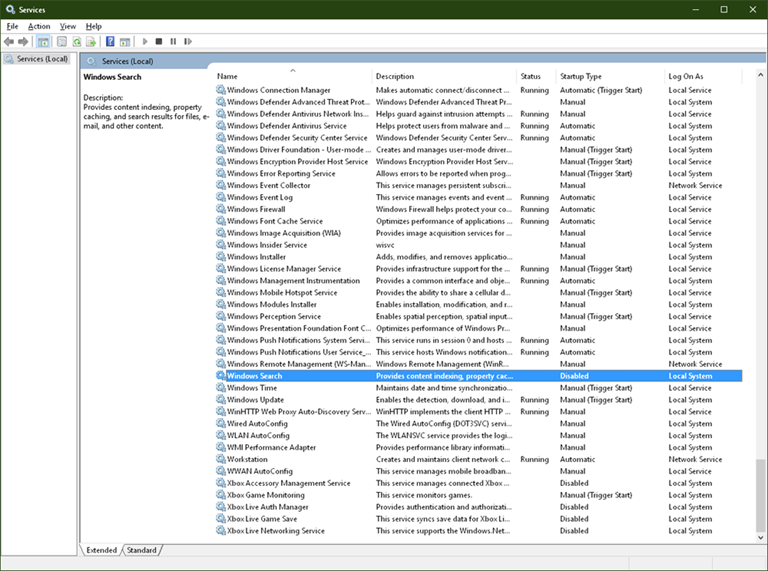
Drill down the list until you find Windows Search. Double-click it to open this Properties Sheet:

Open the drop-down menu and choose one of the following:
- To disable Windows Indexing, click Disabled
- To enable it, choose Automatic (Delayed Start)
Start, Stop, and/or Reboot
In the above image, the Start and Stop buttons are greyed out and inaccessible. This is because the Indexing Service is disabled at this point on my computer from which I took this screen shot. As soon as you change the setting in the drop-down menu, one of these buttons will become available. You may then click the appropriate button to either Start or Stop the service.
“OK” your way out of all the windows to complete the job.
Note: Another way to ensure your choices are ingrained into the Windows “brain” is to reboot your computer. Once you have done that, you can come back here to confirm that your decisions have been honored.
Final Thoughts
As with so many things in the Windows world, your choices are your own. They should be based on how you use your computer and what settings get you the best performance you can squeeze out of your particular system. That is the whole goal of tweaking, after all.
As always, if you have any helpful comments or suggestions, please share them with us,