
VPN (virtual private network) technology lets a computer using a public internet connection join a private network by way of a secure “tunnel” between that machine and the network. This protects the data from being seen or tampered with by bad actors. The two most common use cases are consumer VPN services that allow individuals to surf privately from home or a public setting, and business-oriented solutions that allow employees to securely connect to a corporate network remotely.
For the most part, VPN connections are handled by custom software such as the many consumer VPN services we’ve reviewed, or by third-party generic software such as the OpenVPN client or Cisco AnyConnect.
Another option that’s generally supported by most virtual private networks is to use Microsoft’s built-in VPN client. This is useful when some VPNs don’t provide their own client or if you want to use a VPN protocol not supported by your VPN’s client such as IKEv2.
The downside to using the built-in client is that you have to select a specific server to use as opposed to jumping between different locations the way you can with a commercial VPN service. On the other hand, most employer-supplied VPNs will offer a limited number of servers you can connect to, which makes using this client ideal.
Step by step: How to set up a VPN in Windows 10
Step 1 Click on the Cortana search bar or button on the taskbar and type vpn.
Step 2 The top choice should be Change virtual private networks (VPN). Alternatively, open the Settings app and go to Network & Internet > VPN.

Step 3 At the top of the VPN screen in the Settings app, click Add a VPN connection.

Step 4 In the screen that appears, enter the details for your VPN connection. Under “VPN provider” click on the drop-down menu, and select Windows (built-in). This will also change “VPN type” to Automatic, and “Type of sign-in info” to User name and password.
Step 5 Next fill out the “Connection name” and “Server name or address.” These vary based on your VPN provider—whether a third-party service or an employer. For this example, we’re using Acevpn, a clientless VPN service that supports various connection types such as IKEv2, L2TP, and PPTP.
Step 6 Scroll down this screen and you’ll see a spot to enter your username and password for the VPN—again provided by your VPN service. Once the information is entered, click Save, and close the Settings app.
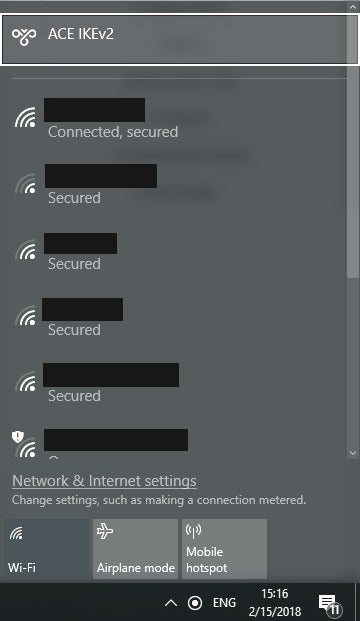
Step 7 Click the Wi-Fi icon in the system tray on your taskbar, and select your newly created VPN connection, which should be right at the top of the list. It should automatically start to connect, and if all goes well the connection process should happen relatively quickly.
The above process works for the easier VPN connection types such as PPTP and L2TP, but if you want to use IKEv2 that requires installing a root certificate from your VPN provider. Keep in mind that not every service supports IKEv2 so using this method depends greatly on your VPN service provider or employer.
Regardless, here’s how it works on Windows 10.
First, download your VPN provider’s IKEv2 certificate to your desktop or somewhere else that’s convenient. Next, double-click on the certificate file and a security warning pops-up. Click Open.
On the next window that opens click Install certificate…

Now we’ve arrived at the Certificate Import Wizard. Select the Local Machine radio button and click Next.
On the next screen make sure to select the radio button labeled Place all certificates in the following store, and click Browse…
A smaller window opens with a folder tree. Select Trusted Root Certification Authorities and then click OK. Now we’re back at the Certificate Import Wizard window. From here click Next.
The hard part is over. On the next screen click Finish and then OK in the smaller window.
Now that the certificate is installed we can set up the IKEv2 VPN using the same step-by-step instructions above. Just make sure that you select IKEv2 under “VPN type,” and then use the server name, address, and username and password provided by your service provider.
Once you’ve connected to the VPN, check to see that your VPN is working by visiting IPleak.net. You should see an IP address, and DNS servers that are different from your non-VPN state. If you don’t, there are a number of potential causes that we can’t go into here. Your best bet is to check with your company’s IP department or the support service of your VPN.
However, one easy and common fix for IKEv2 problems is to right-click on your Wi-Fi or ethernet icon in the system tray, and select Open Network and Sharing Center from the context menu. When the Control Panel opens click Change adapter settings on the left side, then right-click the name of your VPN connection and go to Properties > Internet Protocol Version 4 (TCP/IPv4) > Properties > Advanced… > IP Settings. Check “Use default gateway on remote network” and click OK. Close up all the windows and try IP Leak again.
Step-by-step: How to set up a VPN in Windows 7
Step 1 Click the Start button. In the search bar, type vpn and then select Set up a virtual private network (VPN) connection.
Step 2 Enter the IP address or domain name of the server to which you want to connect. If you’re connecting to a work network, your IT administrator can provide the best address.
Step 3 If you want to set up the connection, but not connect, select Don’t connect now; otherwise, leave it blank and click Next.
Step 4 On this next screen, you can either put in your username and password, or leave it blank. You’ll be prompted for it again on the actual connection. Click Connect.
Step 5 To connect, click on the Windows network logo on the lower-right part of your screen; then select Connect under “VPN Connection.”
Step 6 In the “Connect VPN Connection” box, enter the appropriate domain and your login credentials; then click Connect.

Step 7 If you can’t connect, the problem could be due to the server configuration. (There are different types of VPNs.) Check with your network administrator to see what kind is in use—such as PPTP—then, on the “Connect VPN Connection” screen, select Properties.
Step 8 Navigate to the Security tab and select the specific “Type of VPN” from the drop-down list. You may also have to unselect Include Windows logon domain under the Options tab. Then click OK and Connect.
It takes a little work, but setting up a VPN using the Windows built-in client is relatively quick, and as a user it’s a helpful skill to have.