

If you have an Office 365 subscription at home or work, you’ve likely come to know your Office 365 Calendar quite well. You can use it via the Outlook app to manage appointments and meetings. Well, there’s so much more that you can accomplish with Outlook Calendar in Windows 10. In our latest Office 365 guide, we’ll give you a look at some of our favorites cheats and tips for the Outlook Calendar on Windows 10.
Quickly view the calendar from anywhere in Outlook
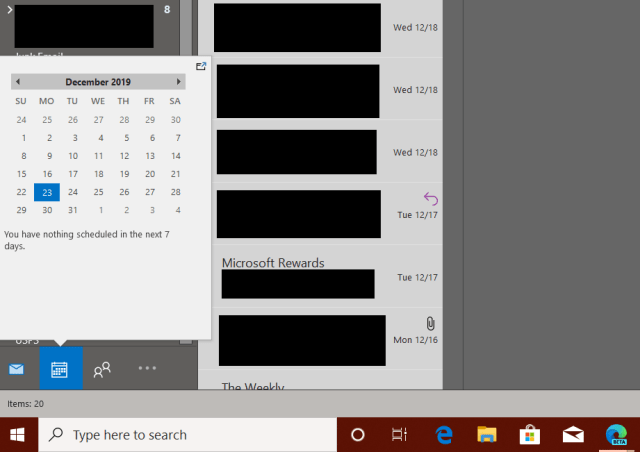
Most of the time you might end up sending and reading emails in Outlook, but did you know you can peek at your calendar without heading into the dedicated calendar view? That’s right. You can get a peek at the events in your calendar from anywhere in Outlook by simply hovering your mouse on the Calendar icon in the bottom left corner of the screen. From there, you’ll be able to see upcoming meetings, incoming appointments, and even see a mini version of your full calendar.
See multiple time zones on your calendar
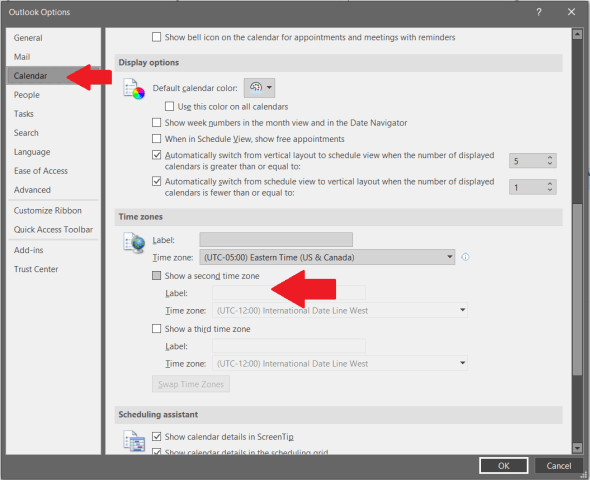
If your company is based in a different time zone from where you reside, you might want to set a second time zone to avoid conflicts in meetings. Well, Outlook makes this easy. You can simply click the File tab inside the Outlook app, and head to the third option in the window for Calendar. Click that, and then scroll down to the Time Zones option. You can then click the toggle box to show a second timezone or to show a third time zone and choose your option from the list.
Create a secondary calendar, or print a blank calendar
Sometimes, you might just want to create a secondary calendar in Outlook. This can help you separate various elements from your workplace, or just create a second calendar for personal reminders and events. Doing this is easy. You just need to open the Outlook Calendar, click the Home button in the ribbon, and then click Open Calendar in the ribbon. After you do that, you can select Create a new Blank Calendar and name it in the option that says Create new Folder and be sure to select your current calendar, and then press OK.
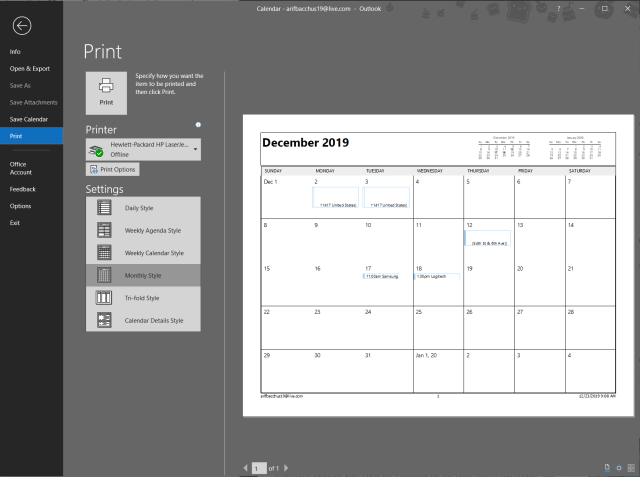
In the event that you want to print this (or any other) calendar, that too is easy. First, select the calendar, and then click File, and Print. You’ll see some options, ranging from Daily Style, Weekly Agenda Style, Weekly Calendar Style, or the more traditional Monthly Style. Look for a preview on the right side of the screen, and then choose one that fits your needs, and press Print when you’re ready.
Email your calendar to your colleagues
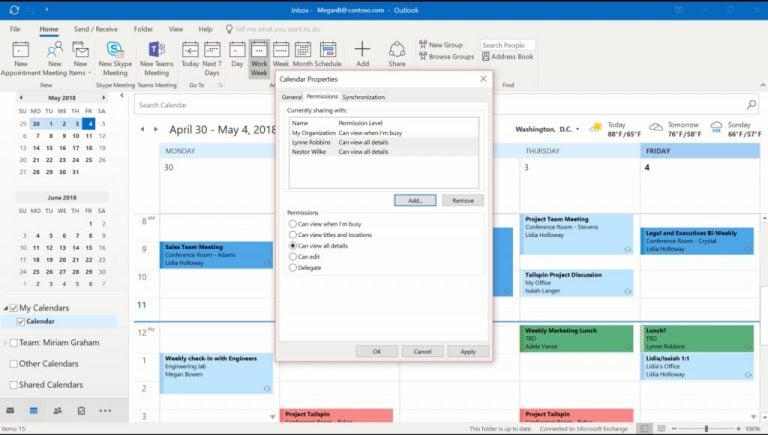
If you need to share information on your calendar to your colleagues, there’s no need to copy and paste. Outlook makes it easy to export your calendar and email it out to whoever you please. You can do this by clicking on Calendar, selecting Home from the Office 365 ribbon, and clicking the Share Calendar button on the far right-hand side of the screen. In the window that pops up, choose the Permissions option, and choose who you want to share your calendar with, and select Add.
Once you’re done, you’ll see a list of people who you can share with. You can tweak the settings if you please and choose the name, and select the permissions, and select OK. An email will arrive in their inbox, and they’ll be able to select Accept to see your calendar.
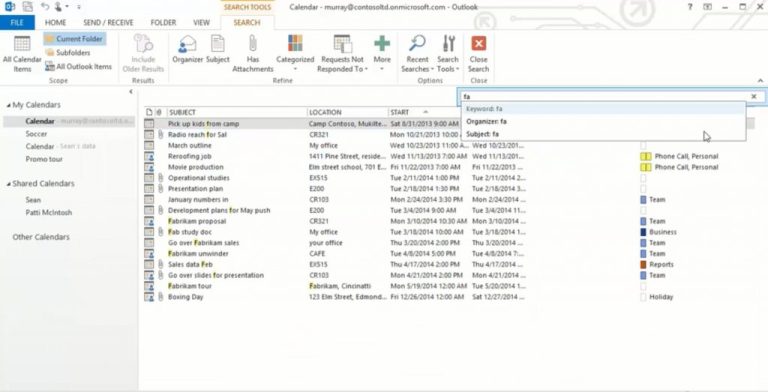
Use the search bar in Calendar to make searches easy
If your calendar is messy with lots of meetings or events, there’s no need to fret. You can use the search box in the top right corner to help you find what you need. The search results will show you a list of search keyboards in yellow, but only for the most recent 30 items. You can scroll down to the bottom of the list and select More to see more results if you please. For better results, you also can use quotation marks, or use the AND, OR, or NOT, keywords to help tweak your results. AND will search for items with both keywords, OR will search for items with either keyword and NOT will search for items that have the first keyword but not the second keyword.
…And there’s more!
We’ve just touched a few basics in our guide, but there’s a lot of other tips and tricks that are available. You can use a scheduling assistant in Outlook to help you schedule meetings, create a meeting request from an email, automatically accept or decline meeting requests, and much more. Microsoft has a page here which explains these tricks, and other Outlook cheats. Feel free to check it out, and let us know if you’ve got a personal favorite Outlook cheat by dropping us a comment below!