
Windows 11 has just received its first major update since it initially launched in October 2021. Called the Windows 11 2022 Update, there’s quite a lot that’s new in this version, from changes to File Explorer to new built-in apps. One of those new apps is Clipchamp, a new video editor Microsoft acquired in 2021. You might have already seen Clipchamp on Windows 11 before, but now, the app is installed by default, and if you want a basic video editing tool, it’s a big leap from what Microsoft used to offer. But if you’re just getting started with editing video, it can be challenging, so we’re here to help. Let’s take a look at the basics of how to use Clipchamp.
Clipchamp is a web-based video editor, so even if you don’t have the app, you can always access it on the Clipchamp website. However, the app does potentially make it easier to access. One thing to note is that Clipchamp also has a paid plan, though it’s not mandatory for the most part.
Clipchamp plans
Until recently, Clipchamp offered multiple plans you could choose from, and it was arguably overpriced for what it offered. Microsoft recently simplified the pricing structure for Clipchamp, so now you can either use the free plan or subscribe to the Essentials plan for $11.99 per month, or $119.99 a year.
The free plan includes most of the basic features you’d expect. You get a multi-track video editor, you can use all of your own assets, and you can also use some stock assets provided by Clipchamp. Some of these are free, but not all of them. You can only export video in 1080p resolution, but unfortunately, this is a limitation that also exists for the Essentials plan.

What you do get if you choose to pay for the Essentials plan is access to a wider catalog of stock assets, like images, audio, and video. While some are available for free, most of these assets are part of the Essentials plan, and it may come in handy if you’re creating videos frequently. You also get access to more video filters and you can upload custom fonts if you have the Essentials plan. Additionally, the Essentials plan also lets you create a brand kit, including a color palette, custom fonts, and logos, which you can easily add to your videos.
Potentially the biggest benefit of the Essentials plan is the cloud backup feature. This backs up all your media files and projects to the cloud, so you can keep working on them from any PC.
Starting a Clipchamp project
When you first launch Clipchamp, you’ll be greeted by the home page, which lets you start a new project. You’ll need to create a Clipchamp account, though if you have a Microsoft account linked to Windows 11, this should be easy. Once you’ve set up your account, the home page will look like this:

Here, you can choose from a few ways to start working on a new video. At the top of the page, there’s a simple Start a new video button, which lets you create a new video from scratch. If you just want to use your own assets, this might be the option you prefer.
Starting with a template
Below that, you have the option to start a new project using a template. There are a few template categories, such as YouTube or Instagram, which let you start with the right aspect ratio, too. For example, most of the Instagram templates come in the 1:1 aspect ratio, which is what’s most common for that social network.

The different templates include things such as video, audio, and text, helping you create a layout or simply adding an intro or outro for your video. You can also add templates to a project later, so you’re not limited to just one.
Starting with a recording
Alternatively, you can start a video project with a brand-new recording. You can record using your webcam, record your screen, or both at the same time, which might be a good idea for a presentation or a tutorial. You can always add a recording while editing a project, too.
When you start a recording, you’ll be prompted to choose a webcam and microphone (if you’re using them). Then, you can click the record button to start recording.

If you’re also recording your screen, you’ll be asked to choose what you want to record – it can be the entire screen, an app window, or a specific area of the screen. You can also choose to record system audio, though this is off by default.

Once you choose what part of the screen you want to capture, the recording will automatically start, and it can last up to 30 minutes if you’re recording your screen. When you finish the recording, you can watch it and choose to retake or add it to your project, which will look something like this:

The webcam and screen recordings go in separate tracks, so you can adjust the position and size to your liking after the fact. That leads us into the next segment, which is actually editing a project.
How to use the Clipchamp video editor
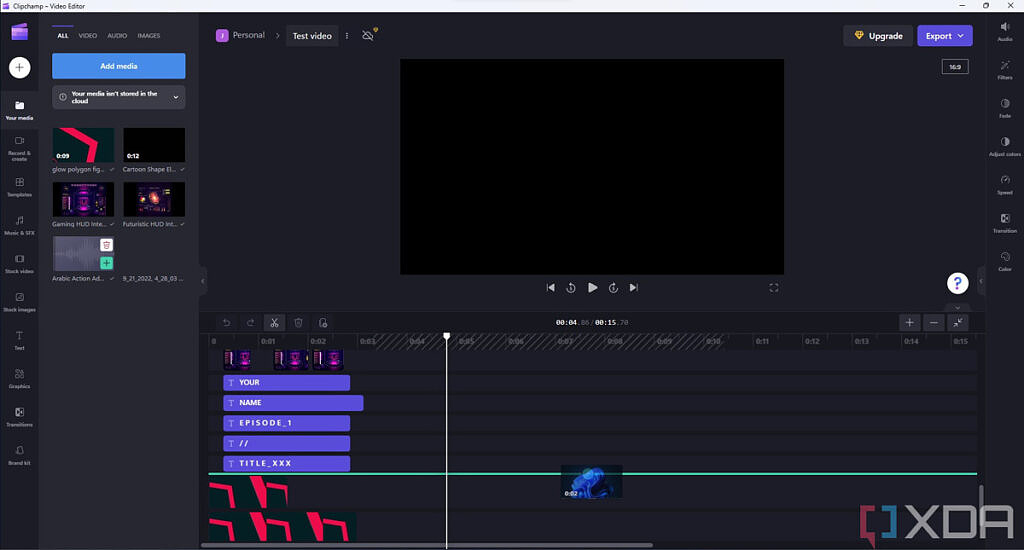
Once you’ve created a project, you’re going to be taken to the video editing interface, which is where you’ll spend the most time. We’re not going to dive into the details of video editing as a whole, but here’s a quick rundown of what you can do with it.

As you can see above, the video editing interface is divided into a few sections. Front and center is you video preview, so you can see what the final result looks like, and you can also resize and move video elements around, in addition to changing the aspect ratio if you want to target a specific format. Below that, you’ll see the video timeline with all the tracks you’ve currently added. In this screenshot, we haven’t added any media yet, so it looks very clean, but you can add as many tracks as you want.
On the left side of the screen, you’ll see all the content tools – the media you’ve already added to the project, stock assets, templates, and so on. On the right side, you can see filters and effects to apply to your content in the final video.
The timeline
Clipchamp is a multi-track video editor, which means you can have multiple video and audio files playing at the same time. This can be useful if you want to mix a recording of your voice with some background music, or if you want to have an overlay of your camera on top of a screen recording, for example. In the screenshot below, you can already see a lot of tracks created automatically because we started this project with a template that added all these assets.

You can move assets around on the timeline, delete them, or cut them so you can split a video into different clips, for example.
If you want to add more assets to the final video, you can drag them from the media pane on the left side of the screen into the timeline. You can either drag content into an existing track on the timeline or create a new track by dragging the content into the edges of an existing track.
One thing to keep an eye out for is that videos often have audio tracks, too, but Clipchamp usually merges them together by default. You can make audio edits directly to the video track, but you can also split a the audio track from the video so it’s easier to manage. That way, you can also reuse audio somewhere else more conveniently. If you’ve edited videos before, using the timeline should feel pretty familiar.
Media and content tools
When you first open a project, the default view will show you all the media you’ve already added to the project on the left-side pane. In the screenshot below, we’ve started with a template, so you can see a few video, image, and audio assets.

From there, you have a few options to add more content to the video. Here are all the options available in this menu:
- Your media – Manage the media already in your project or add more media from local storage, cloud services, to from your phone by scanning a QR code. Adding your own media to a project doesn’t automatically add it to the timeline, so you have full control of where you want to add things in the final video. You can also filter your existing media by type, which can be useful when you’ve added a lot of assets.
- Record & create – This tab allows you to record your screen or your webcam (or both) directly within Clipchamp, as we’ve explained above. There’s also a text-to-speech tool, so you can write text that’s synthesized as an audio file you can add to the video. There are multiple languages and voices you can choose from for the text.
- Templates – Add content from pre-built templates, including outros, intros, or splash screens. Templates can include multiple files, such as audio, video, and images. Templates are automatically added to the timeline after the cursor position.
- Music & SFX – Add stock music and sound effects from the Clipchamp library to your video. You can choose from a range of genres and categories, so you can get a specific vibe. Some assets are available in the free plan, while others require you to pay for the Essentials plan.
- Stock video – Add stock video footage from the Clipchamp library, including video overlays. Some assets are only available with the paid Essentials plan.
- Stock images – Add images from the Clipchamp library to your video. This can include static video frames and overlays to add more flair to your video. Some assets are free, but most require an Essentials plan.
- Text – Add text to your videos, such as title screens, subtitles, and lower thirds. You can choose from a range of existing fonts or, if you have an Essentials plan, upload your own.
- Graphics – Add overlays, backgrounds, GIFs, or stickers to your video.
- Transitions – Add transition effects to the video, which can be useful when switching between different video files in the timeline.
- Brand kit – Access assets from your personal brand kit, including fonts, logos, and color palettes. This feature requires an Essentials plan.
Filters and effects
Finally, on the right-side pane, you’re going to see a set of filters and effects you can apply to your content in the timeline. The options available depend on the type of content you select, so some options are only available for video files, while others are only available for audio.

Here’s a quick rundown of all the options available here:
- Adjust colors (available for video, image, and text assets) – Change properties such as exposure, saturation, and contrast for the selected asset.
- Audio (available for audio assets or videos with an audio track) – This lets you change the volume of the audio track in the final video. You can lower the volume for background music while keeping your voice higher, for example.
- Colors (available for text assets) – Change the color of the text and background.
- Fade (available for all asset types except transitions) – Set fade in and fade out animations for the item you selected.
- Filters (available for video, image, and text assets) – Add filters to change the appearance of the image or video file. Some filters require an Essentials plan.
- Speed (available for video assets and motion graphics) – Change the playback speed of the file.
- Text (available for text assets) – Change the text, font, and aligment of a text asset.
- Transform (available for text assets) – Change the size and position of a text asset. Note that you can also drag the text in the video preview to move it around.
- Transition (available for transition assets) – Change the transition animation and duration.
Exporting your project
Once you’ve made all the edits you want to make to your video, the last step is exporting it, which is fairly straightforward. At the top of the Clipchamp window, there’s an Export button you can click. You can export videos in 480p, 720p, or 1080p resolution, or you can also export them as GIFs if they’re less than 15 seconds long.

Clipchamp also detects if there are gaps in your video with no visual assets and warn you before you export the video, which can save you from having to re-edit the video later. Once you choose the output resolution, the export will start and it will automatically be downloaded to your computer. You can also save it to a cloud storage service or upload straight to YouTube, TikTok, or Pinterest.

And that’s about all the basics you need to know if you’re using Clipchamp for the first time. This is certainly a more basic video editor compared to tools like Adobe Premiere or DaVinci Resolve, but on the flip side, it’s fairly easy to get to grips with and you can still make engaging videos this way. It’s a great tool for beginners, though it may not quite cut it for proficient video editors.
If you’re interested in learning about other recent features in Windows 11, you may want to check out our guide focused on the new File Explorer changes in the Windows 11 2022 Update. There’s also Smart App Control, a new security feature that blocks untrusted apps from running.
The post How to use Clipchamp, the new video editor in Windows 11 version 22H2 appeared first on XDA.