
Screencast Linux Ubuntu – Here is how to record your Linux Desktop using Recordmydesktop app. It is a popular screen recorder for Linux Ubuntu Systems.
ScreenCasts
ScreenCasts generally consist of a video of either a portion of the desktop or a full screen where the author demonstrates some application or process. ScreenCasts are great for showing people how to do specific tasks on a computer. They are especially useful for new users where one of the first stumbling blocks can be a lack of familiarity with the product look & feel, location of options and general operation.
ScreenCasts may optionally contain an audio track describing what is happening on the screen. The audio element can help to supplement and describe the features being demonstrated on the screen. An audio description can also be used to pad out the sections of the video where nothing interesting is happening. Examples of this dead-time include as a client waits for a response from a server, as source code is compiled, or whilst an application starts up.
Recordmydesktop
recordmydesktop is a desktop session recorder for GNU/Linux and FreeBSD. The recordmydesktop application can record either the whole screen or a predefined area within it. It is a very useful application which can be very helpful when one needs to record and share desktop activities to someone else. recordmydesktop can capture both – audio and video of a desktop screen.
Recordmydesktop consists of three main programs, recordmydesktop is a command line tool with gtk-recordmydesktop and qt-recordmydesktop as the graphical frontends for GTK and QT environments.
Install Recordmydesktop on Ubuntu
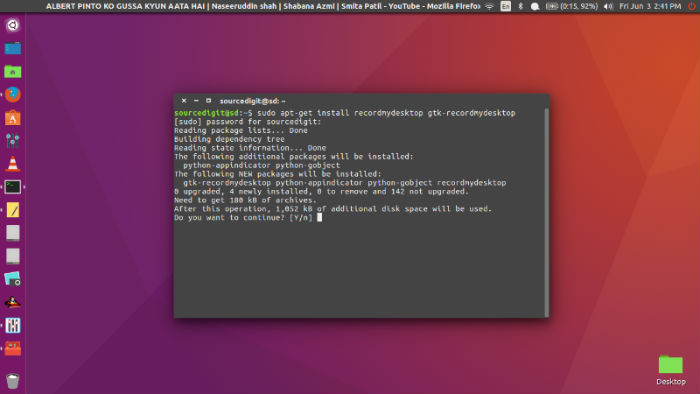
Although recordmydesktop is a command-line tool, Ubuntu users can install GUI frontend for the application – gtk-recordmydesktop. Run the following commands in Terminal to install:
$ sudo apt-get install recordmydesktop gtk-recordmydesktop
Once installed, open the app from Ubuntu Dash.
Use Recordmydesktop
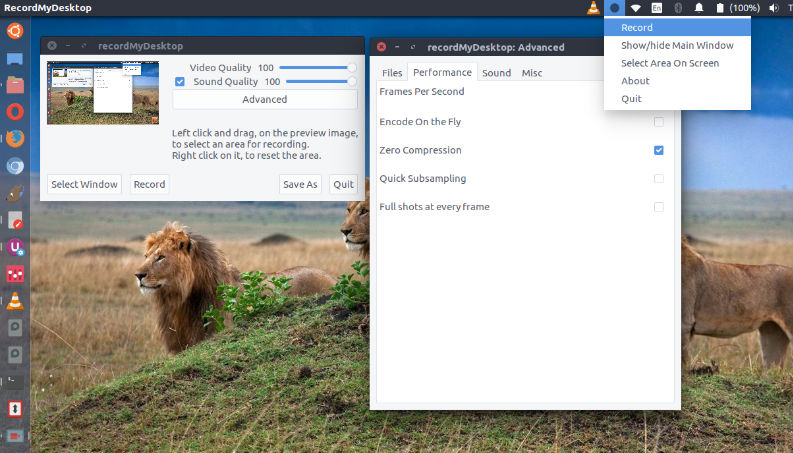
Using the application to record desktop screen is very easy. Before we begin, let us understand the GUI of the application:
When you open the application, you can see two buttons, “Select Window” and “Record”. “Select Window” can be used to confine the area of the recording on a single window. On the top-right corner, we can see two scale widgets, labeled as “Video Quality” and “Sound Quality”. These control the quality of the encoded file (bitrate) and not that of capturing.
A very important element of the interface is the checkbox on the left of the sound quality scale. When this box is checked, sound recording is enabled. When it is empty, there will be no audio recording and the resulting file will consist only of a video stream.
- The simplest way to start a recording is to simply left click on the tray icon, or click the record button on the main window. When you start a recording session the main window will hide itself, unless you have already done so manually through the tray icon pop up-menu.
- After recording encoding of the data into an ogg/theora-vorbis file is automatically done. The file is saved in ogg format. When the encoding ends the main window will reappear, unless you have manually hidden it through the tray icon pop up-menu.
When the application is active you can also see the application in the panel bar which has 3 states:
- Stopped (red circle, aka record sign)
- Recording (square, aka stop sign)
- Paused (two thin parallel and vertical rectangles, aka pause sign)
When recordmydesktop is stopped (when the program starts), the icon will be a record sign, meaning that if you left-click on it, a new recording will start. After you start a recording, it will turn into a square, meaning that a left-clicking will end the current session.
f you right click on the tray icon while recording, the image will change to a pause sign. Either left or right click will return the program to recording state.
Screencast For Linux Ubuntu – How To Record Your Linux Desktop originally posted on Source Digit – Linux, Ubuntu Tutorials & News, Technology, Gadgets & Gizmos.