
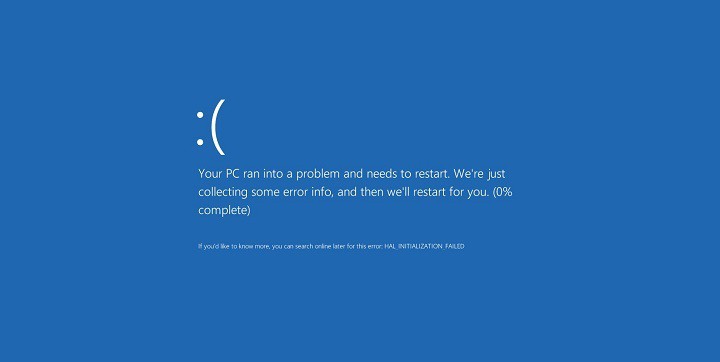
Blue Screen of Death errors, such as NMI HARDWARE FAILURE, can cause many problems on Windows 10. These types of errors will frequently restart your computer in order to prevent damage, therefore it’s crucial to know how to fix these types of errors.
How to fix NMI HARDWARE FAILURE BSoD error
Fix – NMI HARDWARE FAILURE error in Windows 10
Solution 1 – Make sure Windows 10 and all drivers are up to date
BSoD errors are often caused by certain hardware or software issues, and if you want to keep your Windows 10 system error-free, it’s highly advised that you update Windows 10 on regular basis. By using Windows Update you’ll download the latest security patches along with some new features, but most importantly, you’ll download many bug fixes that improve system stability. These bug fixes often fix issues with certain hardware or software, therefore, if you wish to prevent BSoD errors such as NMI HARDWARE FAILURE, be sure to update Windows 10.
In addition to downloading Windows updates, it’s just as crucial to keep your drivers up to date. Drivers allow Windows 10 to recognize and utilize your hardware, and if certain driver is outdated or if it doesn’t support Windows 10 that can cause Blue Screen of Death errors to appear. To fix these types of errors it’s crucial to update your drivers, and to do that you just need to visit your hardware manufacturer’s website and download the necessary drivers for your device. To completely fix Blue Screen of Death errors, be sure to update as many drivers as you can.
Update drivers automatically
Searching for drivers on your own can be time-consuming. So, we advise you to use a tool that will do this for you automatically. Using an automatic driver updater will certainly save you from the hassle of searching for drivers manually, and it will always keep your system up to date with the latest drivers.
Tweakbit’s Driver Updater (approved by Microsoft and Norton Antivirus) will help you update drivers automatically and prevent PC damage caused by installing the wrong driver versions.After several tests, our team concluded that this is the best-automatized solution.
Here is a quick guide on how to use it:
- Download and install TweakBit Driver Updater
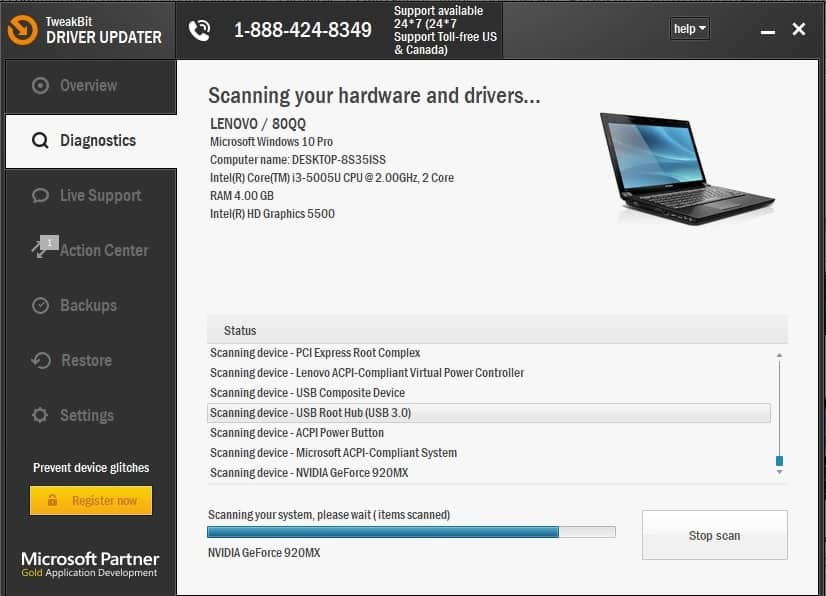
- Once installed, the program will start scanning your PC for outdated drivers automatically. Driver Updater will check your installed driver versions against its cloud database of the latest versions and recommend proper updates. All you need to do is wait for the scan to complete.
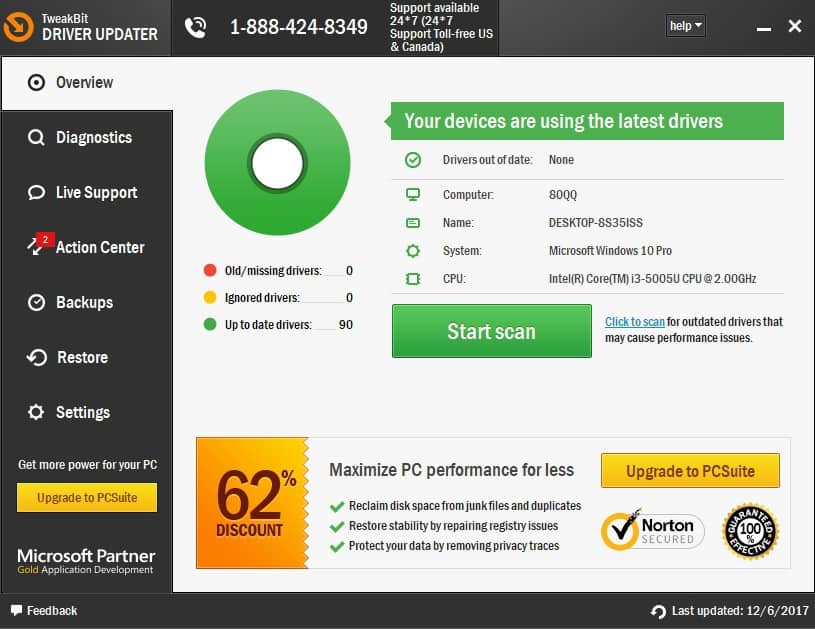
- Upon scan completion, you get a report on all problem drivers found on your PC. Review the list and see if you want to update each driver individually or all at once. To update one driver at a time, click the ‘Update driver’ link next to the driver name. Or simply click the ‘Update all’ button at the bottom to automatically install all recommended updates.
Note: Some drivers need to be installed in multiple steps so you will have to hit the ‘Update’ button several times until all of its components are installed.
Solution 2 – Run the BSOD Troubleshooter
The next troubleshooter we’re going to try is the SFC scan. This is a command-line tool that goes through your system searching for potential issues. Of course, if resolving these issues is possible, the SFC scan will do it automatically.
Here’s how to run the SFC scan in Windows 10:
- Open the Settings app and go to Update & Security section.
- Select Troubleshoot from the menu on the left.
- Select BSOD from the right pane and click Run the troubleshooter.
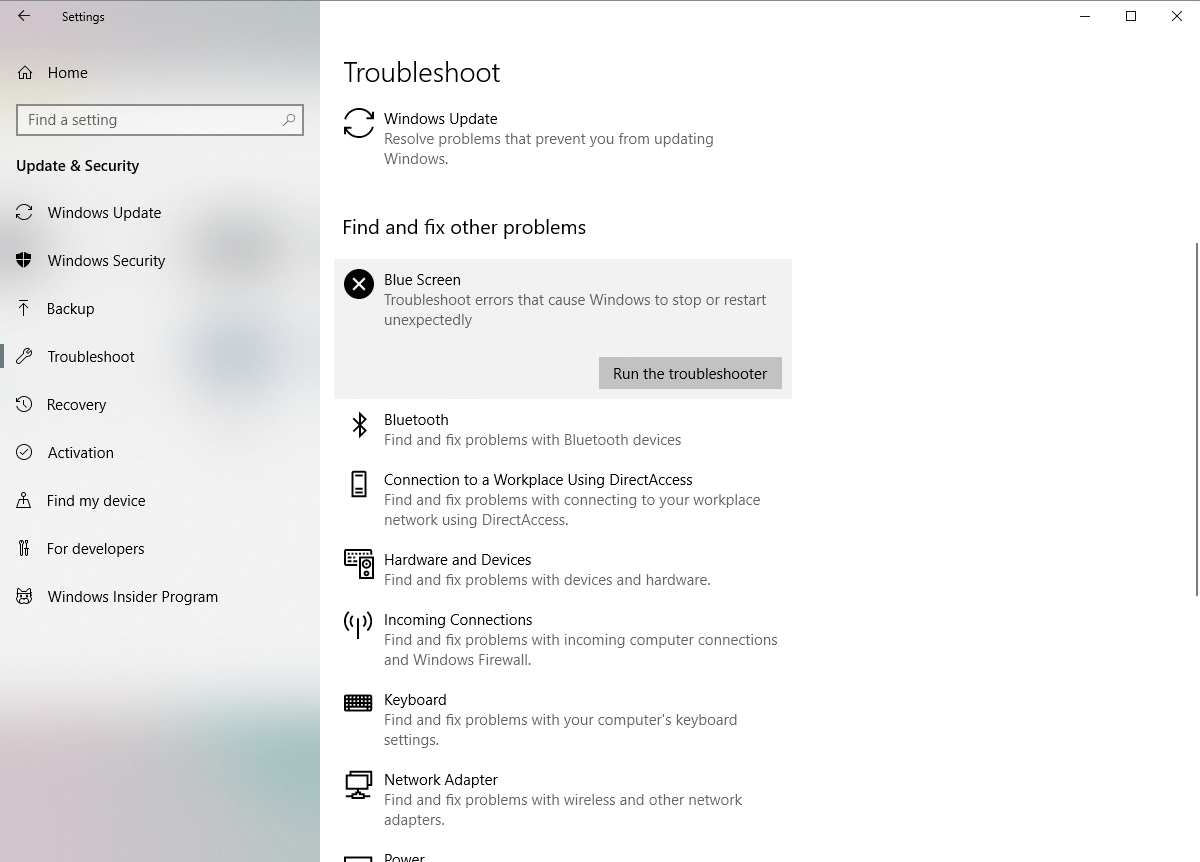
- Follow the instructions on the screen to complete the troubleshooter.
Solution 3 – Run the SFC scan
If the ‘unified’ troubleshooter failed to resolve the problem, we’re going to run the SFC scan. This tool scans your computer for potential issues, and delivers a solution, if possible. So, it might be helpful with the NMI HARDWARE FAILURE error, as well.
Here’s how to run the SFC scan in Windows 10:
- Right-click on the Start Menu button, and open Command Prompt (Admin).
- Enter the following line and press Enter: sfc/scannow
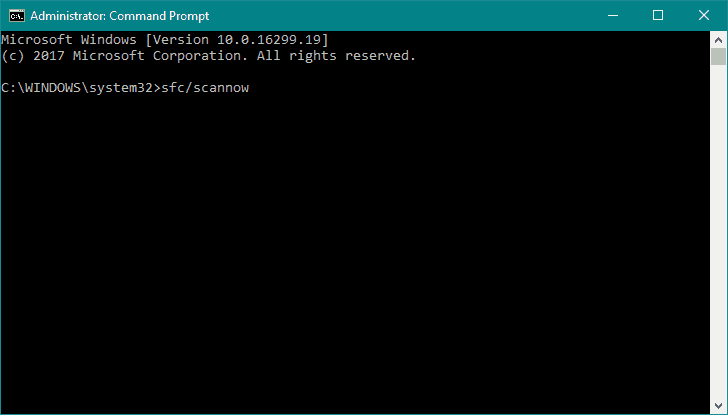
- Wait until the process is done (it may take a while).
- If the solution is found, it will automatically be applied.
- Now, close the Command Prompt and restart your computer.
Solution 4 – Run DISM
And finally, if none of the previous troubleshooters resolved the problem, the final one we’re going to try is DISM. Deployment Image Servicing and Management (DISM) is a tool that reloads the system image, and possible issues may get resolved along the way. So, running this tool may fix the NMI HARDWARE FAILURE error.
We’ll walk you through both standard and the procedure that utilizes the installation media below:
- Standard way
- Right-click Start and open Command Prompt (Admin).
- Paste the following command and press Enter:
-
- DISM /Online /Cleanup-Image /RestoreHealth
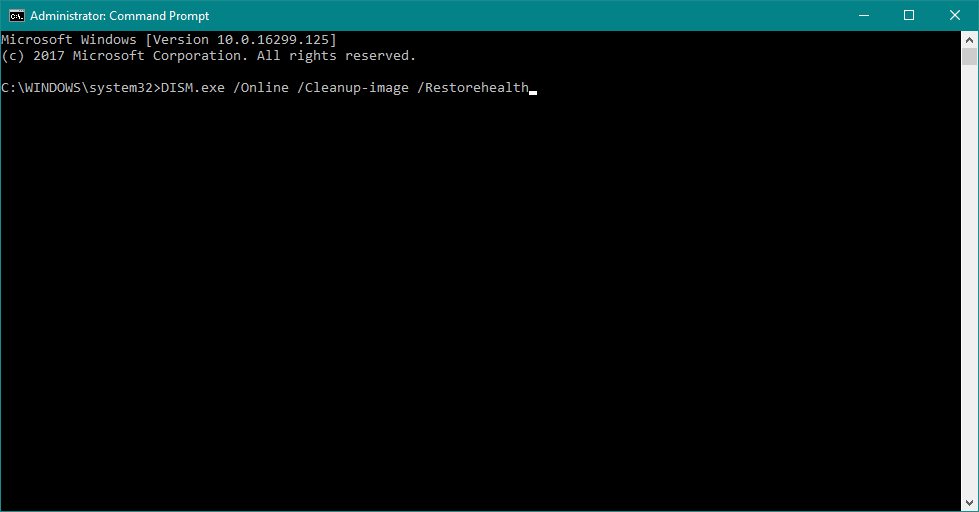
- DISM /Online /Cleanup-Image /RestoreHealth
-
- Wait until the scan is finished.
- Restart your computer and try updating again.
- With the Windows installation media
- Insert your Windows installation media.
- Right-click the Start menu and, from the menu, choose the Command Prompt (Admin).
- In the command line, type the following commands and press Enter after each:
- dism /online /cleanup-image /scanhealth
- dism /online /cleanup-image /restorehealth
- Now, type the following command and press Enter:
- DISM /Online /Cleanup-Image /RestoreHealth /source:WIM:X:SourcesInstall.wim:1 /LimitAccess
- Make sure to change an X value with the letter of the mounted drive with Windows 10 installation.
- After the procedure is finished, restart your computer.
Solution 5 – Check the hard drive
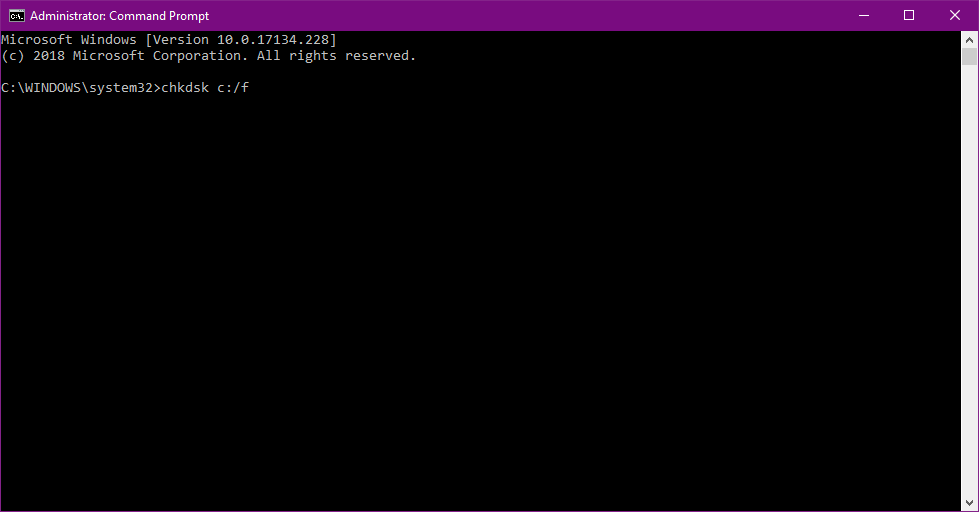
BSoD errors can be caused by corrupted files on your hard drive, and in order to fix this issue it’s advised to run the chkdsk scan. To run a chkdsk scan, you need to do the following:
- Enter the Advanced Startup (Restart your computer while holding the Shift key).
- Choose Troubleshoot > Advanced Options.
- Select Command Prompt from the list of options.
- When Command Prompt appears, enter the following lines and press Enter after each line in order to run it:
- bootrec.exe /rebuildbcd
- bootrec.exe /fixmbr
- bootrec.exe /fixboot
- Some users are also suggesting that you need to run additional chkdsk commands as well. To perform these commands, you need to know drive letters for all your hard drive partitions. In Command Prompt you should enter the following (but remember to use the letters that match your hard drive partitions on your PC):
- chkdsk /r c:
- chkdsk /r d:
This is just our example, so keep in mind that you have to perform chkdsk command for every hard drive partition that you have.
- chkdsk /r c:
- Restart your computer and check if the issue is resolved.
Solution 6 – Uninstall problematic software and your antivirus
Software can be the often cause for these types of errors, especially if the certain software isn’t fully compatible with your computer. Programs such as VPN clients, or even antivirus programs can cause NMI HARDWARE FAILURE error, so be sure to uninstall any problematic software. It’s worth mentioning that recently installed software can cause these types of errors as well, and if you installed or updated certain software before this error started appearing, be sure to uninstall it.
As we briefly mentioned, antivirus software can be the common cause for these types of errors, therefore be sure to uninstall all third-party antivirus software that you have installed. Many antivirus programs will leave certain registry entries and files behind after you remove it, and those files can still cause BSoD errors to appear. To completely remove an antivirus software, it’s advised that you use a dedicated uninstaller tool for it. Many security companies offer these tools for their software, so be sure to download one for your antivirus program.
Solution 7 – Use the bcdedit command
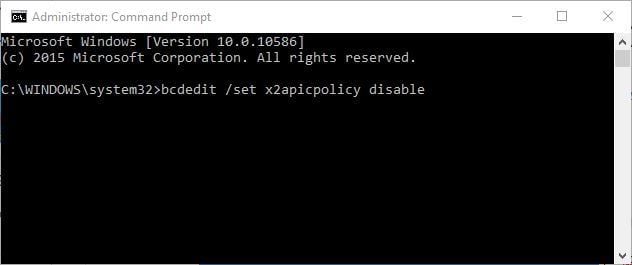
Few users reported that they have issues with Kaspersky antivirus, and according to them, the only way to fix NMI HARDWARE FAILURE error is to use bcdedit command. To do that, follow these steps:
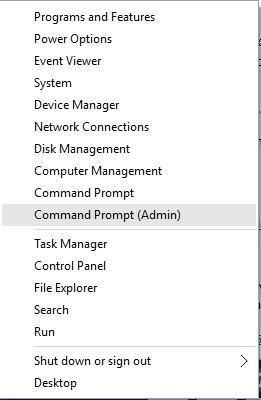
- Press Windows Key + X to open Power User Menu. Select Command Prompt (Admin) from the menu.
- Once the Command Prompt opens, enter bcdedit /set x2apicpolicy disable and press Enter to run it.
If you cannot enter Windows 10 due to this error, you can start Command Prompt by doing the following:
- Restart your computer while it boots. Repeat this step until you start Automatic Repair.
- Select Troubleshoot > Advanced options > Command Prompt.
- When Command Prompt starts, enter bcdedit /set x2apicpolicy disable and press Enter.
- Close Command Prompt and restart your PC.
Solution 8 – Disable Early launch anti-malware protection
Few users claim that they fixed the NMI HARDWARE FAILURE error by disabling the early launch anti-malware protection. Before disabling early launch anti-malware protection, there are few other settings that you need to change.
First, you need to turn on No execution protection in BIOS. To do that, simply enter BIOS, locate the setting and turn it on. Since there are many different versions of BIOS, be sure to check your motherboard manual to see how to enter BIOS and enable No execution protection.
After doing that, you need to turn on DEP for essential Windows programs and services only. To do that, follow these steps:
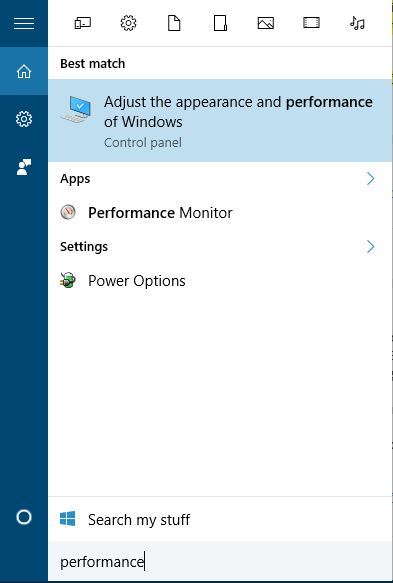
- Press Windows Key + S and enter performance. Select Adjust the appearance and performance of Windows.
- Go to Data Execution Prevention tab and select Turn on DEP for essential Windows programs and services only.
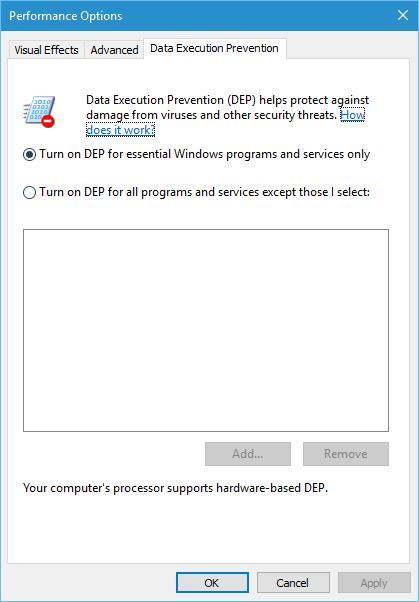
- Click Apply and OK to save changes.
Lastly, you need to disable early launch anti-malware protection. To do that follow these steps:
- Restart your computer few times until you enter Automatic Repair mode. Alternatively, you can just press and hold the Shift key and click the Restart button.
- Choose Troubleshoot > Advanced options > Startup Settings and click the Restart button.
- Once your computer restarts, you’ll see a list of options. Select Disable early launch anti-malware protection by pressing 8 or F8 on your keyboard.
Solution 9 – Check for faulty hardware
Faulty hardware can often cause BSoD errors, but sometimes recently installed hardware can cause NMI HARDWARE FAILURE error to appear as well. If you installed any new hardware recently be sure to remove it or replace it and check if your PC works well without it.
If the problem isn’t recently installed hardware, the cause is most likely a faulty hardware component. Users reported that a faulty sound card or PSU can cause these types of errors, so be sure to check these components. In addition, check other major components such as your RAM, motherboard, graphic card and hard drive.
NMI HARDWARE FAILURE error can cause certain problems on Windows 10, but it can be easily fixed by using one of our solutions.