
![]()
 Source: Windows Central
Microsoft has begun the gradual rollout of the May 2020 Update for Windows 10 with a bunch of new changes and several new features to enhance the experience of laptops and desktop computers. This is the ninth feature update, and it’s the first semi-annual update of 2020 available for supported devices.
Although the company is now finalizing the development earlier and spending more time testing and addressing as many problems as possible before the final release, as a result of version 2004 including significant code changes, it also means a lot of potential compatibility problems, issues with drivers, unexpected errors, and more.
In addition, because the May 2020 Update requires full reinstallation, you can also come across other issues that aren’t the result of the new development. Usually, upgrades could fail to apply because of storage problems, incompatible programs, damaged or outdated drivers, custom configurations, and problems with physical components.
In this Windows 10 guide, we’ll highlight some of the problems you are likely to encounter trying to install the May 2020 Update and possible solutions.
Get help to fix issues installing the May 2020 Update for Windows 10
Good to know – When a new version of Windows 10 becomes available, you may run into two types of problems. For instance, you can come across errors that are known during and after an upgrade, such as issues with activation, storage, features, and system update, which aren’t necessarily problems with version 2004.
Then, there are issues caused by bugs in the feature update. Some of these problems can be related to drivers, compatibility with apps or third-party security solutions.
This guide focuses on resolving common upgrade problems as well as methods to get around specific known issues (if available) during and after the installation using Windows Update, Update Assistant, or Media Creation Tool.
How to fix Windows Update problems with the May 2020 Update
Although using Windows Update is the recommended method to upgrade to a new version of Windows 10, it’s not a flawless mechanism, and sometimes you may run into errors that will prevent your computer from getting the update.
Resolve unexpected errors using Windows Update
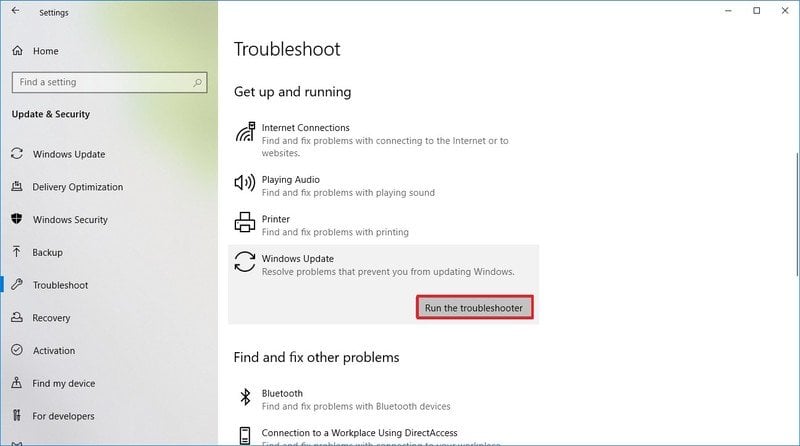
If Windows Update isn’t working, you can use the troubleshooter feature to resolve the most common issues.
To fix Windows Update to download version 2004, use these steps:
- Open Settings.
- Click on Update & Security.
- Click on Troubleshoot.
- Under the “Get up and running” section, select the Windows Update option.
- Click the Run the troubleshooter button.

 Source: Windows Central
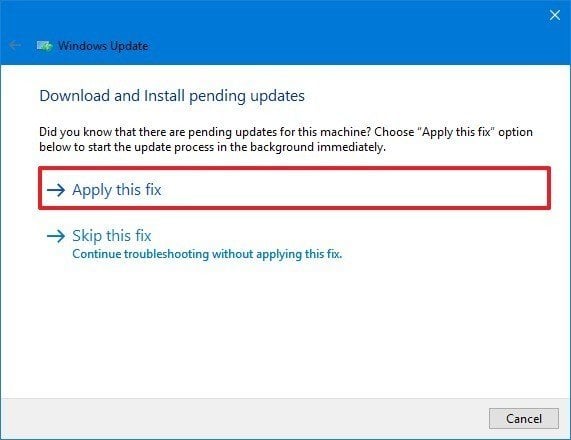
 - Click the Apply this fix option (if applicable).

 Source: Windows Central
Quick note: If you don’t see the option to apply a fix, it’s okay. The troubleshooter will apply fixes automatically. Then if the problem needs user approval, you’ll see the option.
- Continue with the on-screen directions.
- Restart your device.
Once you complete the steps, Windows Update should now be able to download and install the new May 2020 Update.
In the event that you get the error 0xc1900223, it means that there’s an issue downloading the update, and there’s nothing else you need to do. At a later time, Windows Update will try to upgrade again.
Resolve error 0x80073712 using Windows Update
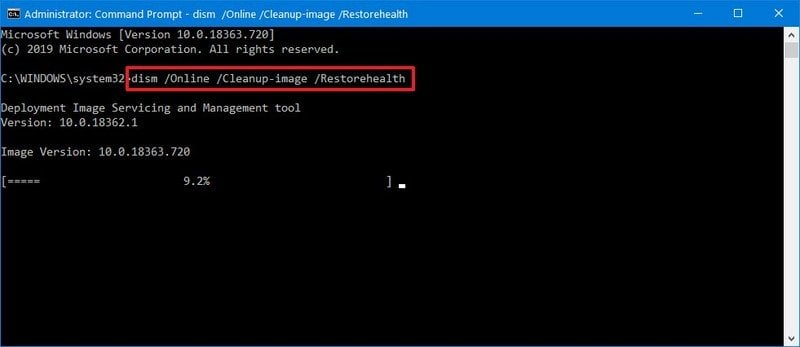
If, during the upgrade to Windows 10 version 2004, you see error 0x80073712 message, then it means that one or more of the required files are either missing or damaged.
To resolve this issue, you can use the Deployment Servicing and Management (DISM) tool with Command Prompt to restore the system files to a known good state.
To use DISM to fix Windows Update, use these steps:
- Open Start.
- Search for Command Prompt, right-click the top result, and select the Run as administrator option.
- Type the following command and press Enter:
dism /Online /Cleanup-image /Restorehealth
 Source: Windows Central
After you complete the steps, the required files will be repaired, and Windows Update should start working to download and install the first semi-annual update of Windows 10.
Resolve error 0x800F0922 using Windows Update
The error 0x800F0922 could appear when using Windows Update, if your device can’t connect to the Microsoft update servers, or if the System Reserved partition doesn’t have enough free space.
Disconnecting VPN session
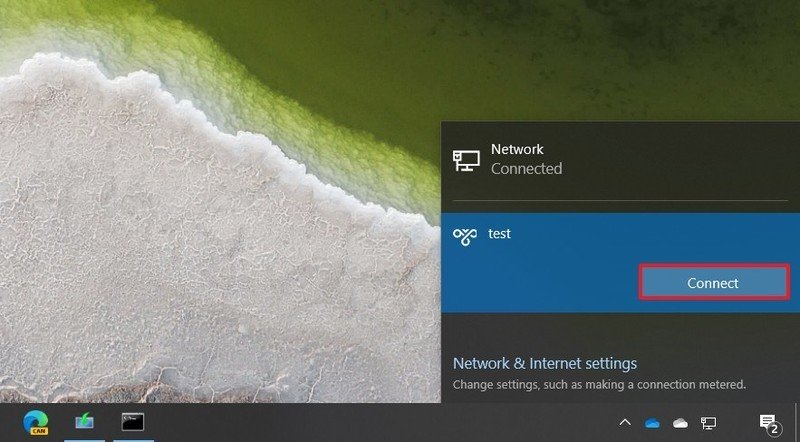
Typically, you’ll see the error 0x800F0922 if you’re trying to upgrade to the May 2020 Update, and a VPN connection is active.
To fix this problem, disconnect the VPN session using these steps:
- Click the network icon in the taskbar.
- Select the VPN connection.
- Click the Disconnect button.
 Source: Windows Central
These steps will work when using the Windows 10 VPN settings. If you’re using another application, check its documentation for more specific instructions.
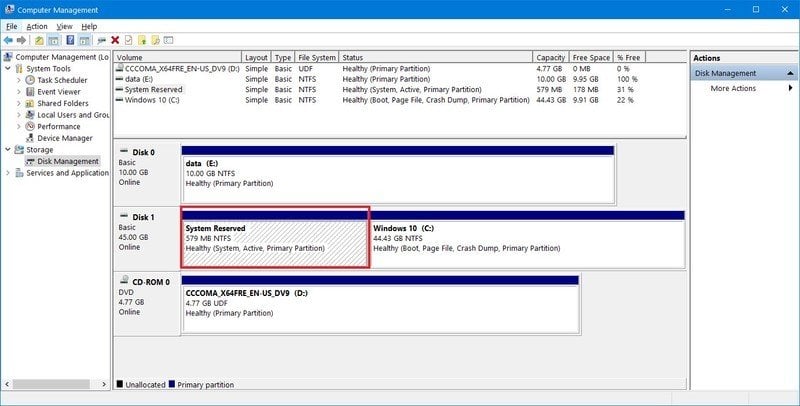
Resizing System Reserved partition
If third-party security software (such as antivirus) stores data in the System Reserved partition, then there’s a good chance that the new version of Windows 10 won’t install.
![]()
 Source: Windows Central
When this happens, you may need to use a third-party tool to resize the resevered partition to make it equal or larger than 500MB. Alternatively, you can choose to perform a clean installation with version 2004, which will not only fix the problem, but you’ll start with a new fresh installation that can resolve previous issues and improve performance.
How to fix Media Creation Tool problems with the May 2020 Update
The Media Creation Tool is a utility designed primarily to perform fresh and upgrade installations of Windows 10, but it also has problems of its own, especially during the early days of the May 2020 Update.
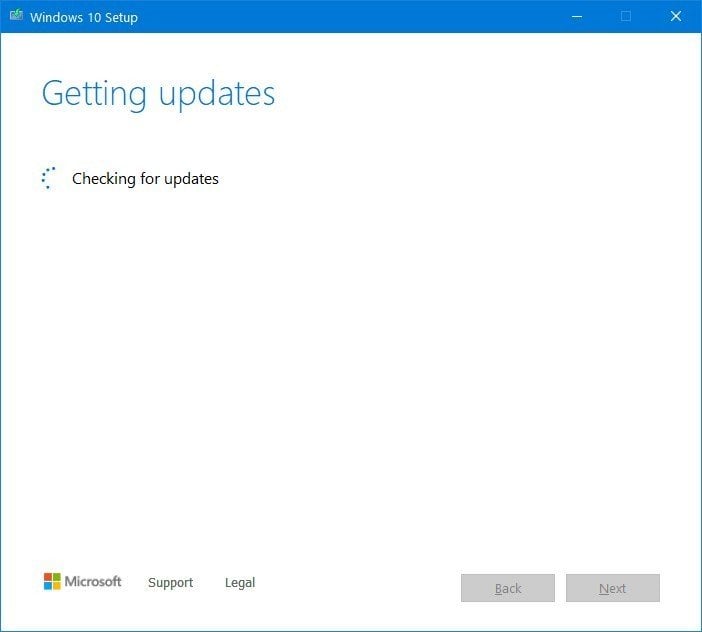
Resolve Media Creation Tool stuck downloading
As part of the upgrade process, the Media Creation Tool downloads the installation files as well as any additional updates.
The only caveat is that the tool can get stuck downloading those additional updates, and it’ll prevent you from continuing the upgrade to version 2004.
If it stays on the “Getting updates” stage for a long time, you can use these steps to get around the problem:
- Click the Close button.
- Start the Media Creation Tool one more time.
- Continue with the on-screen directions.
- As soon as the installation files finish downloading, unplug the network cable from your computer or disconnect from the Wi-Fi network.

 Source: Windows Central
Once you complete the steps, the download for updates will time out, and the setup will continue with the process. After the upgrade, Windows Update will install any remaining updates.
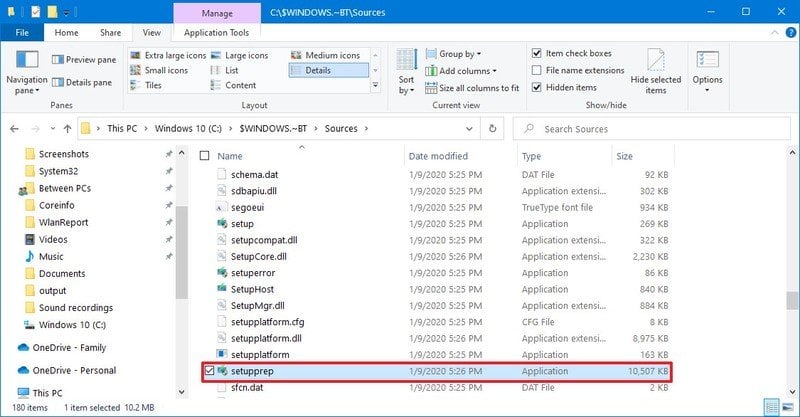
Resolve Media Creation Tool not starting setup
In the event that the installation process doesn’t start downloading the installation files, then you may need to begin the setup manually.
To launch the Windows 10 version 2004 setup manually, use these steps:
- Open File Explorer.
- Navigate to the following path:
C:$Windows.~BTSources - Double-click the Setupprep.exe file to launch the setup wizard.
 Source: Windows Central
After you complete the steps, you should now be able to continue with the upgrade process to the May 2020 Update.
In the case that you’re still dealing with the same problem, then you should upgrade using the Update Assistant.
How to fix USB media problems with the May 2020 Update
When the installation fails using a USB bootable media, then there’s a good chance that the flash drive has some damaged or missing files. You can quickly resolve this problem, recreating the installation media with the Media Creation Tool.
To create a USB bootable media to install Windows 10 version 2004, use these steps:
- Open this Microsoft support website.
- Under the “Create Windows 10 installation media” section, click the Download tool now button.
- Save the installer on your computer.
- Double-click the MediaCreationTool2004.exe to start the setup.
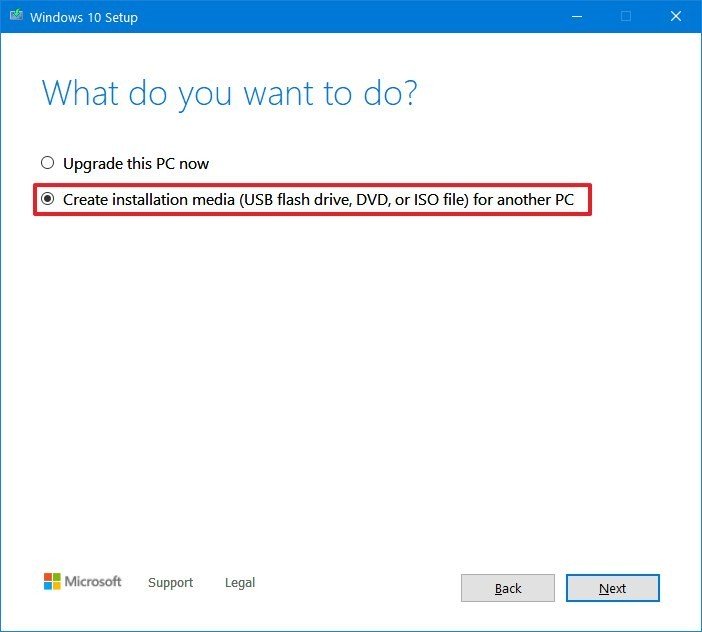
- Click the Accept button.
- Select the Create installation media (USB flash drive, DVD, or ISO file) for another PC option.
 Source: Windows Central
 - Click the Next button.
- Select your language, architecture, and edition settings, if different from the default selection.
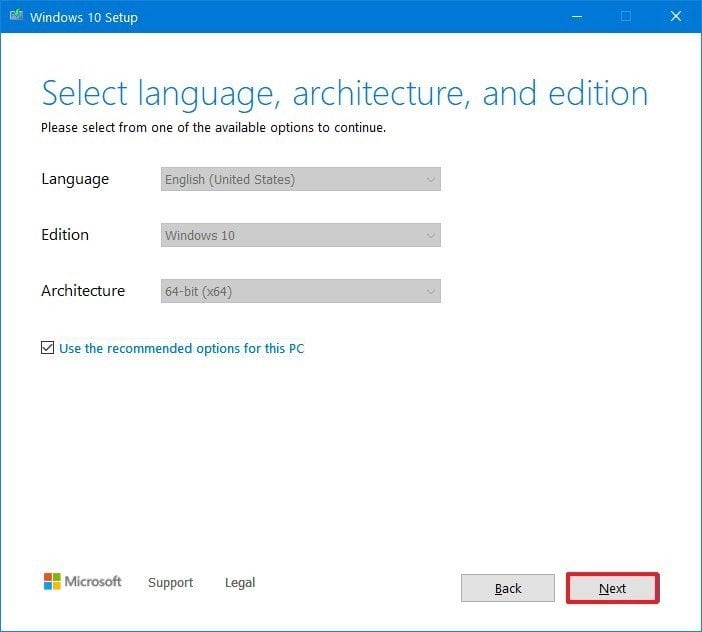 Source: Windows Central
 - Click the Next button.
- Select the USB flash drive option.
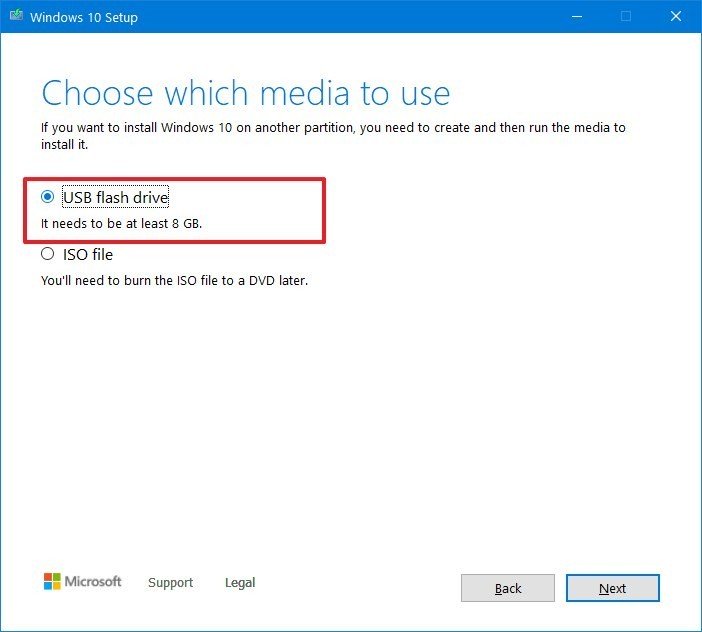 Source: Windows Central
 - Click the Next button.
- Select the removable drive from the list.
 Source: Windows Central
 - Click the Next button.
- Click the Finish button.
Once you complete the steps, you’ll end up with a new installation media with fresh files that you can use to upgrade your device.
If the bootable media fails again, try the steps one more time, but from another computer. Or use another application, such as Rufus to create the installation media.
How to fix Windows 10 setup problems with the May 2020 Update
As you begin the upgrade of the Windows 10 May 2020 Update, the setup process can fail with many error messages depending on the problem that is blocking the process.
Resolve Windows Setup errors 0x8007042B 0x4000D and 0x800700B7 0x2000A
If the setup fails with error 0x8007042B 0x4000D or error 0x800700B7 0x2000A, then it means that another process is running in the background.
Usually, these processes are from applications and services that run at startup, such as from system processes, third-party antivirus, and other desktop applications.
If you’re performing an in-place upgrade, you can use Task Manager to terminate the process or application. Here’s how:
- Open Start.
- Search for Task Manager and click the top result to open the app.
- Click the More details button.
- Select an app.
- Click the End task button.
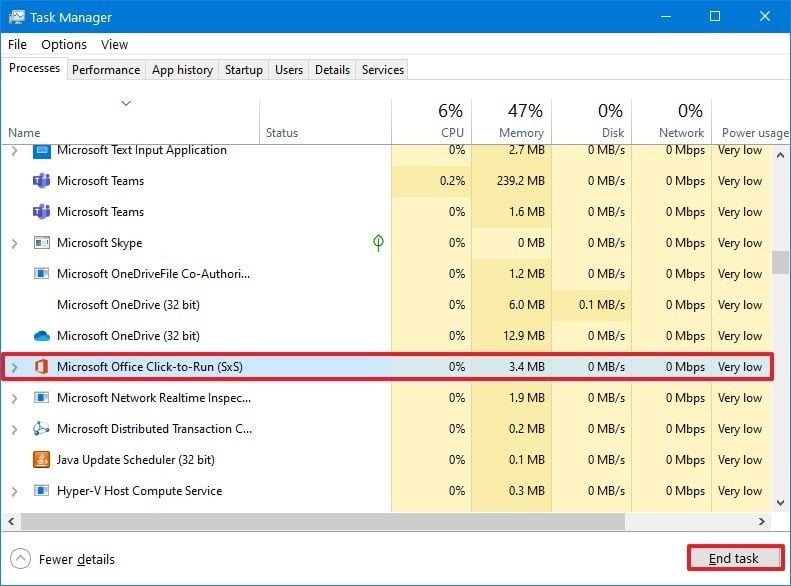 Source: Windows Central
 - Repeat steps No. 3 and 4 to terminate the remaining apps.
After you complete the steps, start the setup again and continue with the upgrade.
Alternatively, you can perform a clean boot of Windows 10 to start the upgrade, or you can temporarily remove the program in question.
To uninstall apps (such as antivirus and legacy programs) that might be conflicting with the upgrade, use these steps:
- Open Settings.
- Click on Apps.
- Click on Apps & features.
- Select the app and click the Uninstall button.
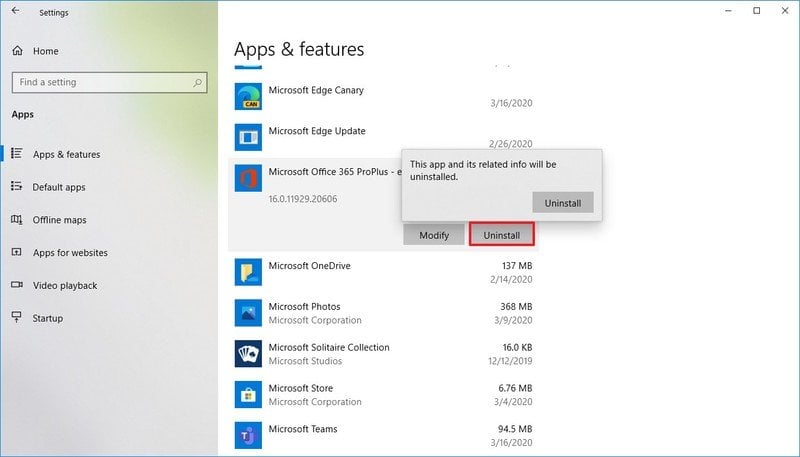 Source: Windows Central
 - Continue with the on-screen directions.
Once you complete the steps, you should no longer see error “0x8007042B 0x4000D” or error “0x800700B7 0x2000A,” and you should now be able to complete the version 2004 installation.
Resolve Windows Setup error 0xC1900107
The 0xC1900107 error message indicates that the device was recently upgraded to a newer version. However, the previous installation files are still pending for deletion before you start the new upgrade process.
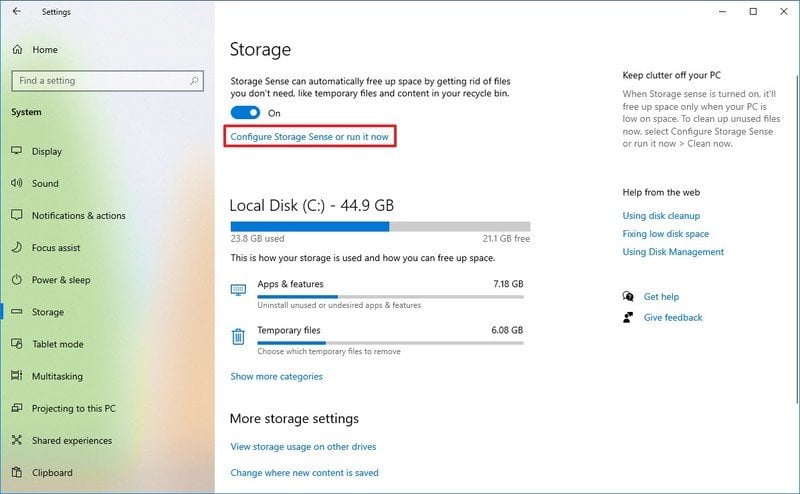
Restarting the computer usually fixes the problem, but if the error persists, use the Storage Sense to remove the previous version manually.
To clean up the previous installation files, use these steps:
- Open Settings.
- Click on System.
- Click on Storage.
- Click the Configure Storage Sense or run in now option.
 Source: Windows Central
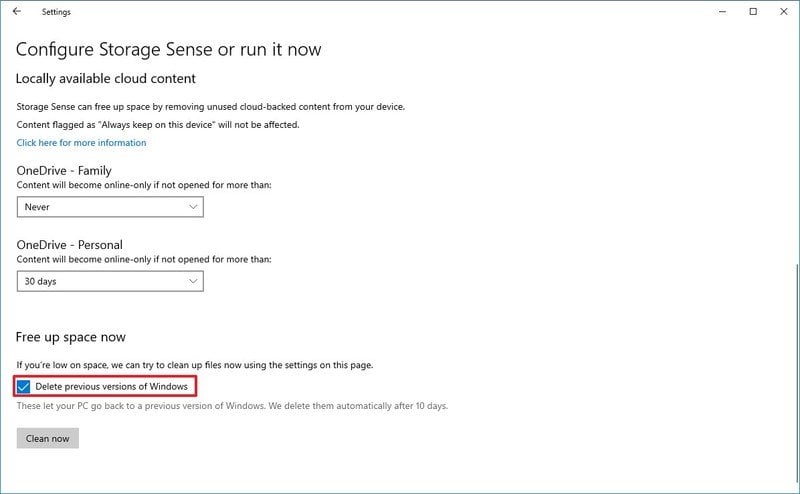
 - Under the “Free up space now” section, check the Delete previous versions of Windows option.
 Source: Windows Central
 - Click the Clean now button.
After you complete the steps, the previous installation will be removed, fixing the error “0xC1900107.”
Resolve Windows Setup install completion problems
Whether you’re trying to install a new feature update or cumulative update, you can run into two error messages:
- Error: We couldn’t complete the updates. Undoing changes. Don’t turn off your computer.
- Error: Failure configuring Windows Updates. Reverting changes.
These are generic messages, and you’ll need to determine the error code to find a solution or workaround.
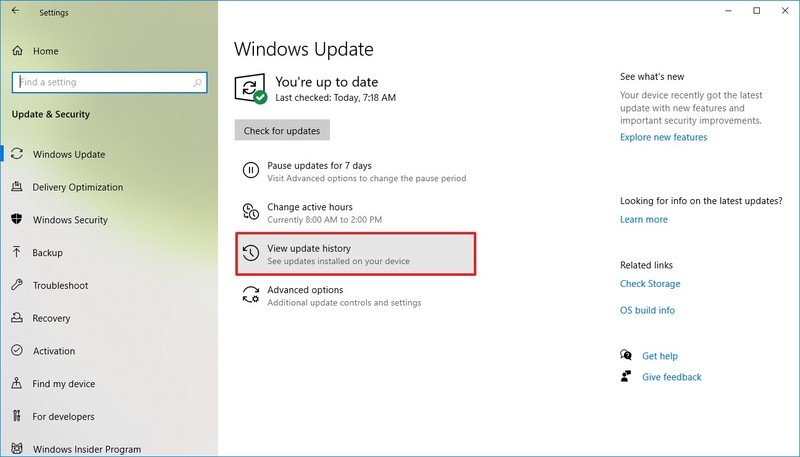
To find out the exact error preventing you from installing version 2004, use these steps:
- Open Settings.
- Click on Update & Security.
- Click on Windows Update.
- Click the View your update history option.
 Source: Windows Central
 - Check the error code next to the failed update.
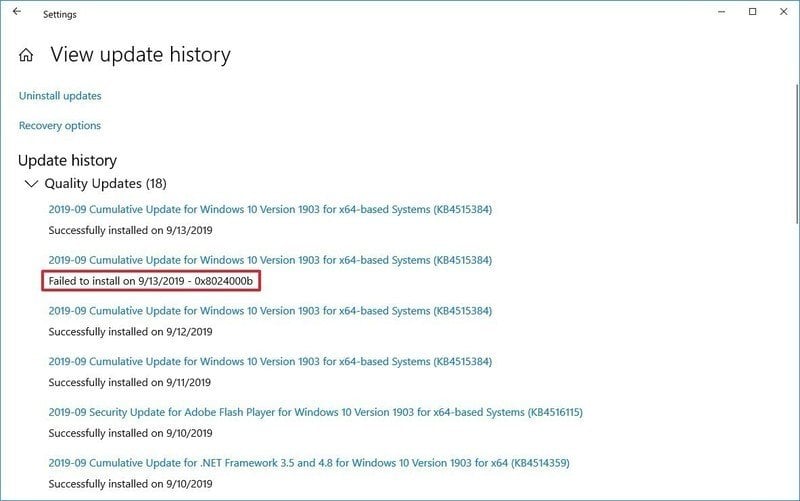 Source: Windows Central
Once you complete the steps, you’ll have to research the message online. You may be able to find a solution at the official Microsoft forums or using the Windows Central forums.
You can also check the Windows 10 update history support page to find if a specific update has a problem and whether Microsoft has a workaround to mitigate the issue (if applicable).
Resolve Windows Setup updates problem
If you’re getting the Error: The update doesn’t apply to your computer message, it means that your device is missing updates, and you won’t be able to upgrade to version 2004 until the required updates are installed.
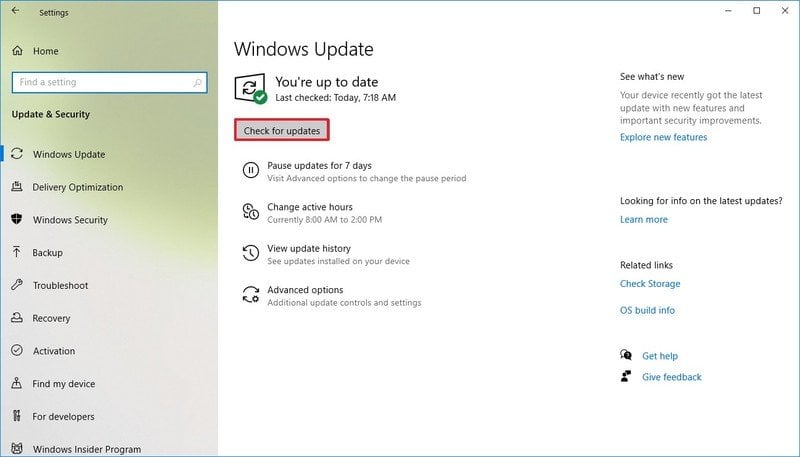
To check for updates, use these steps:
- Open Settings.
- Click on Update & Security.
- Click on Windows Update.
- Click the Check for updates button.
 Source: Windows Central
Once you complete the steps, you can use any of the supported methods to upgrade to the May 2020 Update.
Resolve Windows Setup error 0x80200056
The error 0x80200056 is not a critical problem. The message only indicates that the device accidentally restarted during the update process.
To fix this issue, after the device restarted, restart the Windows 10 setup.
How to fix Update Assistant problems with the May 2020 Update
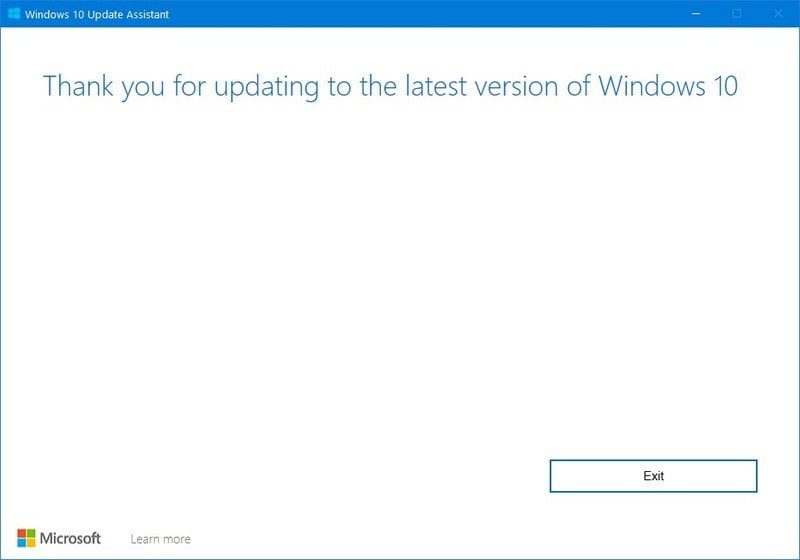
In addition to Windows Update and Media Creation Tool, Microsoft also provides the Update Assistant, which is a tool designed to force an upgrade when Windows Update isn’t working correctly. However, like with any piece of software, it’s not a flawless tool, and some times, you can run into problems.
If you’re having issues with the tool, such as stuck downloading the May 2020 Update files, then it’s likely to be a networking related problem.
![]()
 Source: Windows Central
To fix the Update Assistant tool, use these tips:
- Disconnect the device from the network unplugging the network cable or disabling Wi-Fi. Once you do that, wait about one minute, and reconnect the network, and relaunch the Update Assistant.
- Restart the device and open the Update Assistant again.
- Re-download the tool again.
If you continue with the same problem, use the Media Creation Tool to perform an in-place upgrade to the May 2020 Update.
How to fix storage problems with the May 2020 Update
Although Windows 10 now ships with Reserved Storage, a feature that sets aside part of the hard drive space for updates and temporary files, you can still stumble upon some storage related error messages:
- 0x80070070 – 0x50011
- 0x80070070 – 0x50012
- 0x80070070 – 0x60000
The minimum hardware to install Windows 10 version 2004 requires at least 16GB of available storage to upgrade a 32-bit version or 20GB for the 64-bit version. If your computer doesn’t have enough space, you’ll not be able to install the new version.
To fix storage problems trying to upgrade to the May 2020 Update, use these steps:
- Open Settings.
- Click on System.
- Click on Storage.
- Under the “Local Disk” section, click the Temporary files option.
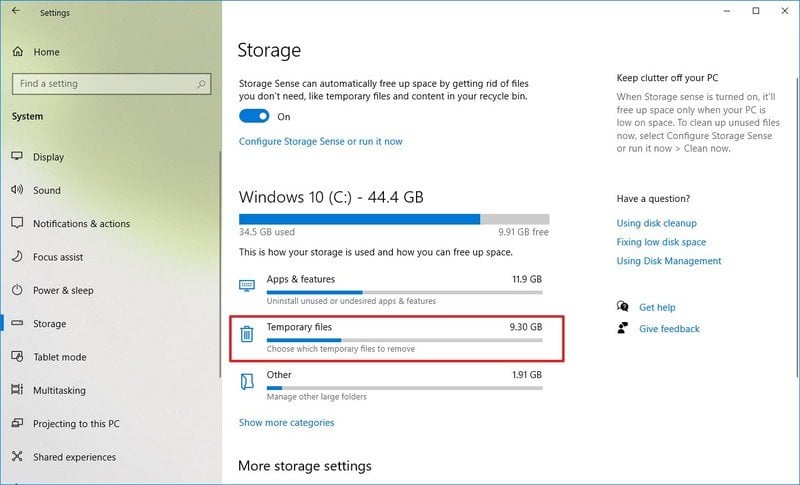 Source: Windows Central
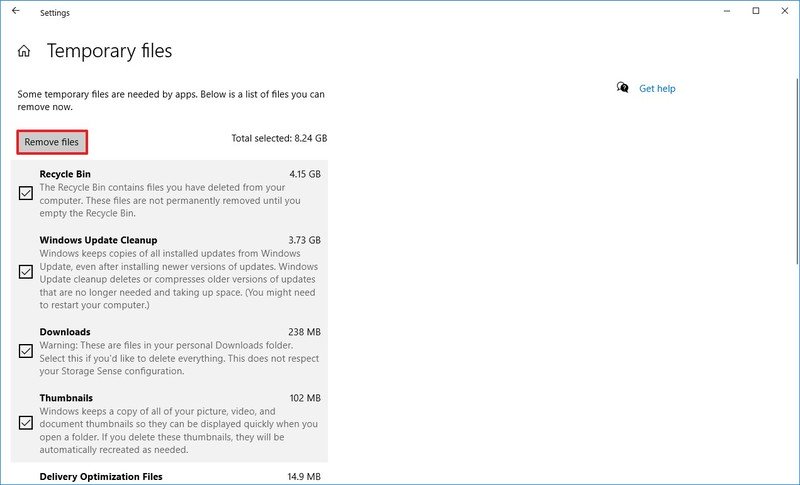
 - Select the items to clear to free up space.Quick tip: You don’t need to select the “Windows Setup temporary files” or “Windows ESD installation files” option, as these are the files required to update your computer.
- Click the Remove files button.
 Source: Windows Central
After you complete the steps, you should now be able to go through the installation of version 2004. However, if you continue without enough space, you should consider adding an external storage (such as a USB flash drive or external hard drive) with at least 16GB of space that the system can use as temporary storage automatically.
You can use this guide with a lot of tips to free up storage space on your computer.
How to fix hardware and software compatibility problems with the May 2020 Update
Hardware and software compatibility can sometimes block the upgrade process, and you won’t be able to continue until you determine and repair the root of the cause.
Resolve error 0x80070002 0x20009
As you try to upgrade from an older version to the May 2020 Update, you may see error 0x80070002 0x20009 that indicates that the setup can’t find specific files.
This is another common problem upgrading to a new version of Windows 10, and you can quickly get around it by disconnecting any drive connected to your device, including USB flash drives (excluding the media installation drive) and external drives. Once you removed the peripheral, rerun the setup to continue with the upgrade.
Resolve error 0xC1900101
Whether you’re attempting to install version 2004 or another release, you can see a number of errors starting with 0xC1900101 or 0x80090011 that could indicate a problem with one or more drivers.
These are the different “0xC1900101” error codes:
- 0xC1900101 – 0x2000c
- 0xC1900101 – 0x20017
- 0xC1900101 – 0x30017
- 0xC1900101 – 0x30018
- 0xC1900101 – 0x3000D
- 0xC1900101 – 0x4000D
- 0xC1900101 – 0x40017
If you’re dealing with any of the error codes mentioned above, you can use the tips below to troubleshoot and fix them.
Disconnect peripherals
To minimize errors during the upgrade of the Windows 10 May 2020 Update is a good idea to disconnect non-essential peripherals, such as external drives, printers, Bluetooth devices, USB devices, cameras, and others.
After the installation, you can reconnect them again.
Update drivers
Updating the device drivers to the latest release can also resolve any of the error codes.
To check for device driver updates on Windows 10, use these steps:
Important: If you’re getting the update from your manufacturer support website, then follow their instructions, and skip the steps below.
- Open Start.
- Search for Device Manager, and click the top result to open the app.
- Expand the branch with the device causing issues. (Typically, it’ll be marked with a yellow exclamation sign.)
- Right-click the device and select the Update driver option.
 Source: Windows Central
 - Click the Browse my computer for driver software option if you previously downloaded the new driver package. (Or click the Search automatically for updated driver software option to check for updates automatically.)
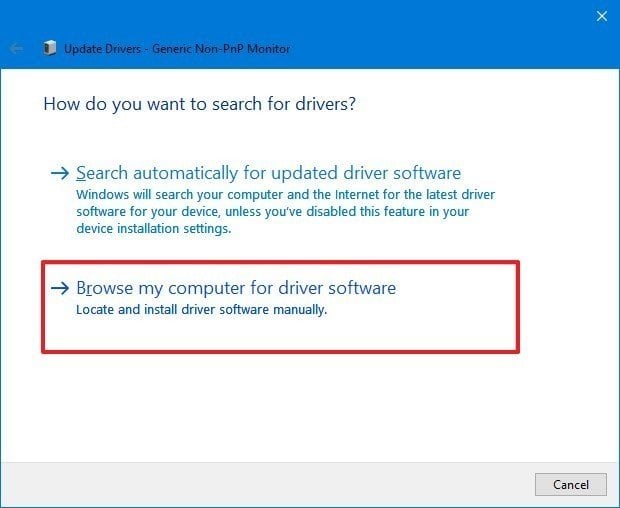 Source: Windows Central
 - Click the Browse button.
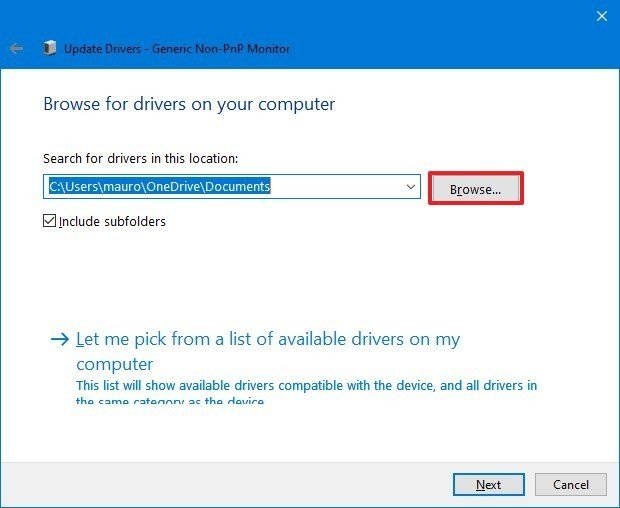 Source: Windows Central
 - Select the location with the driver files (unzipped).
- Click the Next button.
- Continue with the on-screen directions.
Once you complete the steps, you should no longer see in an “0xC1900101” or “0x80090011” error message during the version 2004 installation.
You can also check this comprehensive guide with everything you need to know updating drivers on Windows 10.
Optimize storage
If you see one of the “0xC1900101” errors, you can use the Storage settings, uninstall non-essential apps and games, and migrate personal files to another location to free up space.
You can use this guide with a lot of tips to free up storage space on your computer.
Repair installation
An error message starting with “0xC1900101” can also indicate a problem with the current setup, and as a result, you won’t be able to continue.
You may be able to fix this problem using the Deployment Servicing and Management (DISM), System File Checker (SFC), and System File Checker (SFC) utilities to repair issues with the installation.
You can use this guide with the instructions you need to follow to resolve this issue.
Fresh installation
If you can’t get around the error, then use the Media Creation Tool to start fresh with a clean installation of Windows 10.
Resolve hardware error 0xC1900200, 0xC1900202, 0x80300024
If your device is already running any version of Windows 10, then it’s likely that you won’t see these errors. However, if you see error 0xC1900200 – 0x20008, 0xC1900202 – 0x20008, or 0x80300024, then your computer doesn’t meet the minimum system requirements.
These are the minimum hardware requirements to install Windows 10 version 2004:
- Processor: 1GHz.
- Memory: 2GB for 32 bit or 64 bit.
- Hard drive: 16GB for 32 bit or 20GB for 64 bit.
- Graphics: DirectX 9 or later with WDDM 1.0 driver.
- Display: 800×600.
You can check this guide to understand the hardware specifications of your device. However, if you see one of these errors, then it’s likely that you may need to upgrade the system memory.
Resolve driver error 0x800F0923
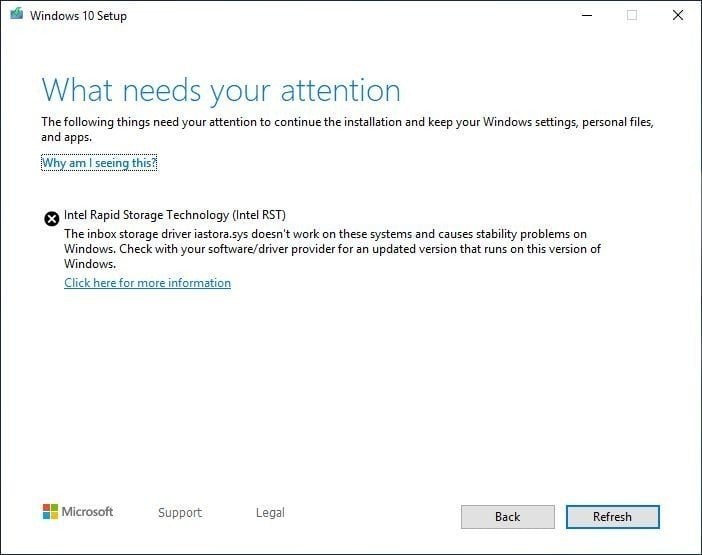
The error message 0x800F0923 refers to a compatibility problem with a driver or program on your computer. When upgrading to a new version of Windows 10, this error usually points out an issue with the graphics driver, legacy program, or third-party antivirus.
One method to find out the issue is to run the Update Assistant or Media Creation Tool, and during the setup process, if there’s a compatibility problem, the tools will report it more clearly.
![]()
 Source: Microsoft
In the case that it’s a driver problem, you should download and install a newer version from the manufacturer support website using their instructions. If available, try to download a beta version of the driver, as during the early days of a new version of Windows 10, the manufacturer is in the testing phase of new drivers to make them fully compatible with the latest release.
Remove incompatible driver
Alternatively, you can remove the driver, proceed with the upgrade, and then reinstall the device (if applicable).
To remove a driver causing upgrade problems, use these steps:
- Open Start.
- Search for Device Manager, and click the top result to open the app.
- Expand the branch with the device having issues.
- Right-click the component and select the Uninstall device option.
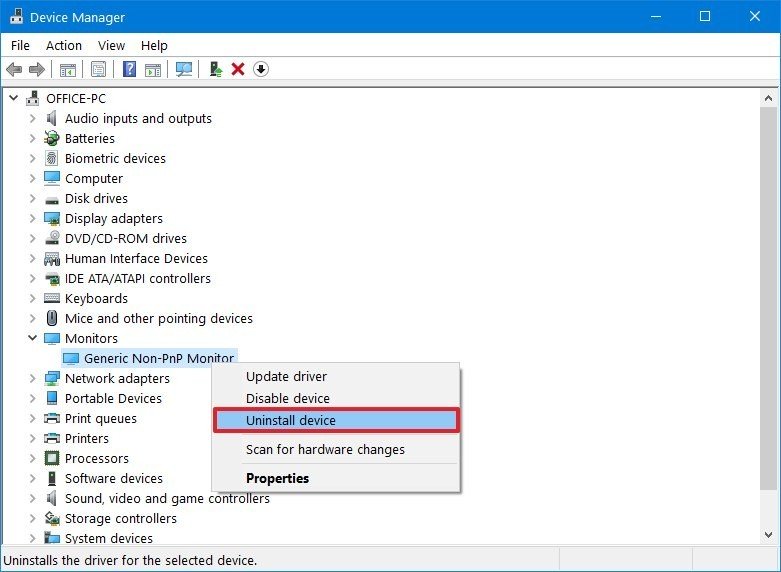 Source: Windows Central
 - Click the Uninstall button again.
After you complete the steps, you should now be able to complete the upgrade of the May 2020 Update.
In addition, you may see error 0x80070490 – 0x20007, which also indicates incompatible driver, and error 0x80070003 – 0x20007 that refers to an upgrade failure during the driver installation stage.
If you receive either of these errors, you should the device drivers causing the problem, and then try the upgrade process one more time.
Resolve app error 0xC1900208
During the upgrade to version 2004, it’s also possible that you’ll see the error 0xC1900208 – 0x4000C. This message could signal that an app installed on your device isn’t compatible and is blocking the process. Usually, the apps causing the problem include legacy desktop programs and third-party antivirus.
To remove incompatible apps to complete the upgrade, use these steps:
- Open Settings.
- Click on Apps.
- Click on Apps & features.
- Select the incompatible program.
- Click the Uninstall button.
Source: Windows Central
- Click the Uninstall button again.
- Continue with the on-screen directions (if applicable).
Once you complete the steps, you may need to repeat the instructions to remove other conflicting apps.
How to fix after installation problems with the May 2020 Update
Although the installation of Windows 10 version 2004 may have completed successfully, you can still come across a number of issues, such as black screen, network connectivity, and activation.
Resolve black screen problems after upgrade
Black screen during and after an upgrade is not uncommon. Usually, it indicates a problem with the graphics driver, hardware, or it could suggest that the new version didn’t apply correctly.
The quickest resolution is to remove the May 2020 Update from your computer using the Advanced startup settings:
- Turn on your computer.
- As soon as the Windows logo appears on your screen, press the power button. (This will immediately interrupt the boot sequence.)
- Repeat steps No. 1 and 2 two more times.
- Click the Advanced options button.
 Source: Windows Central
 - On the Advanced startup settings, click on Troubleshoot.
- Click on Advanced options.
 Source: Windows Central
 - Click on Uninstall Updates.
 Source: Windows Central
 - Click on Uninstall latest feature update.
 Source: Windows Central
 - Sign-in with your Windows 10 account.
- Click the Uninstall feature update button.
After you complete the steps, Windows 10 version 2004 will be removed, restoring the previous installation and fixing the black screen problem. Also, it’s recommended not to upgrade again until a new patch becomes available that fixes the problem.
Resolve network problem after upgrade
After installing the Windows 10 May 2020 Update, there’s a chance that you experience networking problems, such as slow wireless connectivity, intermittent connection, no connection at all, or the adapter isn’t available.
Troubleshoot network problem
To fix problems with a network adapter after installing version 2004, use these steps:
- Open Settings.
- Click on Network & Security.
- Click on Status.
- Under the “Advanced network settings” section, click the Network Troubleshooter button.
 Source: Windows Central
 - Continue with the on-screen directions (if applicable).
Once you complete the steps, the network should start working again.
Reset network adapters
If the problem persists, then resetting the networking stack will uninstall, reinstall, and set the default settings that could fix the problem.
To reset Wi-Fi as well as wired network adapters after upgrading to version 2004, use these steps:
- Open Settings.
- Click on Network & Security.
- Click on Status.
- Under the “Change your network settings” section, click the Network reset button.
 Source: Windows Central
 - Click the Reset now button.
 Source: Windows Central
 - Click the Yes button.
After you complete the steps, Windows 10 will remove and reinstall all the network adapters, and it’ll reset the settings to their factory defaults fixing the connectivity problem.
In the case that you’re experiencing networking issues, remember that there could be a lot of reasons, including problems with the adapter, driver, settings, signal, cable, router, internet service provider (ISP), and of course, a bug with version 2004.
Resolve activation problem after upgrade
On Windows 10, once you activate the installation, the device will be reactivated automatically after an upgrade or clean installation without the need to type the license key. However, there will be times that the reactivation won’t work, and you’ll receive a “Windows not activated” message with error 0x803F7001 in the Activation settings page.
If this ever happens, be patient and wait, Windows 10 will reactivate later automatically. However, if it’s been a few days, you can use the activation troubleshooter to activate your device running the May 2020 Update.
How to fix memory integrity blocking install of the May 2020 Update
If you’re trying to upgrade to the May 2020 Update, you’re likely to see the “Your PC settings need to be adjusted before upgrading to the latest version of Windows 10. Turn off memory integrity protection to continue” message that will prevent you from continuing the installation.
![]()
 Source: Microsoft
According to the company, there’s a compatibility problem with certain display drivers, and it’s recommending to update the graphics drivers to the latest version. However, the quickest way to mitigate this problem is to disable the memory integrity feature.
To resolve this issue, you need to disable the memory integrity feature using these steps:
- Open Windows Security.
- Click on Device security.
- Click the Core isolation details option.
- Turn off the Memory integrity toggle switch.
 Source: Windows Central
Once you complete the steps, you should be able to run the setup of Windows 10 again install version 2004.
How to fix problem with older Nvidia GPU drivers on the May 2020 Update
If during or after the installation process of version 2004, you receive a Blue Screen of Death (BSoD), it’s likely because you’re using an older graphics driver from Nvidia. According to Microsoft, there’s a compatibility issue with some versions of Nvidia display adapters, and the company recommends to check and update the video drivers to the latest version (if possible).
To install the latest graphics drivers, you can use these instructions.
Alternatively, if you’re still on a previous version of Windows 10, it’s best not to upgrade until a solution is available. However, if you already upgraded, and you’re experiencing problems, you can try rolling back to the previous version using these steps:
- Open Settings.
- Click on Update & Security.
- Click on Recovery.
- Under the “Go back to a previous version of Windows 10” section, click the Get started button.

- Check any of the reasons available.

- Click the Next button.
- Click the No, thanks button.

- Click the Next button.

- Click the Next button again.

- Click the Go back to earlier build button.

Also, the company is working closely with Nvidia to find a permanent resolution, which is expected to release in future updates.
How to fix Cortana won’t close on the May 2020 Update
Starting with the May 2020 Update, Cortana becomes a regular app that updates through the Microsoft Store, and it’s no longer integrated into Windows 10. However, after installing version 2004, some users are reporting that Cortana doesn’t fully close when they close it, as you’ll still see the app when opening Task View or use the Alt + Tab keyboard shortcut.
It’s unclear if this behavior is bug or if the app has been designed that way, but if you need to close the app, you can use these steps:
- Open Start.
- Search for Task Manager and click the top result to open the app.
- Click the Processes tab.
- Select the Cortana process.
- Click the End task button.
 Source: Windows Central
Once you complete the steps, Cortana will fully close on Windows 10.
If you want to prevent Cortana from launching on startup, use these steps:
- Open Settings.
- Click on Apps.
- Click on Startup.
- Turn off the Cortana toggle switch.
 Source: Windows Central
After you complete the steps, Cortana will no longer start automatically when you sign in to Windows 10.
How to fix DISM corruption report on the May 2020 Update
According to Microsoft, after using the Deployment Image Servicing and Management (DISM) command with the /restorehealth option there’s a chance of the tool reporting corruption even if the problem has been resolved running the command.
If you’re having this issue, you can quickly resolve this issue by running the same command again to confirm the current state of the system or using the the /ScanHealth option with these steps:
- Open Start.
- Search for Command Prompt, right-click the top result, and select the Run as administrator option.
- Type the following command and press Enter:
DISM /Online /Cleanup-Image /ScanHealth Source: Windows Central
Once you complete the steps, you should no longer receive the message that corruption still present.
How to minimize problems upgrading to Windows 10 May 2020 Update
The development of Windows 10 to accommodate thousands of hardware and software configurations is a complex process, which means that there will always be the chance of problems during and after an upgrade.
However, when you prepare accordingly, you can reduce and, most of the time, eliminate any type of issues as you move to a new version, such as the Windows 10 May 2020 Update.
Create backup
A backup of your entire computer is one of the best steps you can take to prepare before an upgrade. The Windows 10 setup process includes a safeguard mechanism to restore the previous installation in case of a problem, but it doesn’t always work as expected.
![]()
 Source: Windows Central
Before clicking the install button, take the time to create a temporary backup. You can use any third-party tool, or you can use the legacy system image backup tool available on Windows 10.
In addition to the backup, it’s also recommended to create a file backup to an external hard drive or cloud storate service, such as OneDrive.
Remove non-essential apps
Legacy desktop apps and third-party antivirus solutions are usually the reason an installation will fail. This means that it’s a good idea to remove these apps before proceeding with the upgrade. You can reinstall them after installing the May 2020 Update.
To remove apps on Windows 10, use these steps:
- Open Settings.
- Click on Apps.
- Click on Apps & features.
- Select the app you want to remove, and click the Uninstall button.
Source: Windows Central
- Click the Uninstall button again.
- Continue with the on-screen directions (if applicable).
Once you complete the steps, you may need to repeat the instructions to uninstall additional apps that may cause conflicts.
Disabling security software
In addition to removing conflicting apps, you should also consider uninstalling third-party antivirus and other security software temporarily. (After the update, you can install them again.)
Although it’s unlikely, if the problem is Windows Defender, you won’t be able to remove it, but you can disable it to continue with the upgrade.
Important: Uninstalling or disabling a security solution temporarily has low-to-none security risks. However, it’s assumed that you understand that it’s never recommended to leave your device without protection. Proceed with caution. You’ve been warned.
To temporarily disable Windows Defender Antivirus, use these steps:
- Open Windows Security.
- Click on Virus & threat protection.
- Under the “Virus & threat protection settings” section, click the Manage settings option.
 Source: Windows Central
 - Turn off the Real-time protection toggle switch.
 Source: Windows Central
After you complete the steps, the antivirus should not conflict with the upgrade process, and it’ll re-enable automatically after the installation of Windows 10.
Free up space
If the device is running low on storage space, the new version won’t install. As such, another good tip is to free up space to make sure the setup will run as expected.
![]()
 Source: Windows Central
You can use this guide to find out the best options to free up space on your computer.
Remove non-essential peripherals
Usually, non-essential peripherals connected to your computer can cause an installation to fail. Before proceeding with the May 2020 Update installation, disconnect USB flash drive, SD cards, external hard drives, printers, scanners, dongles, and Bluetooth devices.
Also, if you’re using a laptop connected to a docking station, undock it before proceeding.
Only keep the components you need, including mouse, keyboard, monitor, and internet connection. Then after applying the update, you can reconnect all your peripherals.
Disable firewall
The firewall can also cause problems if it has a custom configuration, or you’re using a particular solution that doesn’t play well with Windows 10.
If you’re using a third-party firewall, refer to the developer’s instructions to disable the software. In the rare case that the problem is the Windows Firewall, to disable the feature, use these steps:
- Open Windows Security.
- Click on Firewall & network protection.
- Click the “active” network.
 Source: Windows Central
 - Turn off the Windows Firewall toggle switch.
 Source: Windows Central
After you complete the steps, Windows 10 version 2004 should download without interruptions.
Disable metered connection
If you previously configured a network connection as metered, the Windows 10 version 2004 won’t download on your device.
If you’re using a limited internet connection, it’s recommended to connect to a regular uncapped network , remove the settings, and continue with the upgrade.
To remove the metered setting for a connection, use these steps:
- Open Settings.
- Click on Network & Security.
- Click on Wi-Fi or Ethernet.
- Select the active network connection.
 Source: Windows Central
 - Under the “Metered connection” section, turn off the Set as metered connection toggle switch.
 Source: Windows Central
Alternatively, you could create a USB bootable media on another computer that’s connected to a different network, and then use that media to perform an offline in-place upgrade.
Use clean installation
If you want to minimize the chances of problems, the better option is to perform a clean installation.
A clean installation will delete everything on the main drive and will install a fresh copy of Windows 10, which also helps to fix existing issues.
If you want to go with a clean installation, you have to create a flash drive bootable using the Media Creation Tool, and then use it to start your device and continue with the fresh installation.
Although it’s a straightforward process, you have to execute a lot of steps. If you need assistance, use this guide that includes everything you need to know to perform a clean installation of Windows 10.
Wrapping things app
Microsoft has been working proactively to improve and ensure that users go through a good experience upgrading to a new version of Windows 10, but with such a complicated system, there will always be a chance of something going wrong.
If you’re upgrading to the new version of Windows 10, this guide covers a lot of ground to resolve virtually every known problem during and after the installation of the Windows 10 May 2020 Update.
However, remember that’s never recommended to upgrade as soon as the feature update is ready, as it may still contain unknown issues and bugs that could negatively affect the experience. Usually, it’s best to wait until after a few cumulative updates become available to make sure that you’re installing a more stable release.
Did you have any problems upgrading to Windows 10 version 2004? Let us know in the comments and tell us the fix you used.