
UFW (Uncomplicated Firewall) is a simple-to-use firewall utility with plenty of options for all kinds of users.
It is actually an interface for iptables, which is the classic low-level tool (and harder to get comfortable with) to set up rules for your network.
Why should you use a Firewall?
A firewall is a way to regulate the incoming and outgoing traffic on your network. This is crucial for servers, but it also makes a regular user’s system much safer, giving you control. If you are one of those people who like to keep things under control on an advanced level even on the desktop, you may consider setting up a firewall.
In short, the firewall is a must for servers. On desktops, it is up to you if you want to set it up.
Setting up a firewall with UFW
It is important to properly set up firewalls. An incorrect setup may leave the server inaccessible if you are doing it for a remote Linux system, like a cloud or VPS server. For example, you block all incoming traffic on the server you are accessing via SSH. Now you won’t be able to access the server via SSH.
In this tutorial, I’ll go over configuring a firewall that suits your needs, giving you an overview of what can be done using this simple utility. This should be suitable for both Ubuntu server and desktop users.
Please note that I’ll be using the command line method here. There is a GUI frontend called Gufw for desktop users but I won’t be covering it in this tutorial. There is a dedicated guide to Gufw if you want to use that.
Install UFW
If you are using Ubuntu, UFW should already be installed. If not, you can install it using the following command:
sudo apt install ufwFor other distributions, please use your package manager for installing UFW.
To check that UFW is properly installed, enter:
ufw --versionIf it is installed, you should see the version details:
[email protected]:~$ ufw --version
ufw 0.36.1
Copyright 2008-2021 Canonical Ltd.
Great! So you have UFW on your system. Let’s see about using it now.
Note: You need to use sudo or be root to run (almost) all the ufw commands.
Check ufw status and rules
UFW works by setting up rules for incoming and outgoing traffic. These rules consist of allowing and denying specific sources and destinations.
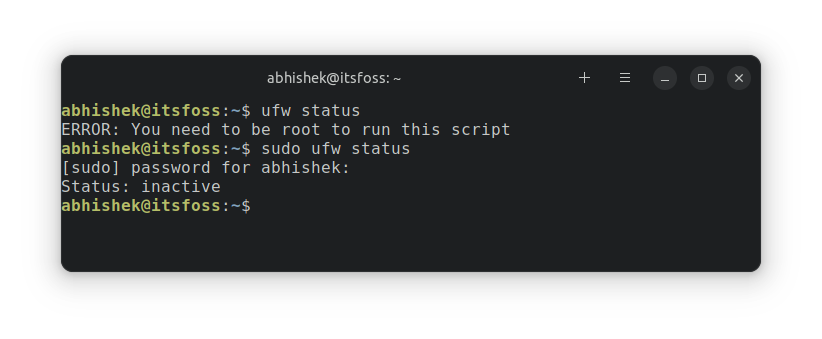
You can check the firewall rules by using the following command:
sudo ufw statusThis should give you the following output at this stage:
Status: inactiveThe above command would have shown you the firewall rules if the firewall was enabled. By default, UFW is not enabled and doesn’t affect your network. We’ll take care of that in the next section.
But here’s the thing, you can see and modify the firewall rules even ufw is not enabled.
sudo ufw show addedAnd in my case, it showed this result:
[email protected]:~$ sudo ufw show added
Added user rules (see 'ufw status' for running firewall):
ufw allow 22/tcp
[email protected]:~$
Now, I don’t remember if I added this rule manually or not. It’s not a fresh system.
Default policies
By default, UFW denies all incoming and allows all outgoing traffic. This behavior makes perfect sense for the average desktop user, since you want to be able to connect to various services (such as http/https to access web pages) and don’t want to have anyone connect to your machine.
However, if you are using a remote server, you must allow traffic on the SSH port so that you can connect to the system remotely.
You can either allow traffic on SSH default port 22:
sudo ufw allow 22In case you are using SSH on some other port, allow it at the service level:
sudo ufw allow sshDo note that the firewall is not active yet. This is a good thing. You can modify rules before you enable ufw so that essential services are not impacted.
If you are going to use UFW a production server, please ensure to allow ports through UFW for the running services.
For example, web servers usually use port 80, so use “sudo ufw allow 80”. You may also do it at service level “sudo ufw allow apache”.
This onus lies on your side and it is your responsibility to ensure your server runs properly.
For desktop users, you can go ahead with the default policies.
sudo ufw default deny incoming
sudo ufw default allow outgoing
Enable and disable UFW
For UFW to work, you have to enable it:
sudo ufw enableDoing so will start the firewall and schedule it to start every time you boot up. You receive the following message:
Firewall is active and enabled on system startup.Again: if you are connected to a machine via ssh, make sure ssh is allowed before enabling ufw by entering sudo ufw allow ssh.
If you want to turn UFW off, type in:
sudo ufw disableYou’ll get back:
Firewall stopped and disabled on system startupReload firewall for new rules
If UFW is already enabled and you modify the firewall rules, you need to reload it before the changes take into effect.
You can restart UFW by disabling it and enabling it again:
sudo ufw disable && sudo ufw enableOr reload the rules:
sudo ufw reloadReset to default firewall rules
If at any time you screw up any of your rules and want to return to the default rules (that is, no exceptions for allowing incoming or denying outgoing traffic), you can start it afresh with:
sudo ufw resetKeep in mind that this will delete all your firewall configs.
Configuring firewall with UFW (more detailed view)
Alright! So you have learned most of the basic ufw commands. At this stage, I would prefer to go a bit in more detail on the firewall rule configuration.
Allow and deny by protocol and ports
This is how you add new exceptions to your firewall; allow enables your machine to receive data from the specified service, while deny does the opposite
By default, these commands will add rules for both IP and IPv6. If you’d like to modify this behavior, you’ll have to edit /etc/default/ufw. Change
IPV6=yesto
IPV6=noThat being said, the basic commands are:
sudo ufw allow <port>/<optional: protocol>
sudo ufw deny <port>/<optional: protocol>
If the rule was successfully added, you’ll get back:
Rules updated
Rules updated (v6)
For example:
sudo ufw allow 80/tcp
sudo ufw deny 22
sudo ufw deny 443/udp
Note: if you don’t include a specific protocol, the rule will be applied for both tcp and udp.
If you enable(or, if already running, reload) UFW and check out its status, you can see that the new rules have been successfully applied.

You can also allow/deny port ranges. For this type of rule, you must specify the protocol. For example:
sudo ufw allow 90:100/tcpWill allow all services on ports 90 to 100 using the TCP protocol. You can reload and verify the status:

Allow and deny by services
To make things easier, you can also add rules using the service name:
sudo ufw allow <service name>
sudo ufw deny <service name>
For example, to allow incoming ssh and block and incoming HTTP services:
sudo ufw allow ssh
sudo ufw deny http
While doing so, UFW will read the services from /etc/services. You can check out the list yourself:
less /etc/services
Add rules for applications
Some apps provide specific named services for ease of use and might even utilize different ports. One such example is ssh. You can see a list of such apps that are present on your machine with the following:
sudo ufw app list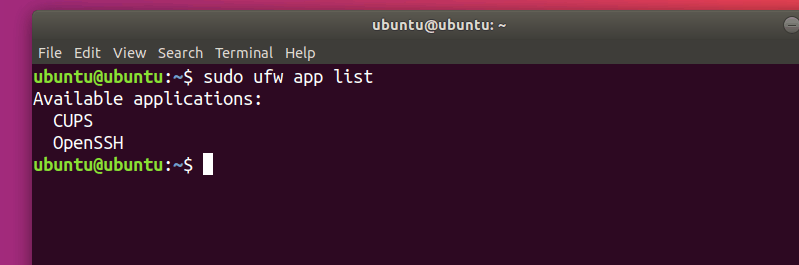
In my case, the available applications are CUPS (a network printing system) and OpenSSH.
To add a rule for an application, type:
sudo ufw allow <application>
sudo ufw deny <application>
For example:
sudo ufw allow OpenSSHReloading and checking the status, you should see that the rule has been added:

Conclusion
This was just the tip of the iceberg firewall. There is so much more to firewalls in Linux that a book can be written on it. In fact, there is already an excellent book Linux Firewalls by Steve Suehring.

$49.99
We earn a commission if you make a purchase, at no additional cost to you.
11/17/2022 01:42 am GMT
If you think setting up a firewall with UFW, you should try using iptables or nftables. Then you’ll realize how UFW uncomplicates the firewall configuration.
I hope you liked this beginner’s guide to UFW. Let me know if you have questions or suggestions.